[MSA] Spring Cloud로 개발하는 마이크로서비스 애플리케이션 #2(API Gateway Service)
Spring Cloud로 개발하는 마이크로서비스 애플리케이션 #2
API Gateway 사용
1장. API Gateway란?
기존의 전통적인 방식에서는 모바일APP, WebAPP에서 해당 Microservice의 주소를 참조하며 사용하였지만 이럴경우 새롭게 마이크로서비스가 추가되는 경우 모바일APP, WEBAPP에 새롭게 추가된 Microservice 엔드포인트를 같이 추가하여 수정후 배포해야한다
하지만 중간에 진입로를 두고 모바일APP, 웹APP 한 곳을 바라보고 있다면 새롭게 Microservice가 추가되어도 클라이언트는 별도로 수정한다음 배포할 필요는 없다
즉 클라이언트는 API GATEWAY만 바로보고 신경쓰면 되고 그 뒤에 대해서는 추가가되든 삭제가 되든 신경 X

API GATEWAY 장점
- 인증 및 권한 부여(단일로 작업 가능)
- 서비스 검색 통합
- 응답캐싱
- 정책, 회로차단기 및 QoS 다시 시도(일괄적으로 정책 지정도 가능)
- 속도제한
- 부하분산(로드밸런싱)
- 로깅(ELK), 추적, 상관관계
- 헤더, 쿼리 문자열 및 청구 변환
- IP 허용 목록에 추가
API Gateway를 구현하기 전에 잠깐 Netflix Ribbon에 대해서 알아보기
스프링클라우드에서 MSA 내부에 마이크로서비스 사이에 통신하는 방법은
- RestTemplate
- Feign Client
대표적으로 2가지 방식이 있다
RestTemplate 예시는 보통 아래와 같다(전통적으로 자주 자바에서 다른 AP서버와 통신할 때 사용)
RestTemplate restTemplate = new RestTemplate();
restTemplate.getForObject("http://localhost:8080/", User.class, 200);
스프링 클라우드에서는 Feign Client를 이용해서 호출할 수 있다
@FeignClient("stores")
public interface StoreClient{
  @RequestMapping(method = RequestMethod.GET, value = "/stores")
  List<Store> getStores();
}
특정한 인터페이스를 만들고 앞에 있는 인터페이스에서 호출하고 싶은 이름을 등록(FeignClient)
이렇게 하면 RestTemplate처럼 IP,Port 없이 Microservice 이름만 가지고 호출 할 수 있다
User라는 서비스에서 FeignClient 등록하고 Stores가 호출하겠다고 하면 그냥 원래 자기 안에 있었던 메소드인것처럼 바로 사용 할 수 있다
문제는 로드밸런서를 어디에 구축하는지가 문제였음 => 해결하기 위해 Netflix Ribbon이 만들어짐
Ribbon : Client Side Load Balancer
리본은 클라이언트 사이드 로드 밸런서이므로 특정 가운데 서버에 설치되는것이 아니라 클라이언트 쪽에 Ribbon 에이전트가 설치되는 방식으로 진행된다
최근에는 Ribbon이 잘 사용되지 않는다(비동기 지원 X 등 문제)
Ribbon 사용 장점
- 서비스 이름으로 호출가능
- Health Check 가능
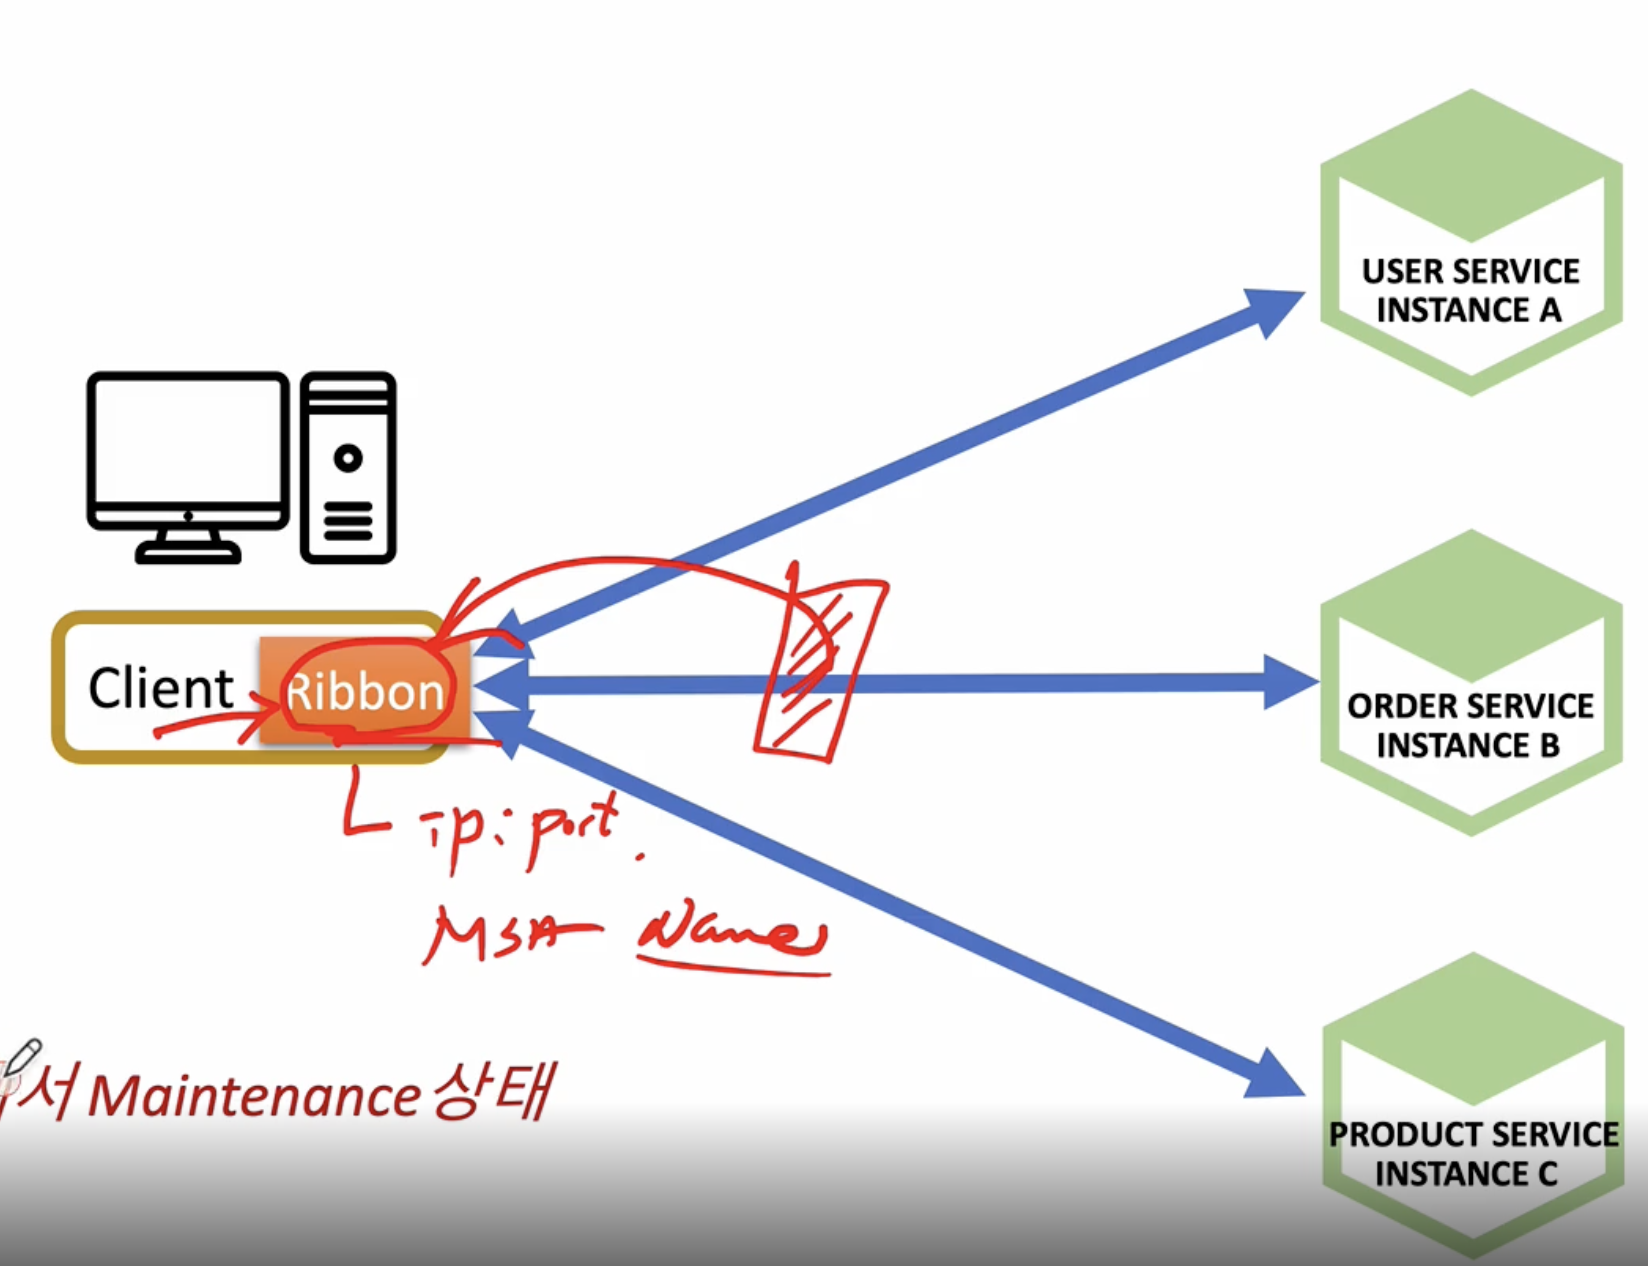
위 처럼 API Gateway가 있지 않고 Ribbon이 클라이언트 쪽에 설치되서 API Gateway처럼 역할을 수행
IP, Port없이 그냥 Service Name으로 바로 통신 가능한 장점
- Spring Cloud Ribbon은 Spring Boot 2.4에서 Maintenance 상태
스프링부트 2.4 이상부터는 Ribbon 사용 대신 Spring Cloud Loadbalancer를 사용 권장
Ribbon을 대체할 다른 방법
Netflix Zuul(API Gateway) 구현
클라이언트는 Netflix ZUUL에 대해서만 신경쓰고 데이터 요청하고 Netflix ZUUL이 First Service, Second Service로 보내줄 수 있다
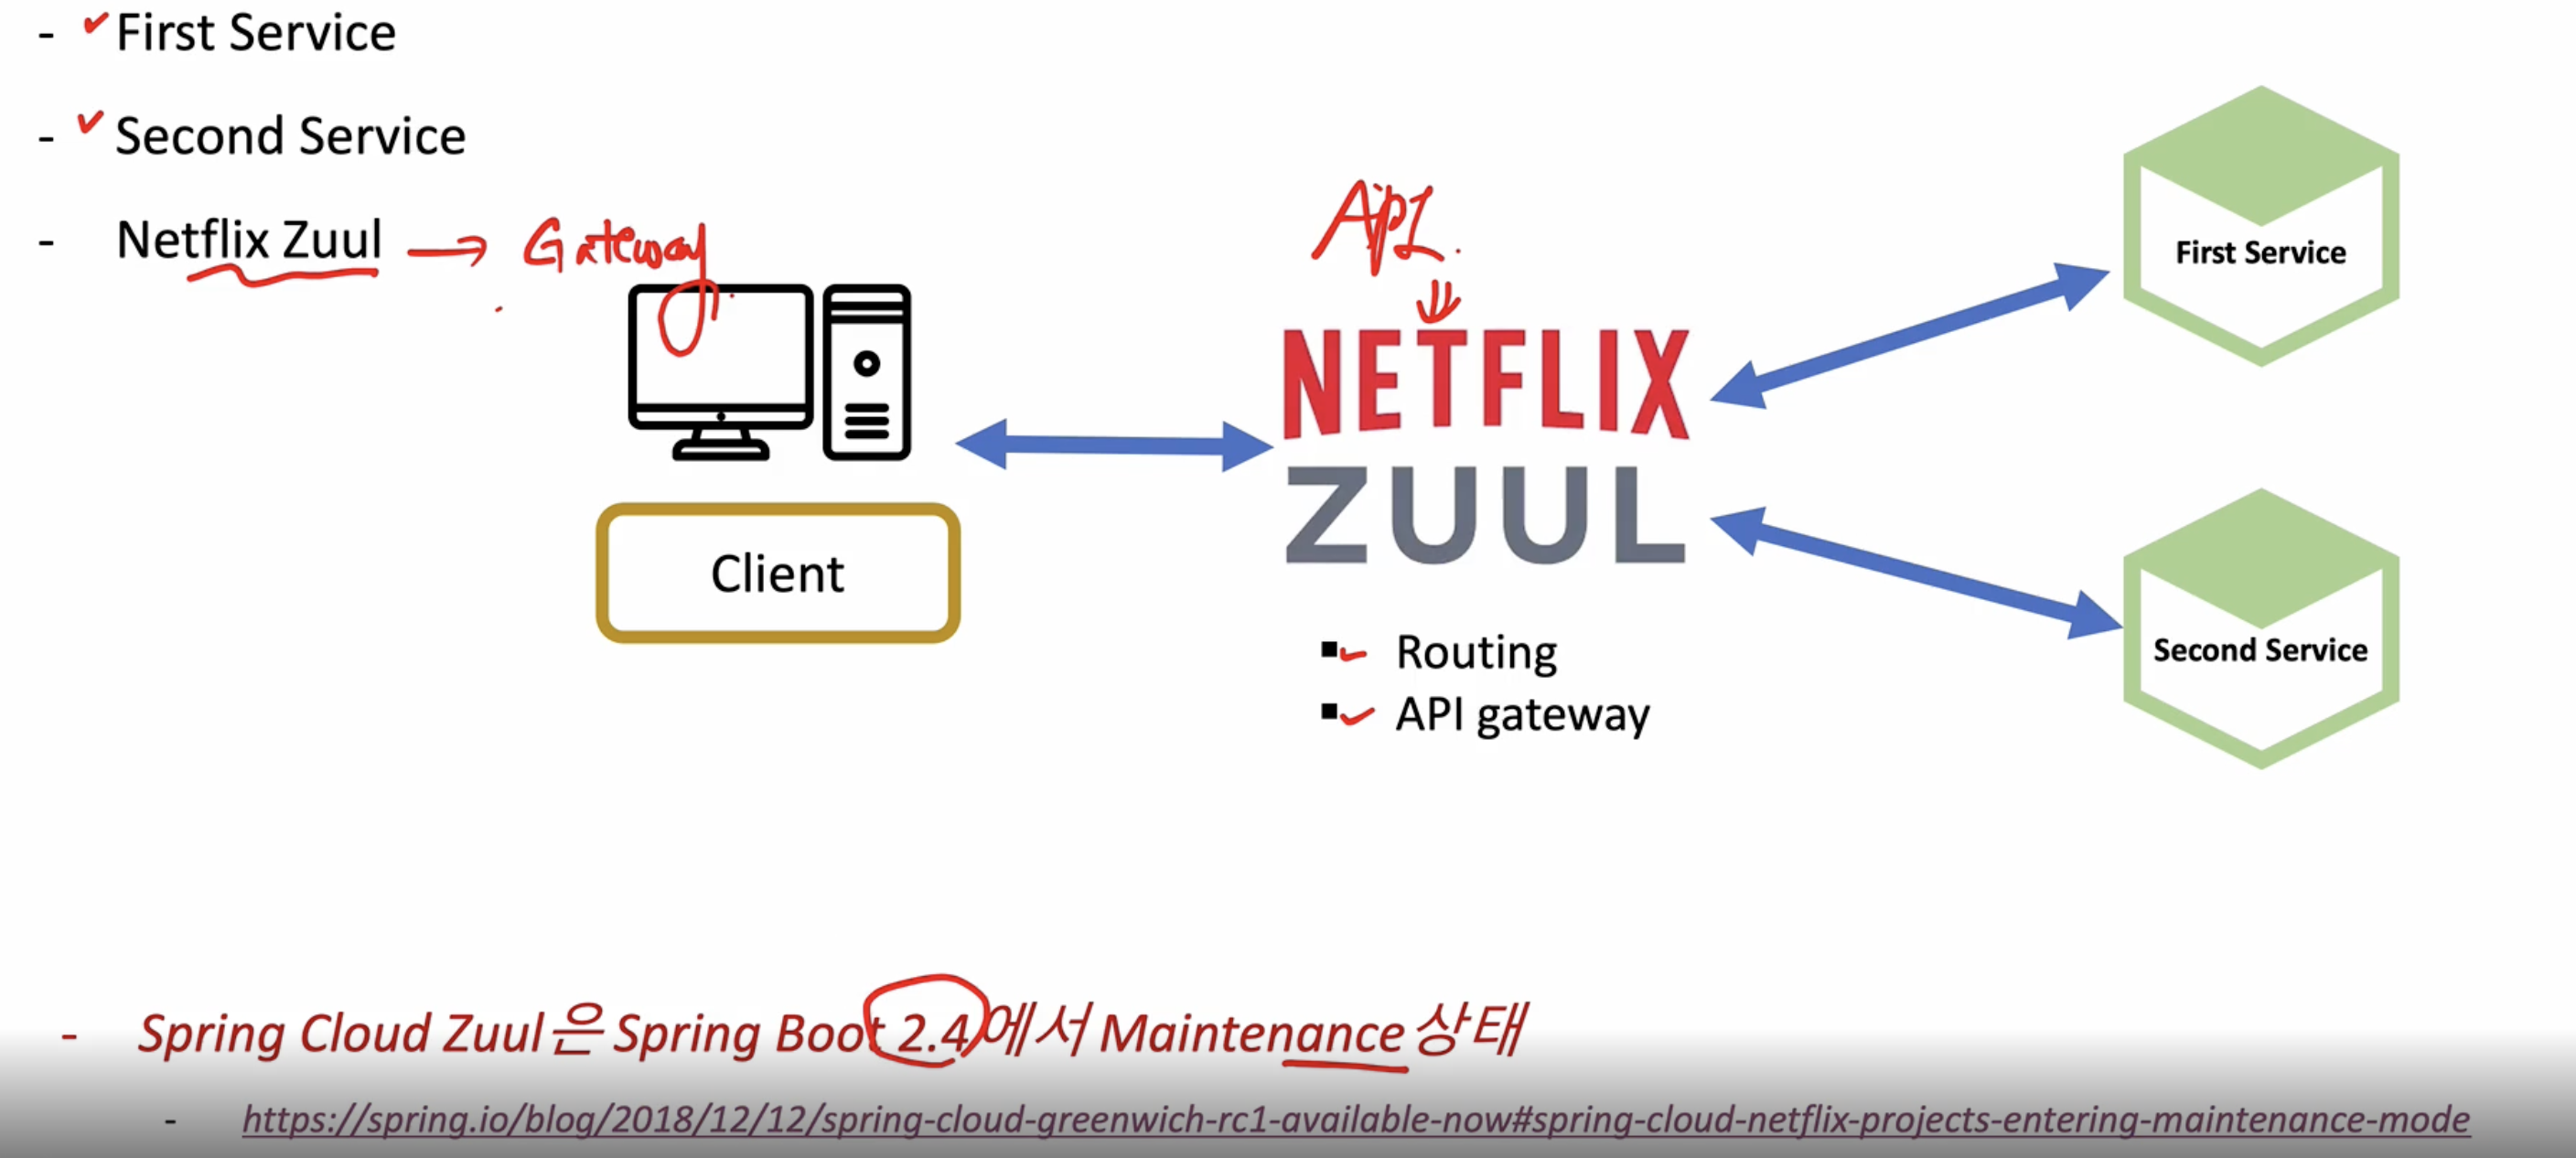
- 마찬가지로 Maintenance 상태
스프링부트 2.4 이상부터는 ZUUL 사용 대신 Spring Cloud Gateway를 사용 권장
3장. Netflix Zuul - 프로젝트 생성
Zuul을 사용하기 위해서 스프링 버전 2.3.8 필요함(해당 내용은 참고용으로 보기)
하지만 first-service, second-service의 경우는 프로젝트 생성 필요(start.spring.io)
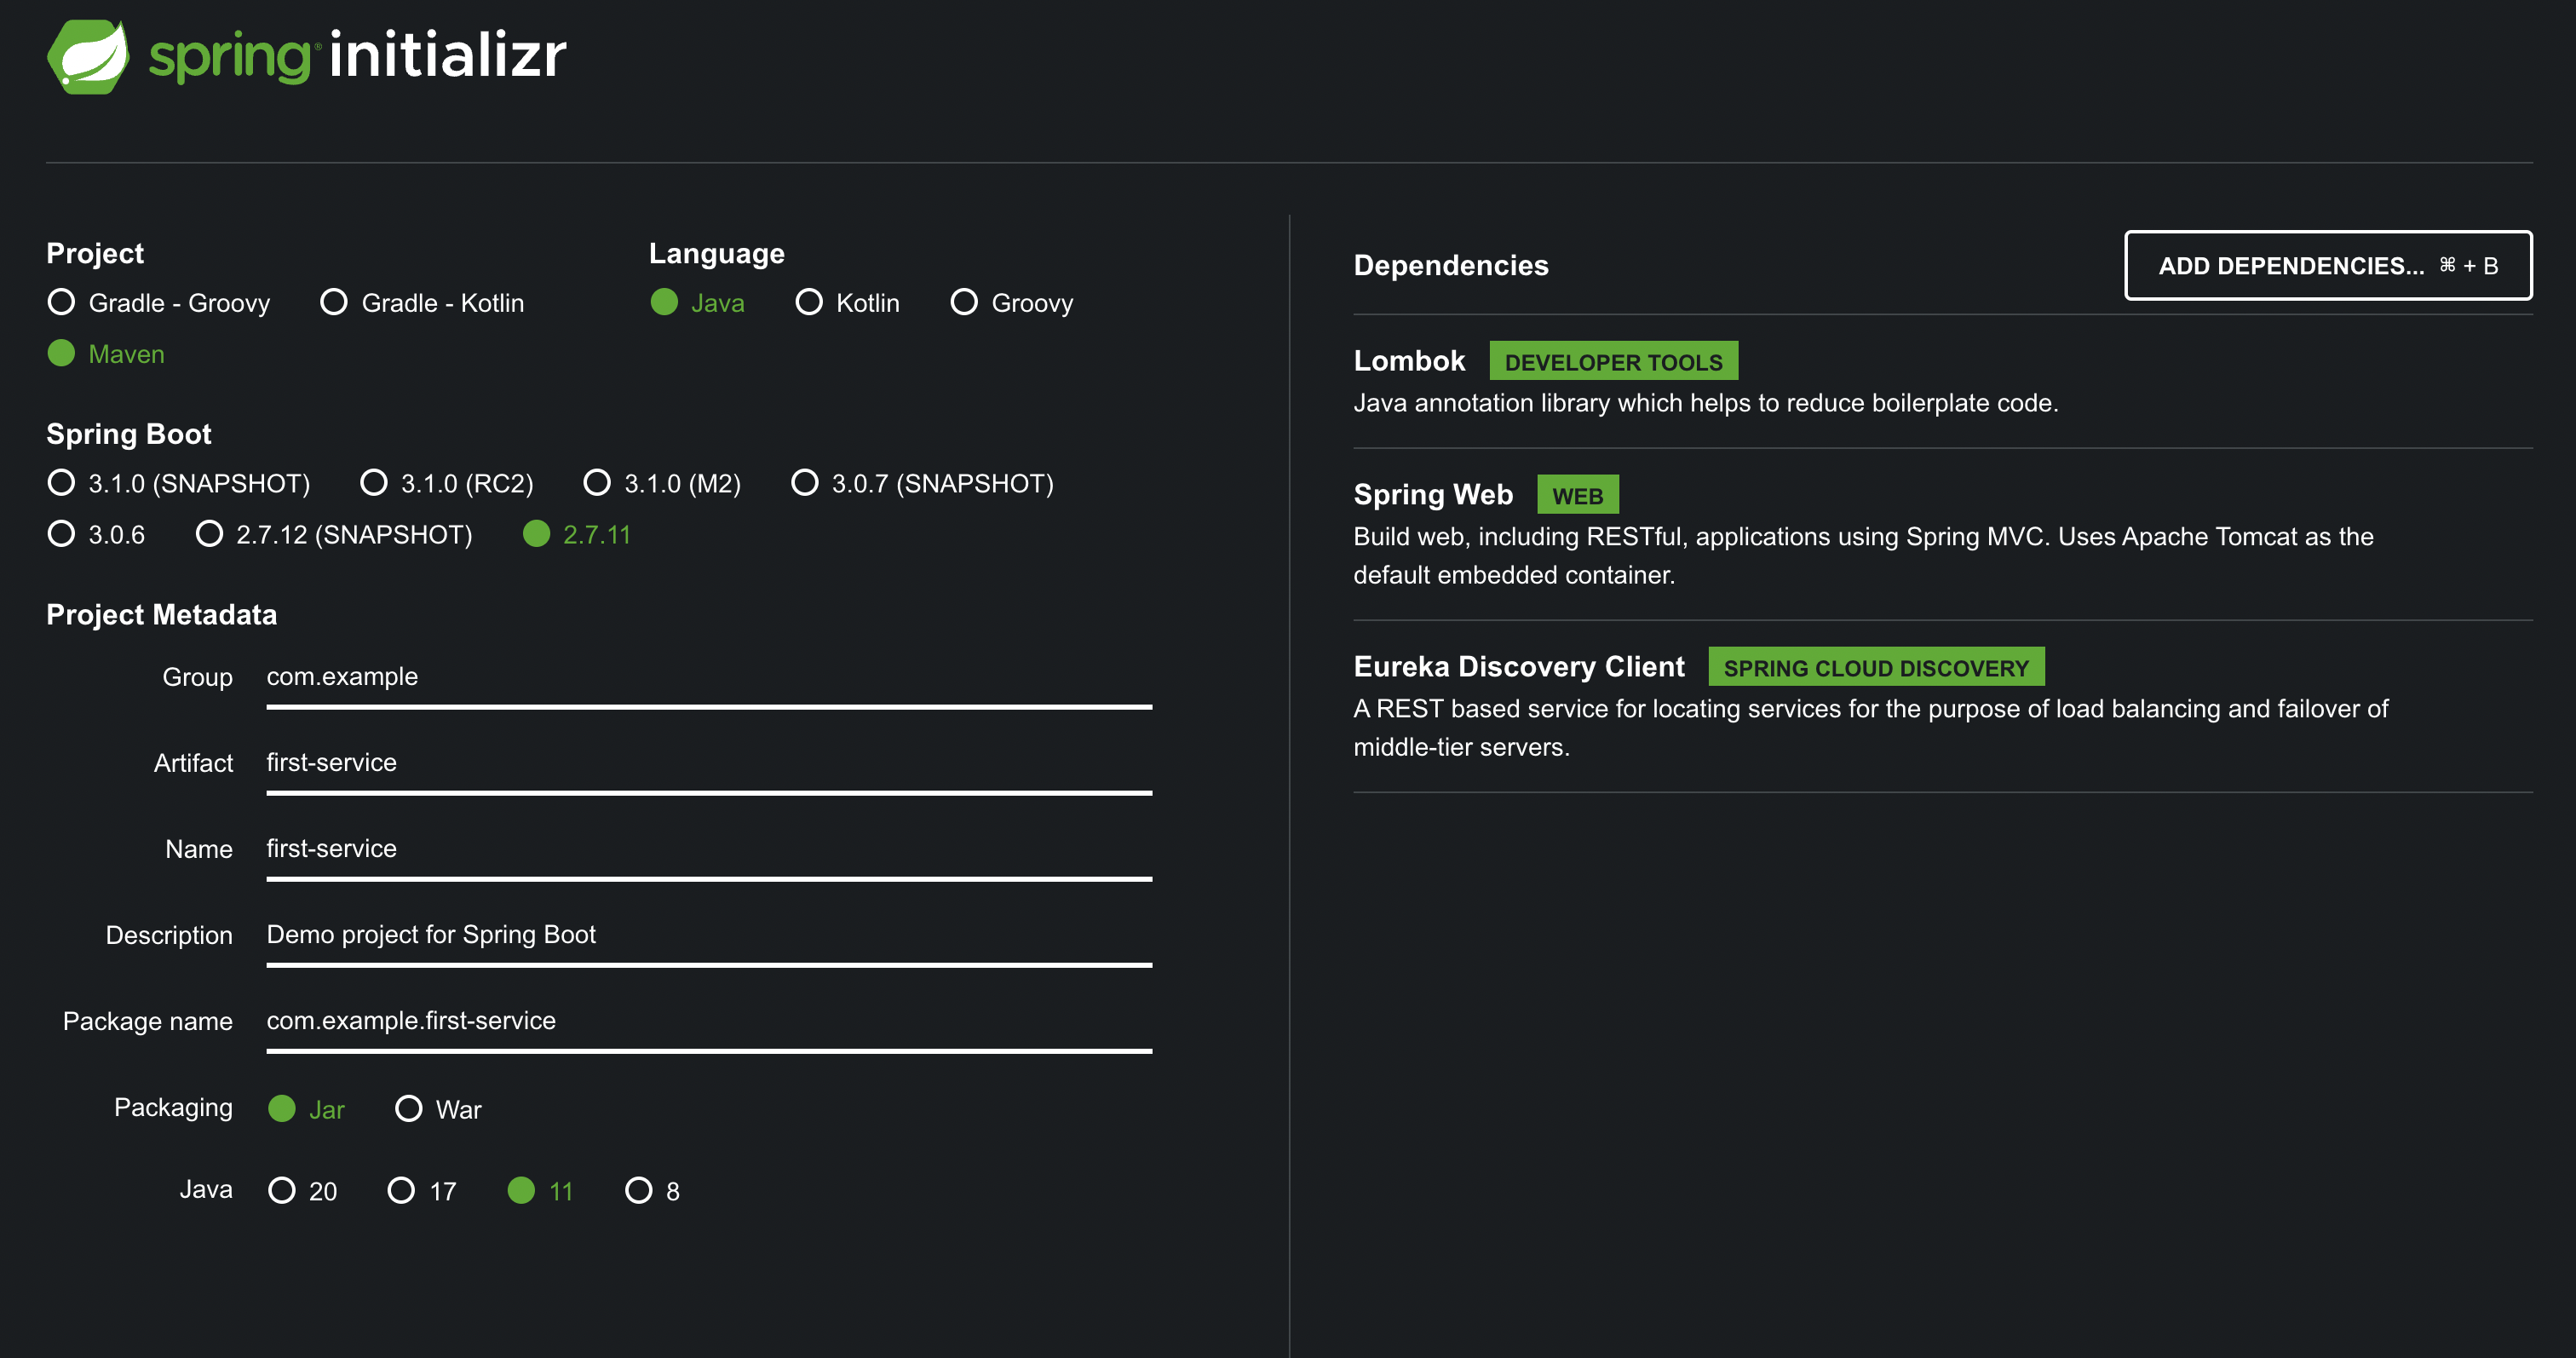
second-service도 Artifact만 바꿔서 만들어주기
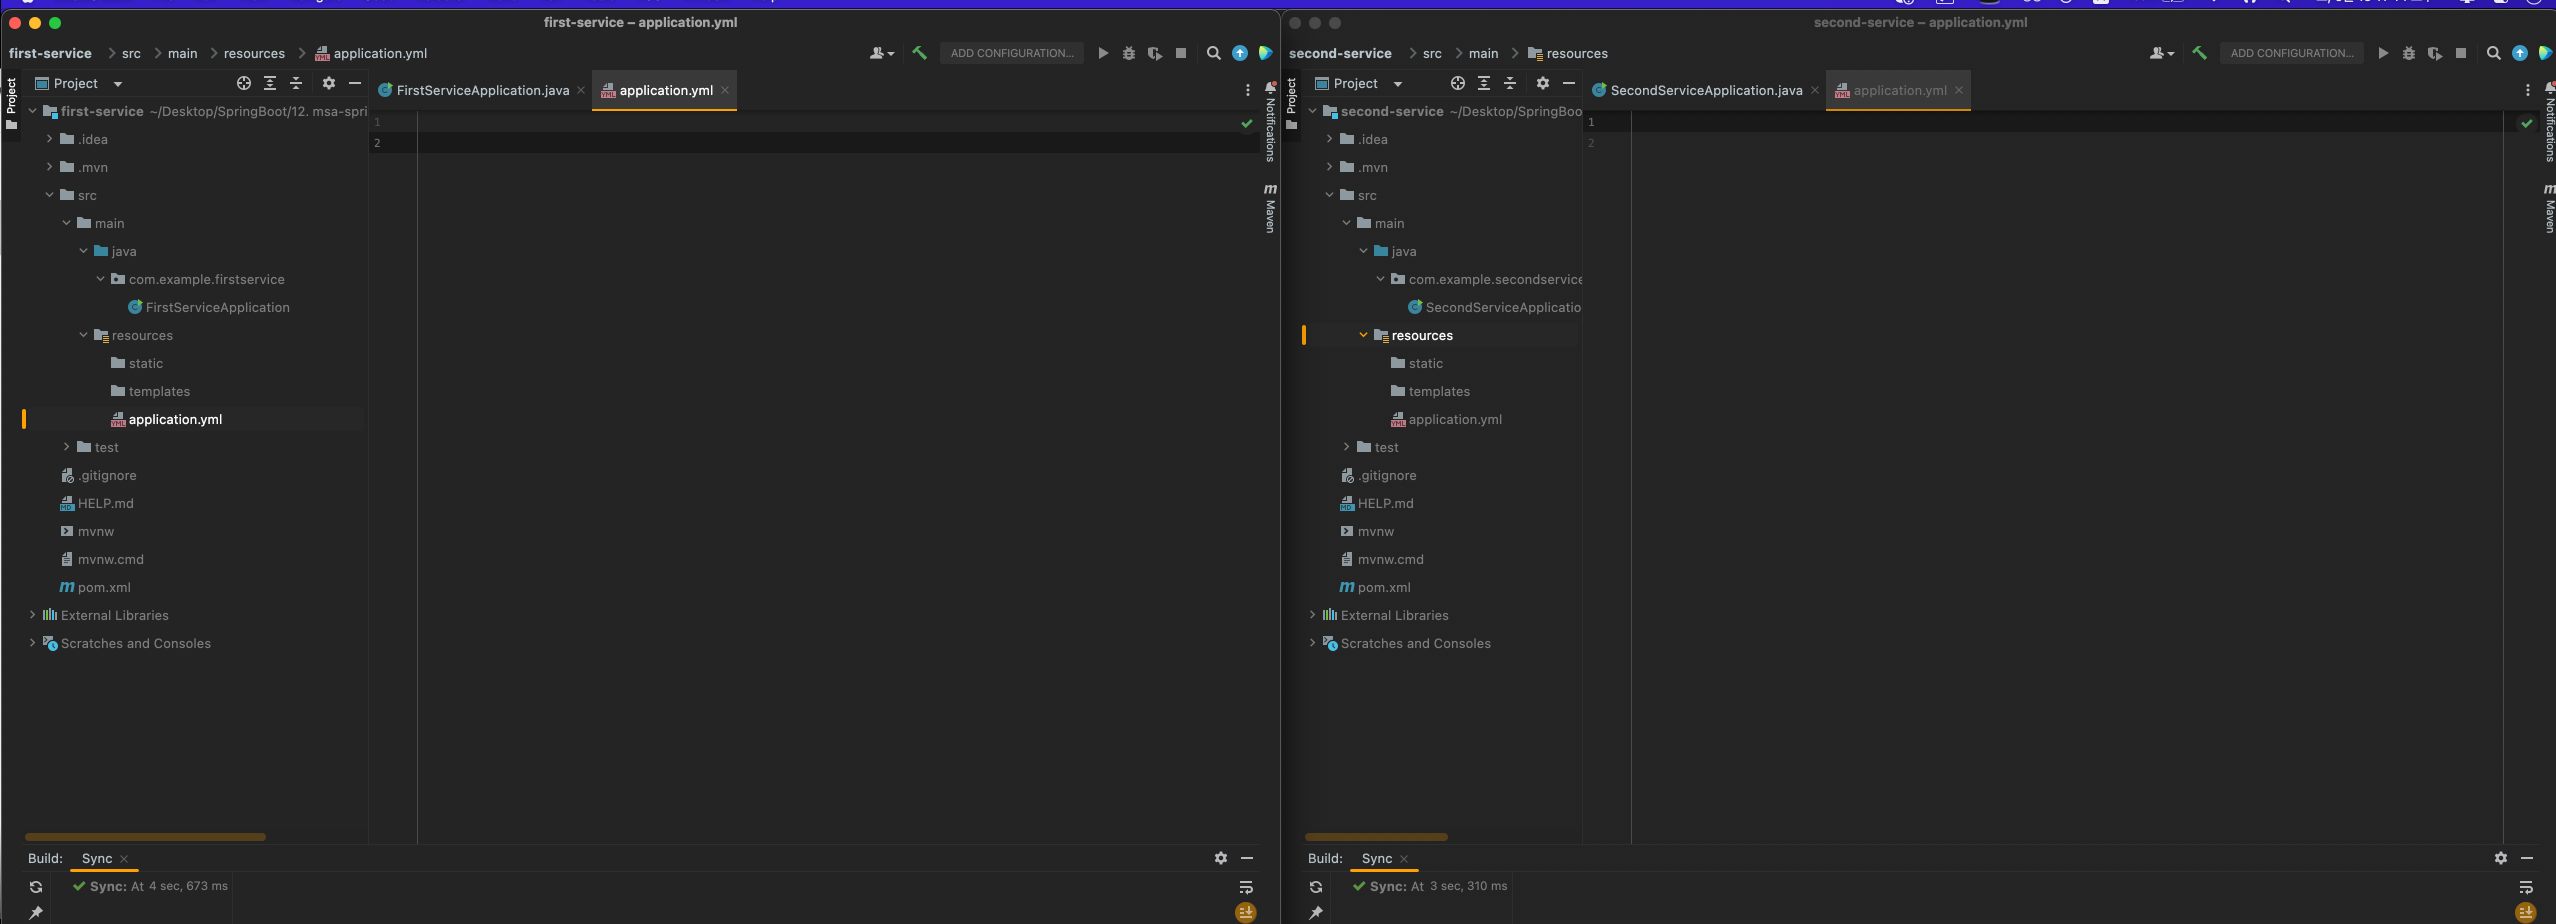
두 개 프로젝트 만들어서 인텔리제이로 실행
추가로 간단한 컨트롤러 만들어주기(FirstServiceController, SecondServiceController)
경로는 FirstServiceApplication이랑 동일 경로에 새로운 클래스 추가해서 아래 내용 추가
package com.example.firstservice;

import org.springframework.boot.SpringApplication;
import org.springframework.boot.autoconfigure.SpringBootApplication;

@SpringBootApplication
public class FirstServiceApplication {

	public static void main(String[] args) {
		SpringApplication.run(FirstServiceApplication.class, args);
	}
}
server:
  port: 8081

spring:
  application:
    name: my-first-service

eureka:
  client:
    fetch-registry: false
    register-with-eureka: false
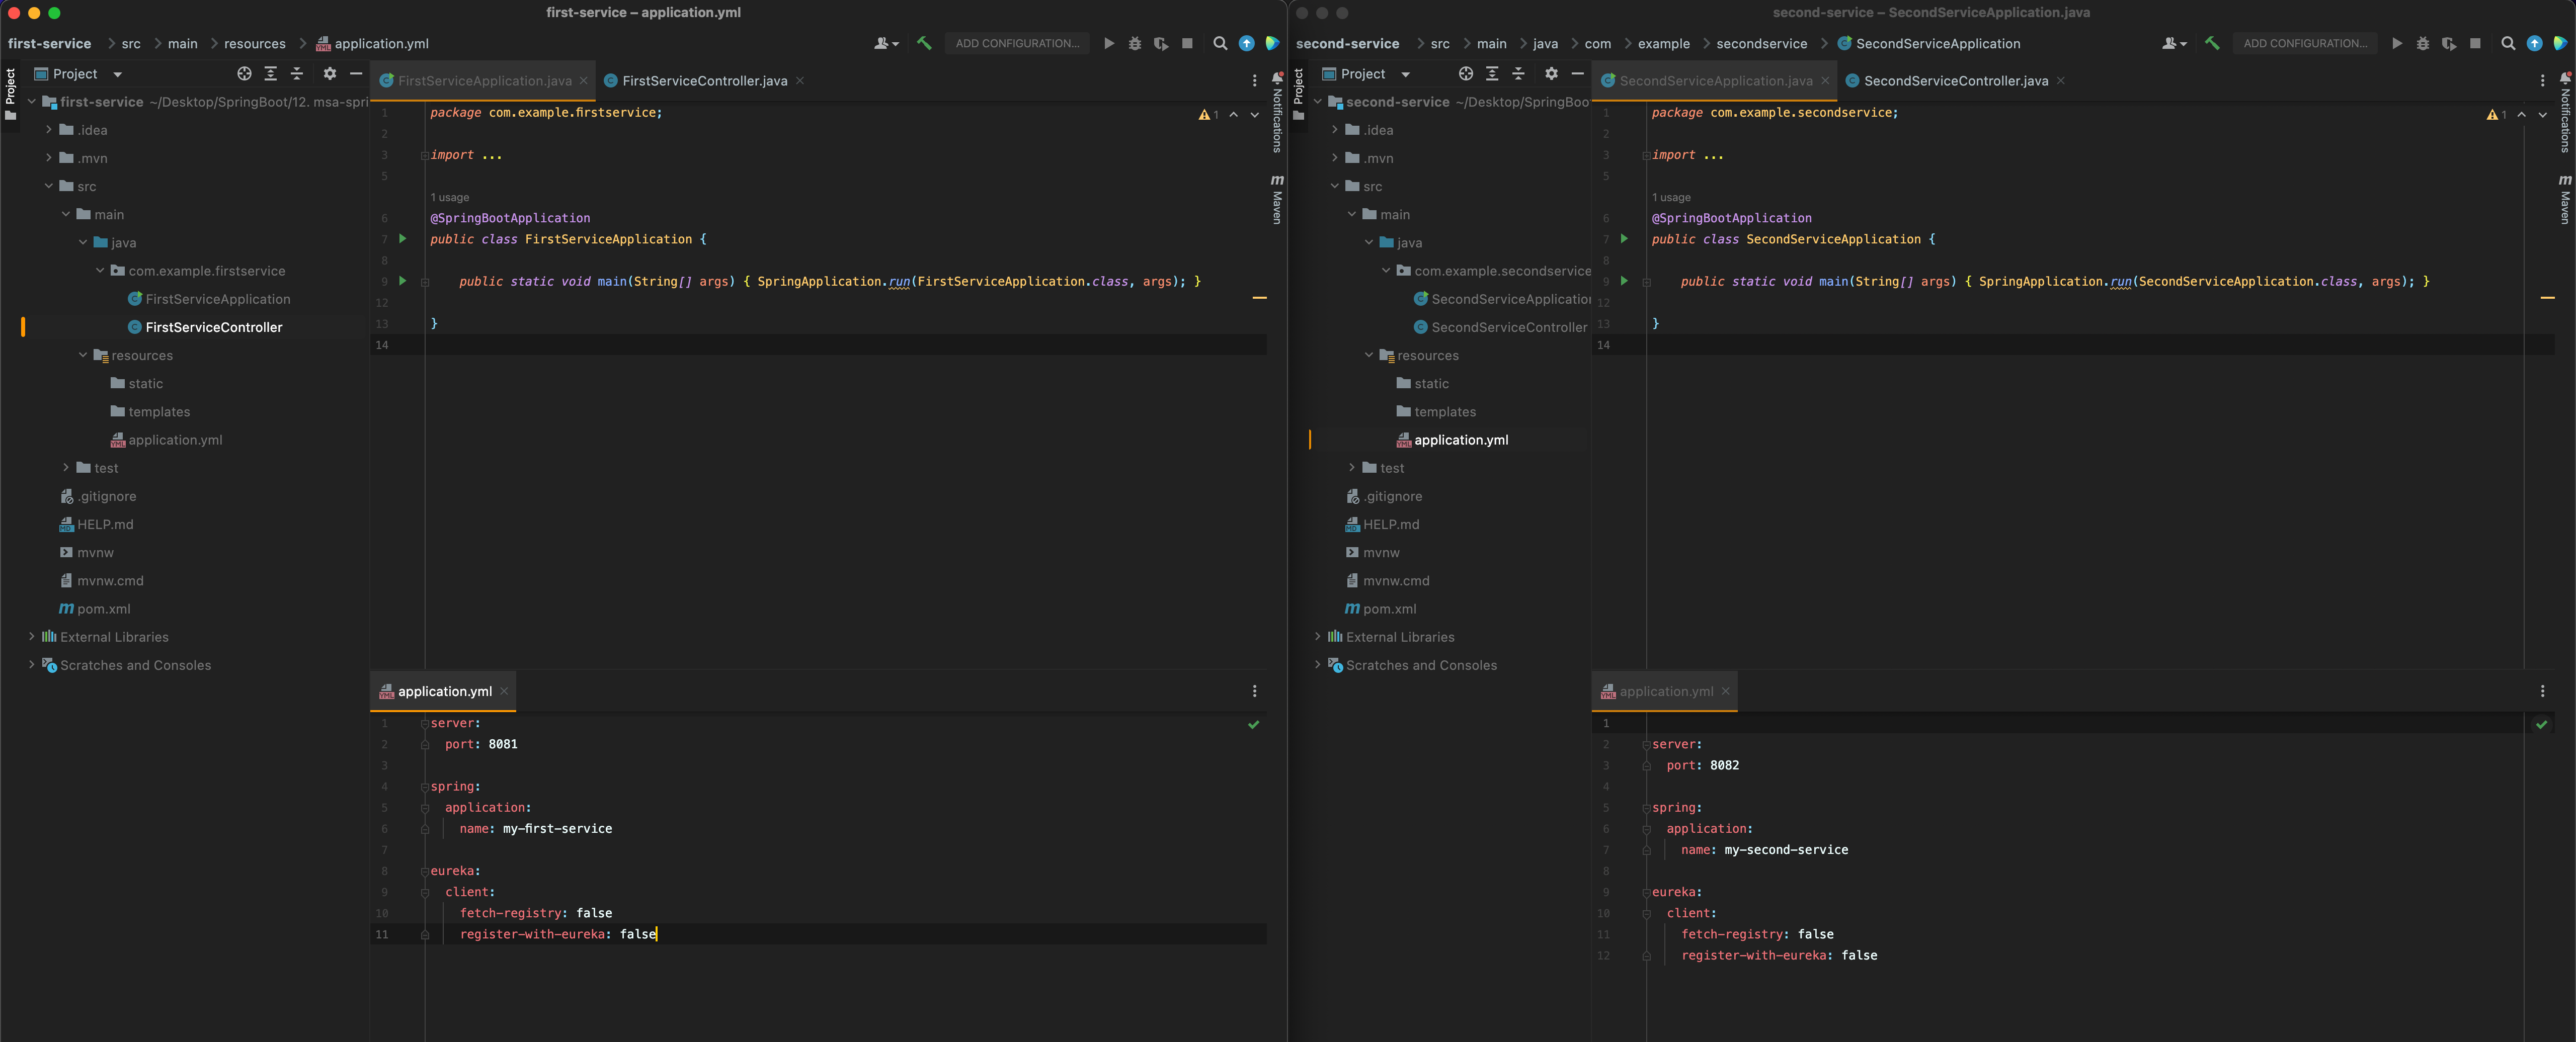
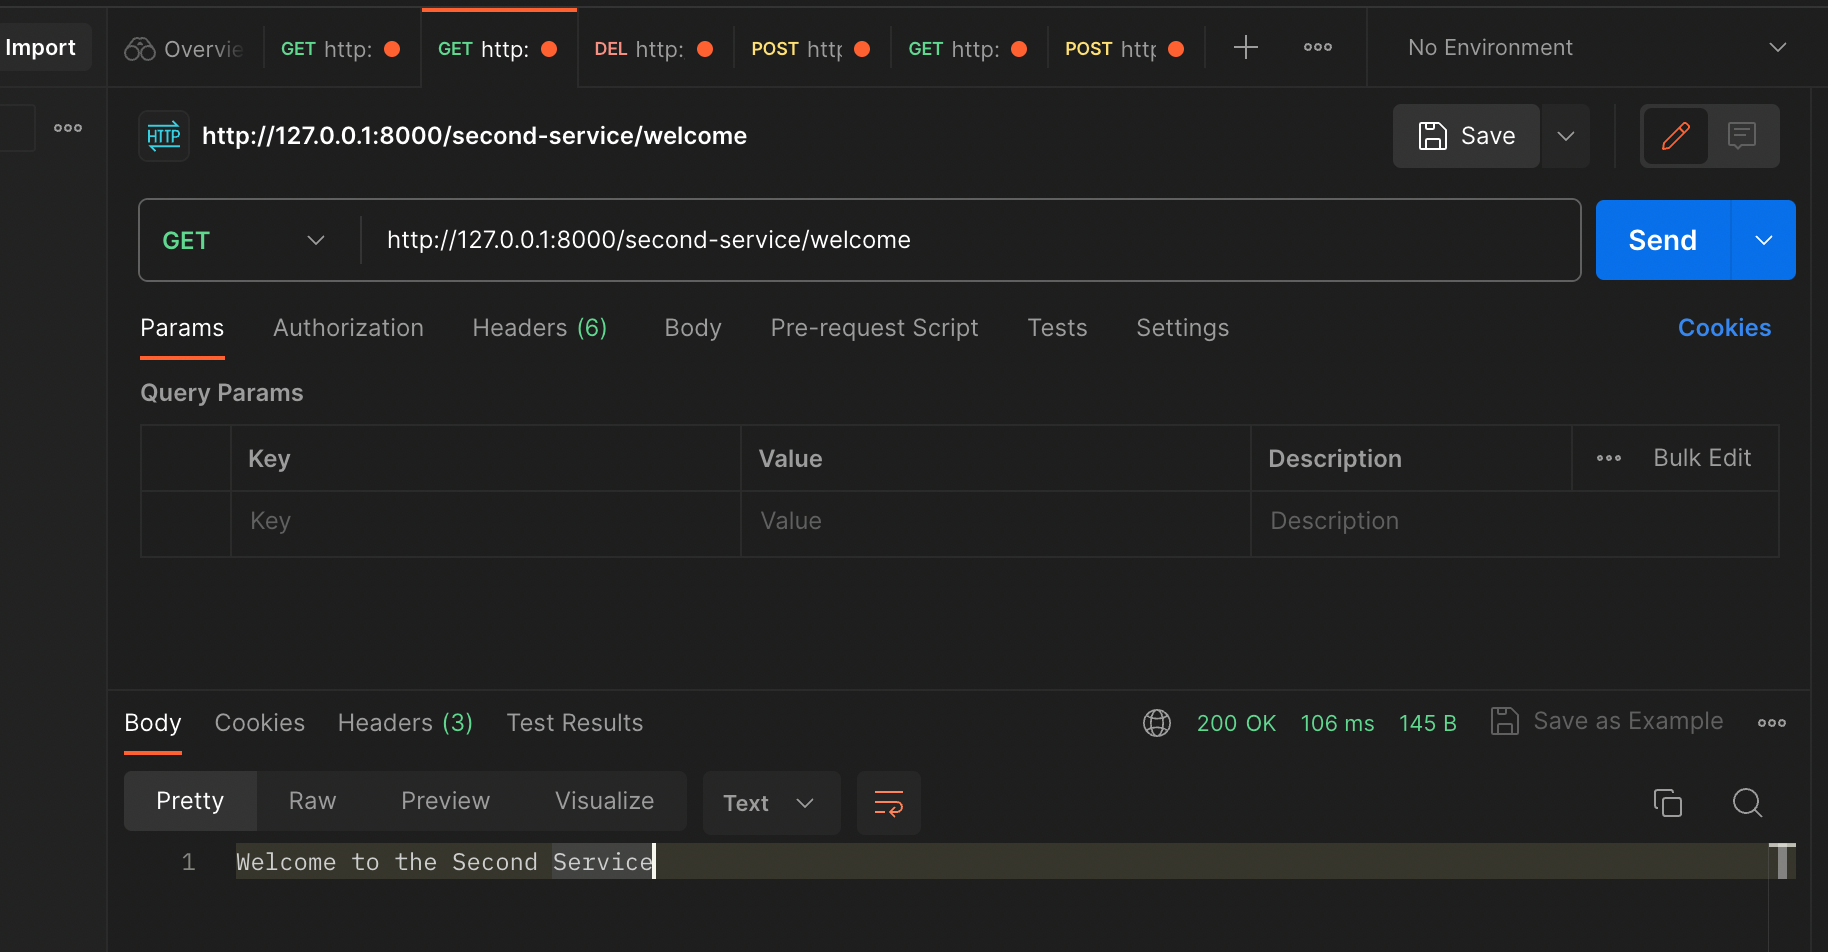
SecondService에도 동일하게 작업 필요(대신 Port는 8082번으로 변경)
return 내용도 first, second 구분될수 있도록 하기
추가로 ZUUL 프로젝트 생성 및 filter 방법의 경우는 이미 버전이 낮아 사용하지 않을것 같구 그냥 참고용으로 알아만 두기 위해서 별도로 블로그에는 글을 남기지 않겠음
대신 Spring Cloud Gateway는 필요하니 학습내용 기록 필요
4장. Spring Cloud Gateway 란?
Zuul 1버전은 비동기 지원 X, 2버전부터 지원
Spring Cloud Gateway는 비동기 지원함(최신 트렌드에 맞음 - 현재는 아닐수도..)
설정법의 경우 ZUUL과 유사함
5장. Spring Cloud Gateway - 프로젝트 생성
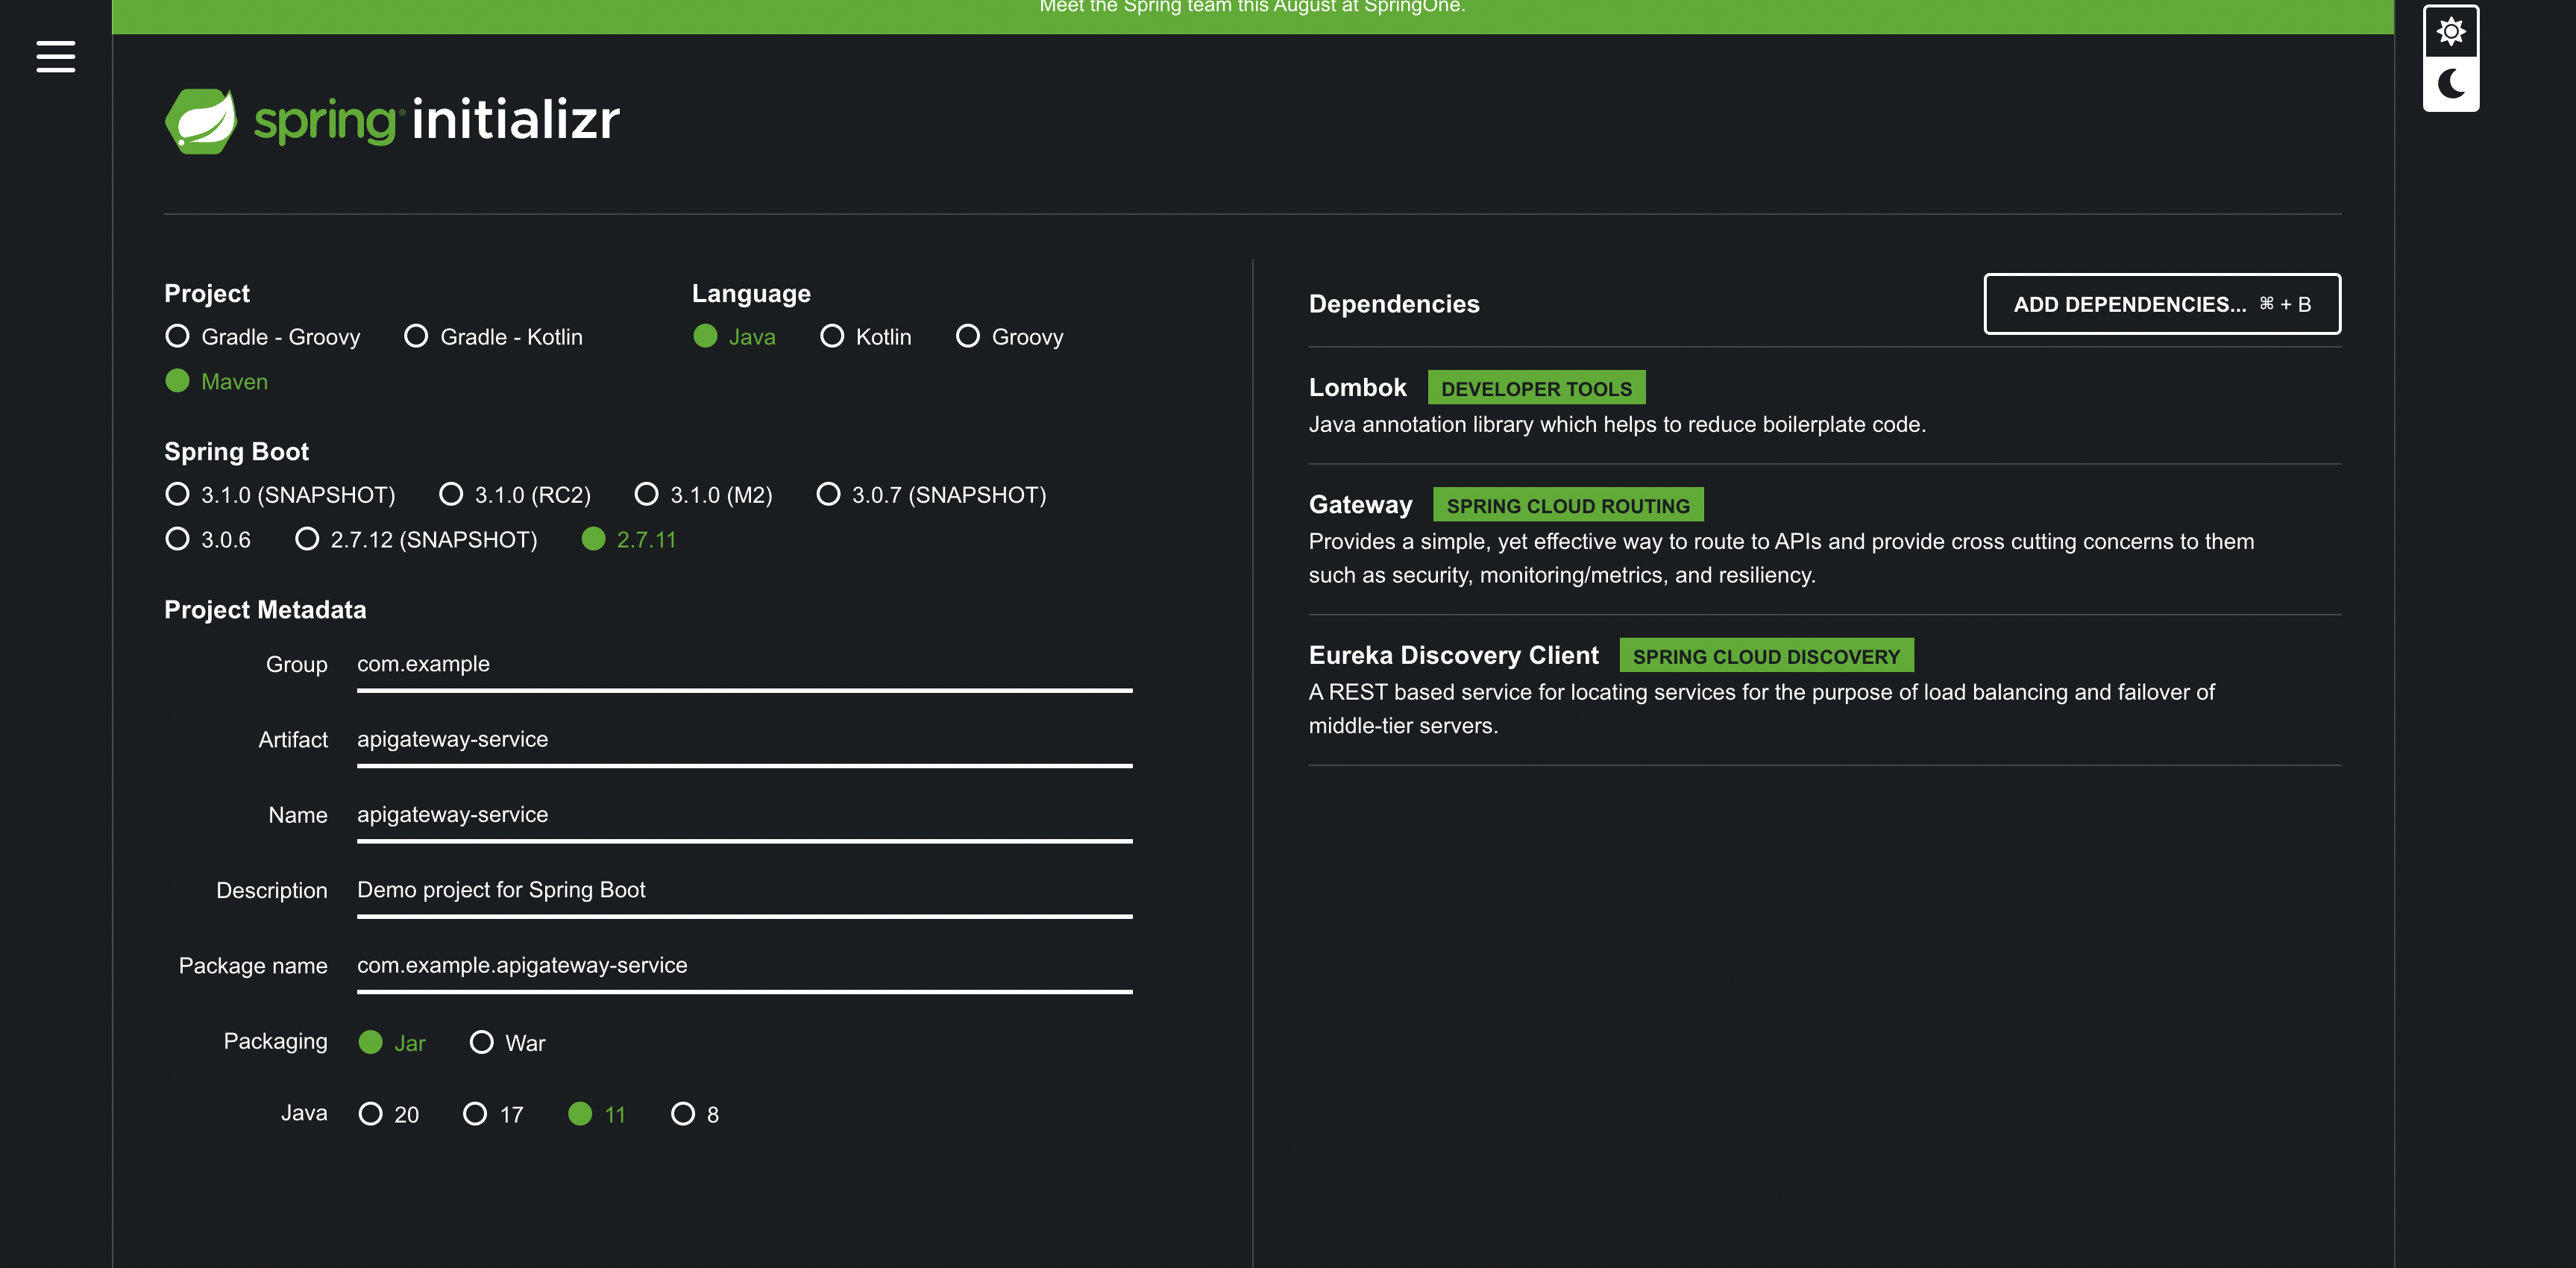
새로운 프로젝트 생성(Spring Cloud Gateway) - start.spring.io
디펜던시
- DevTools
- Eureka Discovery Client
- Gateway
자바 버전 : 11 패키징 : jar 빌드도구 : Maven artifact : apigateway-service
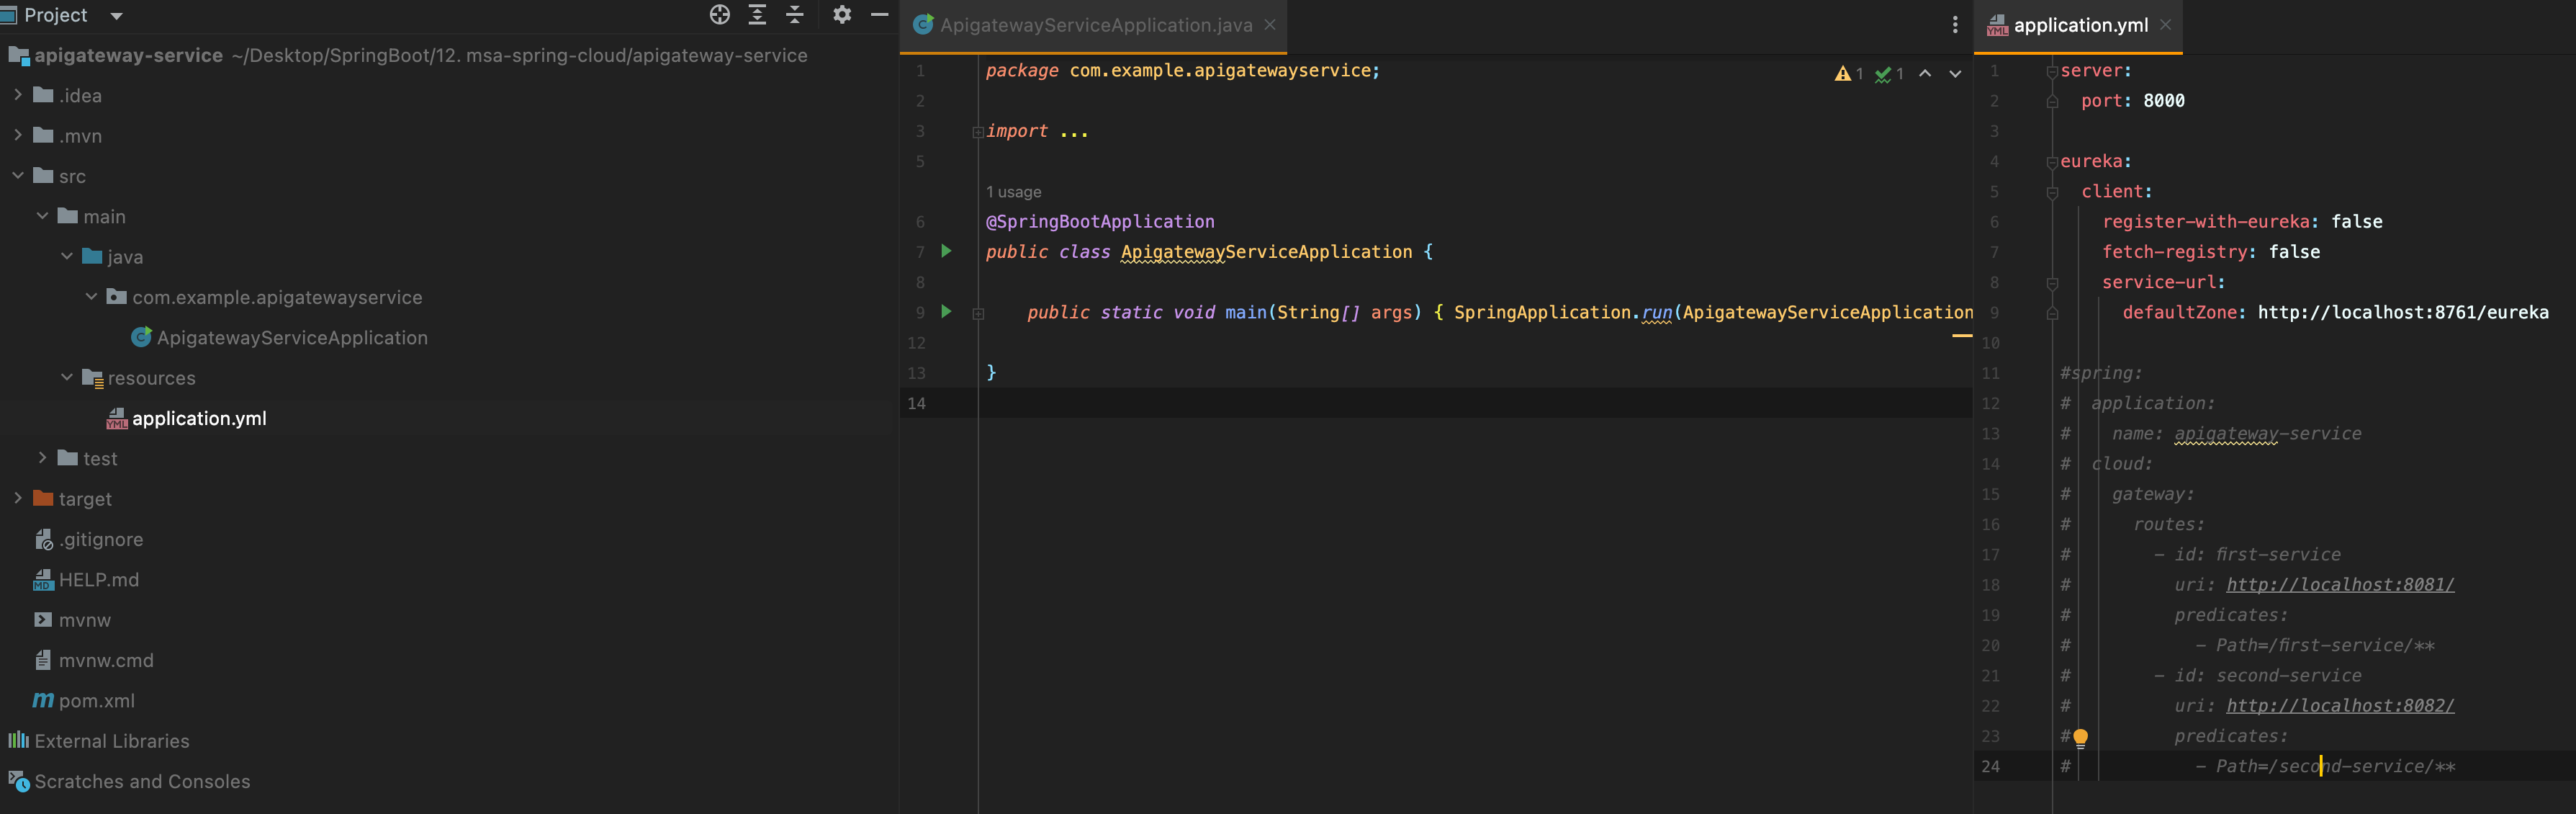
프로젝트 생성 후 인텔리제이로 오픈한 다음 application.yml에 들어가서 아래 설정을 추가해준다
(현재는 Eureka 서버에 등록하지 않기 위해서 아래 설정에 false로 지정하였음)
server:
  port: 8000

eureka:
  client:
    register-with-eureka: false
    fetch-registry: false
    service-url:
      defaultZone: http://localhost:8761/eureka

spring:
  application:
    name: apigateway-service
  cloud:
    gateway:
      routes:
        - id: first-service
          uri: http://localhost:8081/
          predicates:
            - Path=/first-service/**
        - id: second-service
          uri: http://localhost:8082/
          predicates:
            - Path=/second-service/**
여기서 gateway를 보면 id값이 들어오면 해당 uri로 전달하겠다는 뜻이고 Predicates의 경우 조건절이라고 생각하면 된다
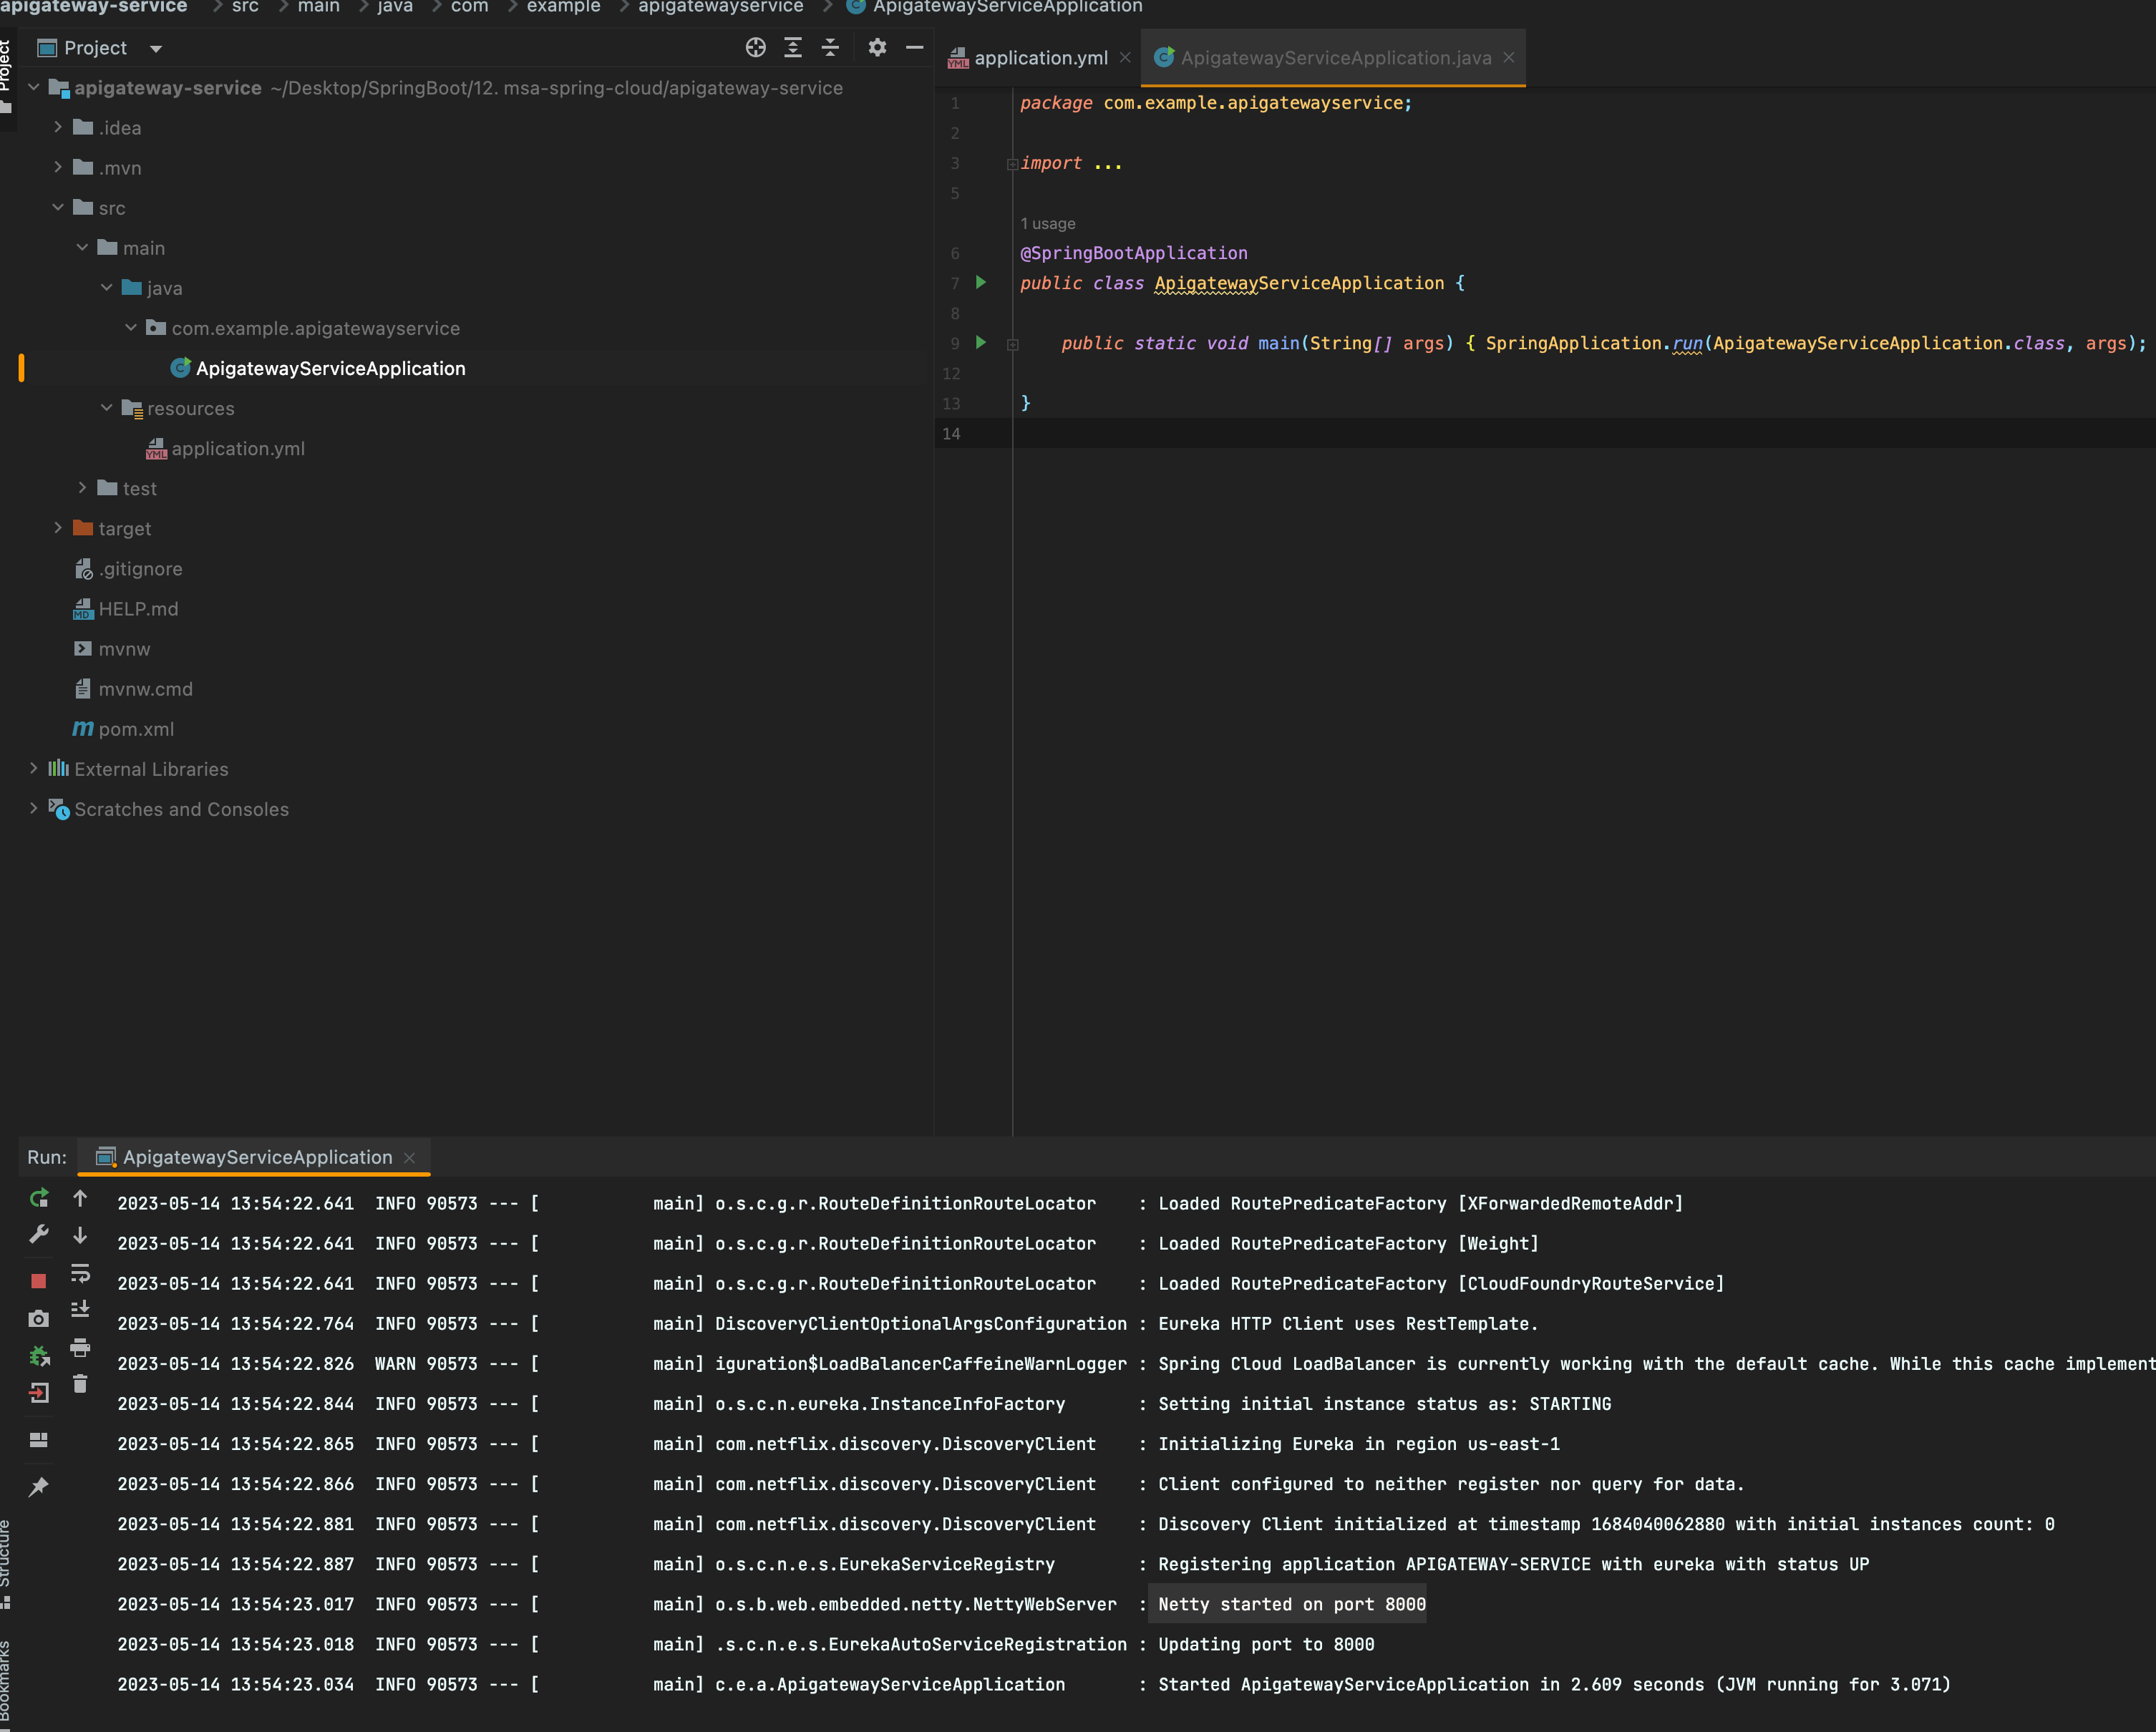
실행하면 정상적으로 서버가 기동이 되는데 여기서 보면 Tomcat이 아니라 Netty 서버가 기동되는 것을 확인 할 수 있다(비동기 처리)
API-Gateway = 비동기서버(Netty)사용

그런데 이렇게 하고 아래 URL을 입력하면 404 에러 발생
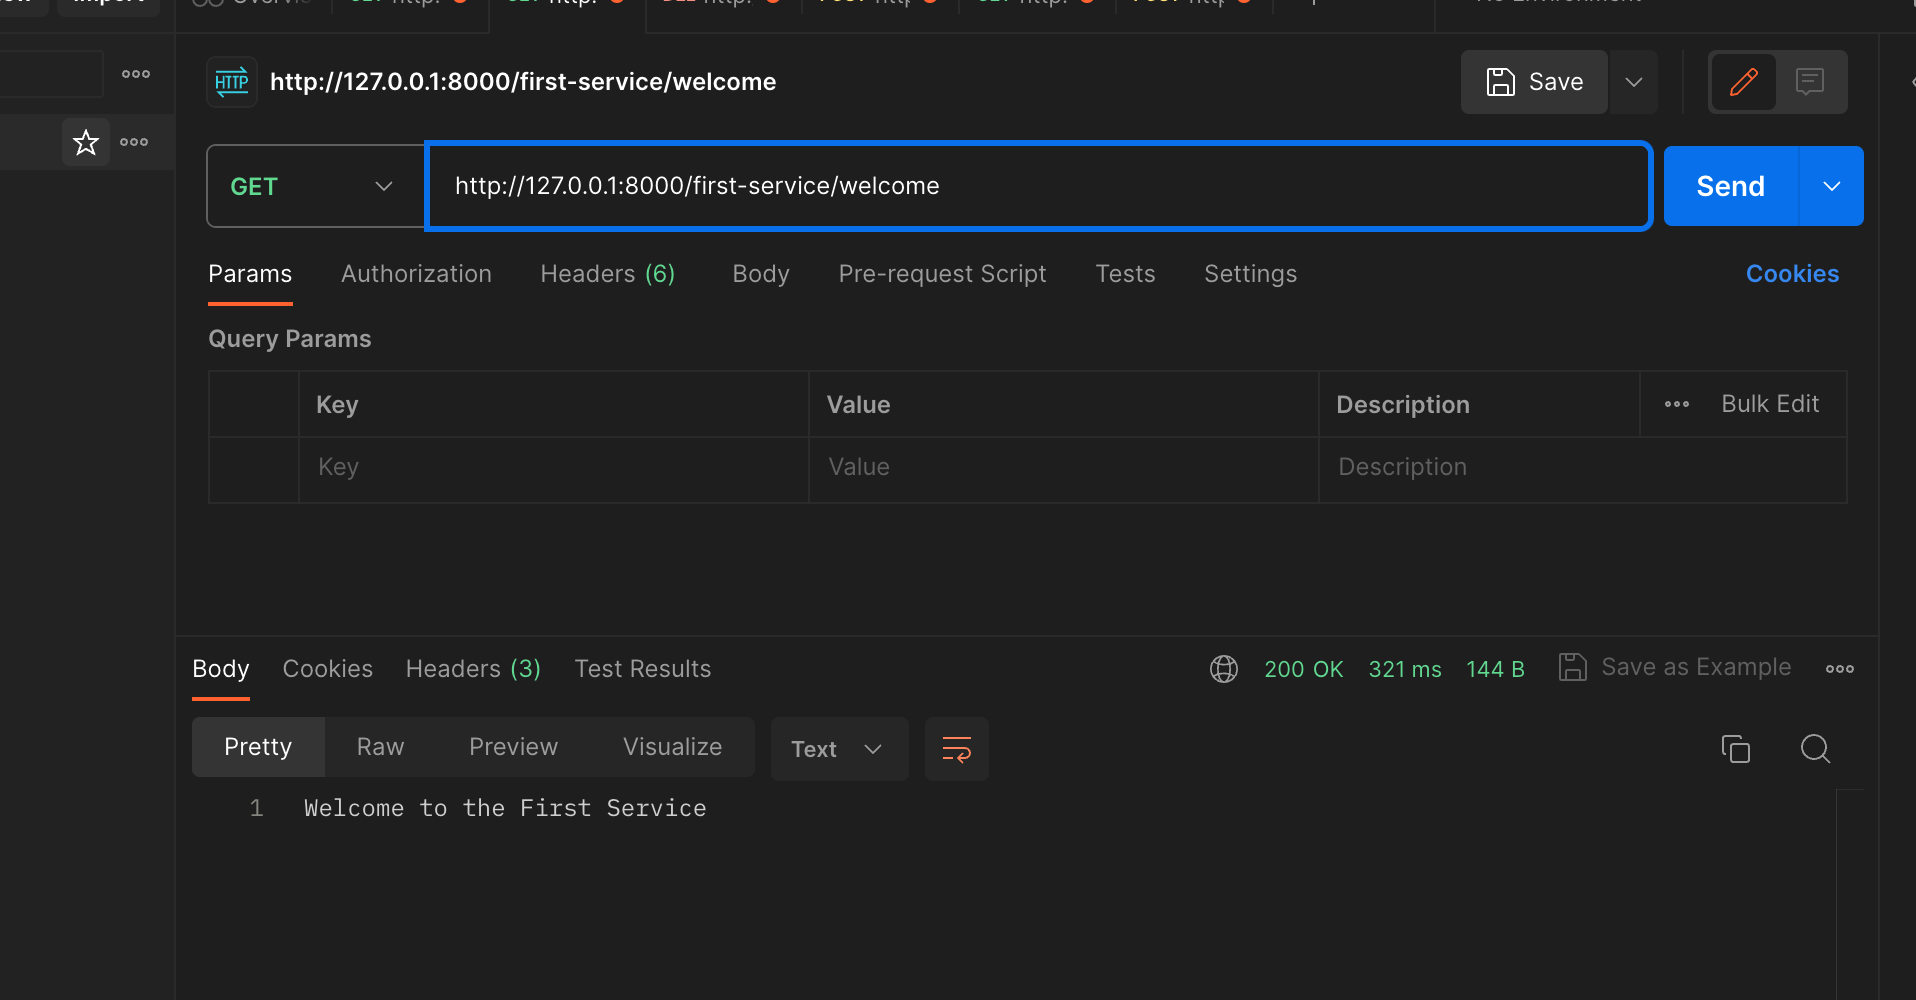
http://localhost:8000/first-service/welcome
http://localhost:8000/second-service/welcome
http://localhost:8081/welcome 우리가 만든 프로젝트가 받기로 한 URI
하지만 API-GATEWAY를 통해서 전달받을 때에는 http://locahost:8081/first-service/welcome 이렇게 받기 때문에 에러가 발생
그래서 이 문제를 해결하기 위해서는 기존에 만들었던 FirstService, SecondService의 컨트롤러 부분을 수정해주면 해결할 수 있다
[FirstServiceController] Before
package com.example.firstservice;

@RestController
@RequestMapping("/")
public class FirstServiceController {
    @GetMapping("/welcome")
    public String welcome(){
       return "Welcome to the First Service";
    }
}
[FirstServiceController] After
//http://localhost:8081/welcome 우리가 만든 프로젝트가 받기로 한 URI
//하지만 API-GATEWAY를 통해서 전달받을 때에는 http://locahost:8081/first-service/welcome 이렇게 받기 때문에 에러가 발생
//그러면 받는 URI처럼 /first-service를 모두 받을수 있게 처리
@RestController
@RequestMapping("/first-service") //요기 변경
public class FirstServiceController {
    @GetMapping("/welcome")
    public String welcome(){
       return "Welcome to the First Service";
    }
}
위에처럼 변경해주고 Second-Service도 동일하게 작업해주면 아래처럼 정상적으로 동작하는것을 확인 가능

만약 Page NotFound가 나오는 경우에는 ApiGateWay에 설정한 uri + predicates(/first-service 등) 정보도 같이 넘어가니 이 점 유의해서 구현하면 정상적으로 동작할 것
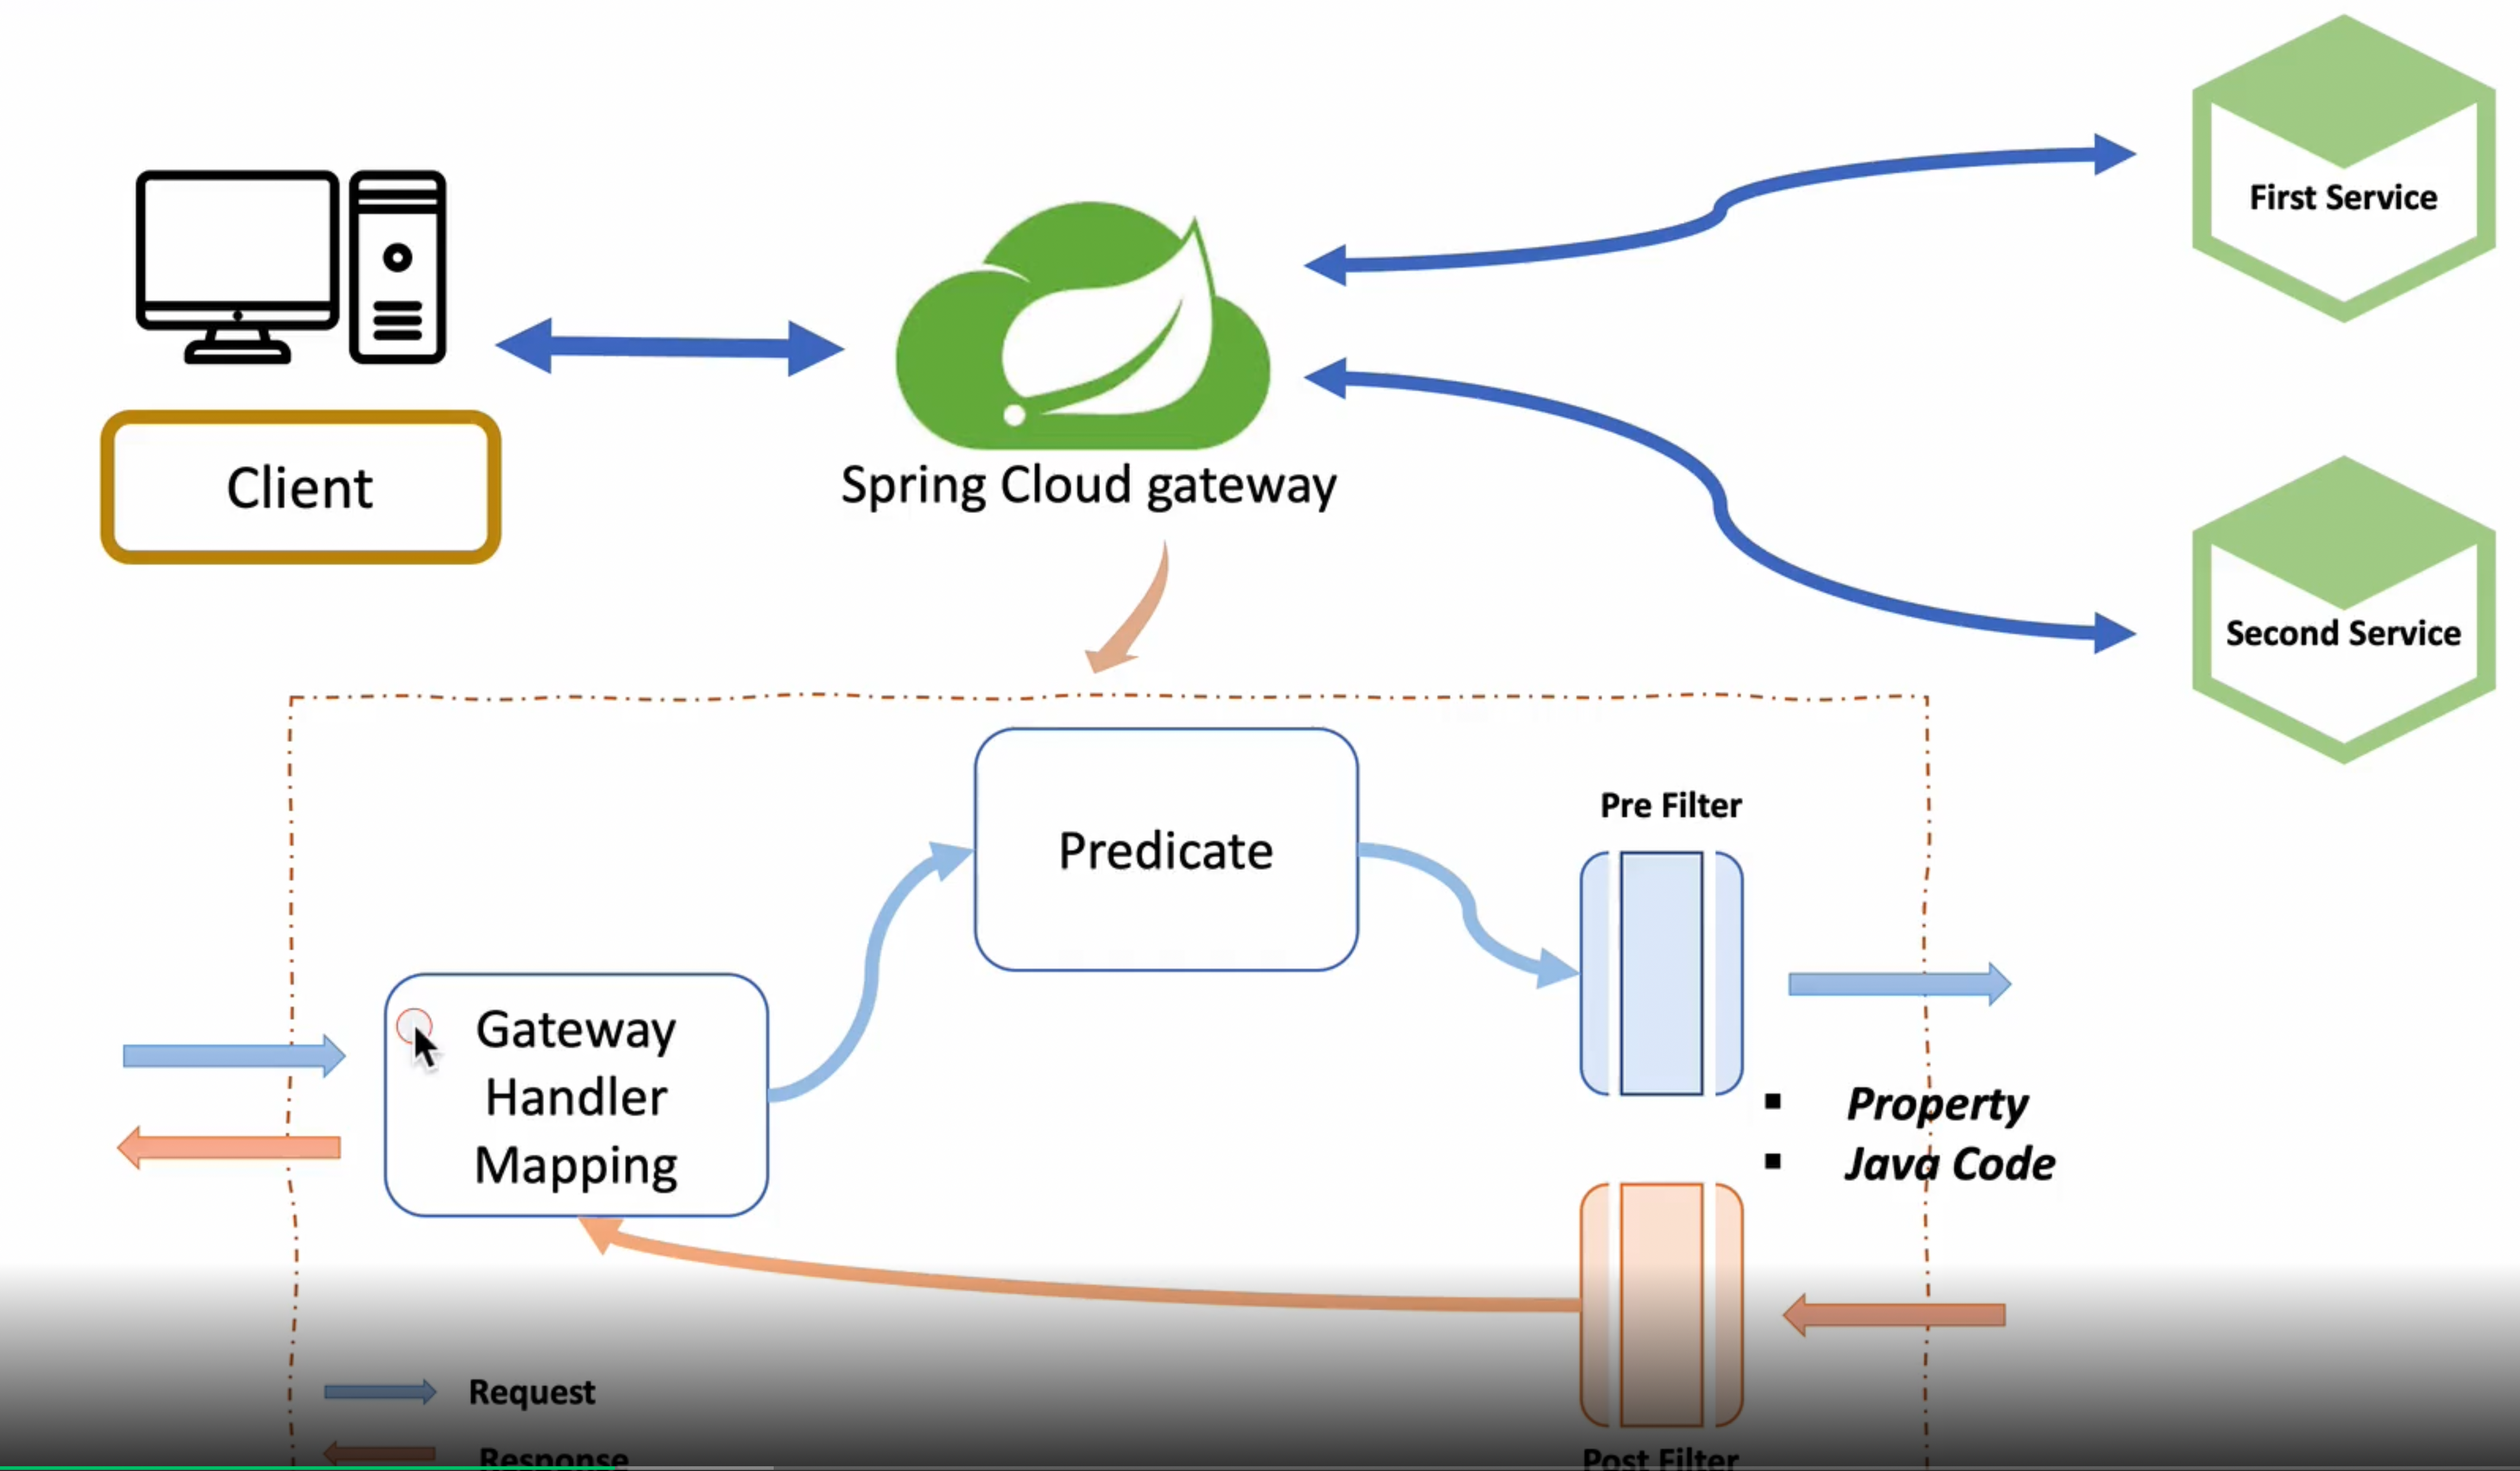
6장. Spring Cloud Gateway - Filter
스프링 클라우드 게이트웨이 필터의 프로세스
스프링 클라이언트가 게이트웨이쪽으로 어떤 요청을 전달하게 되면 First, Second 서비스로 갈지 분기처리를 해준다
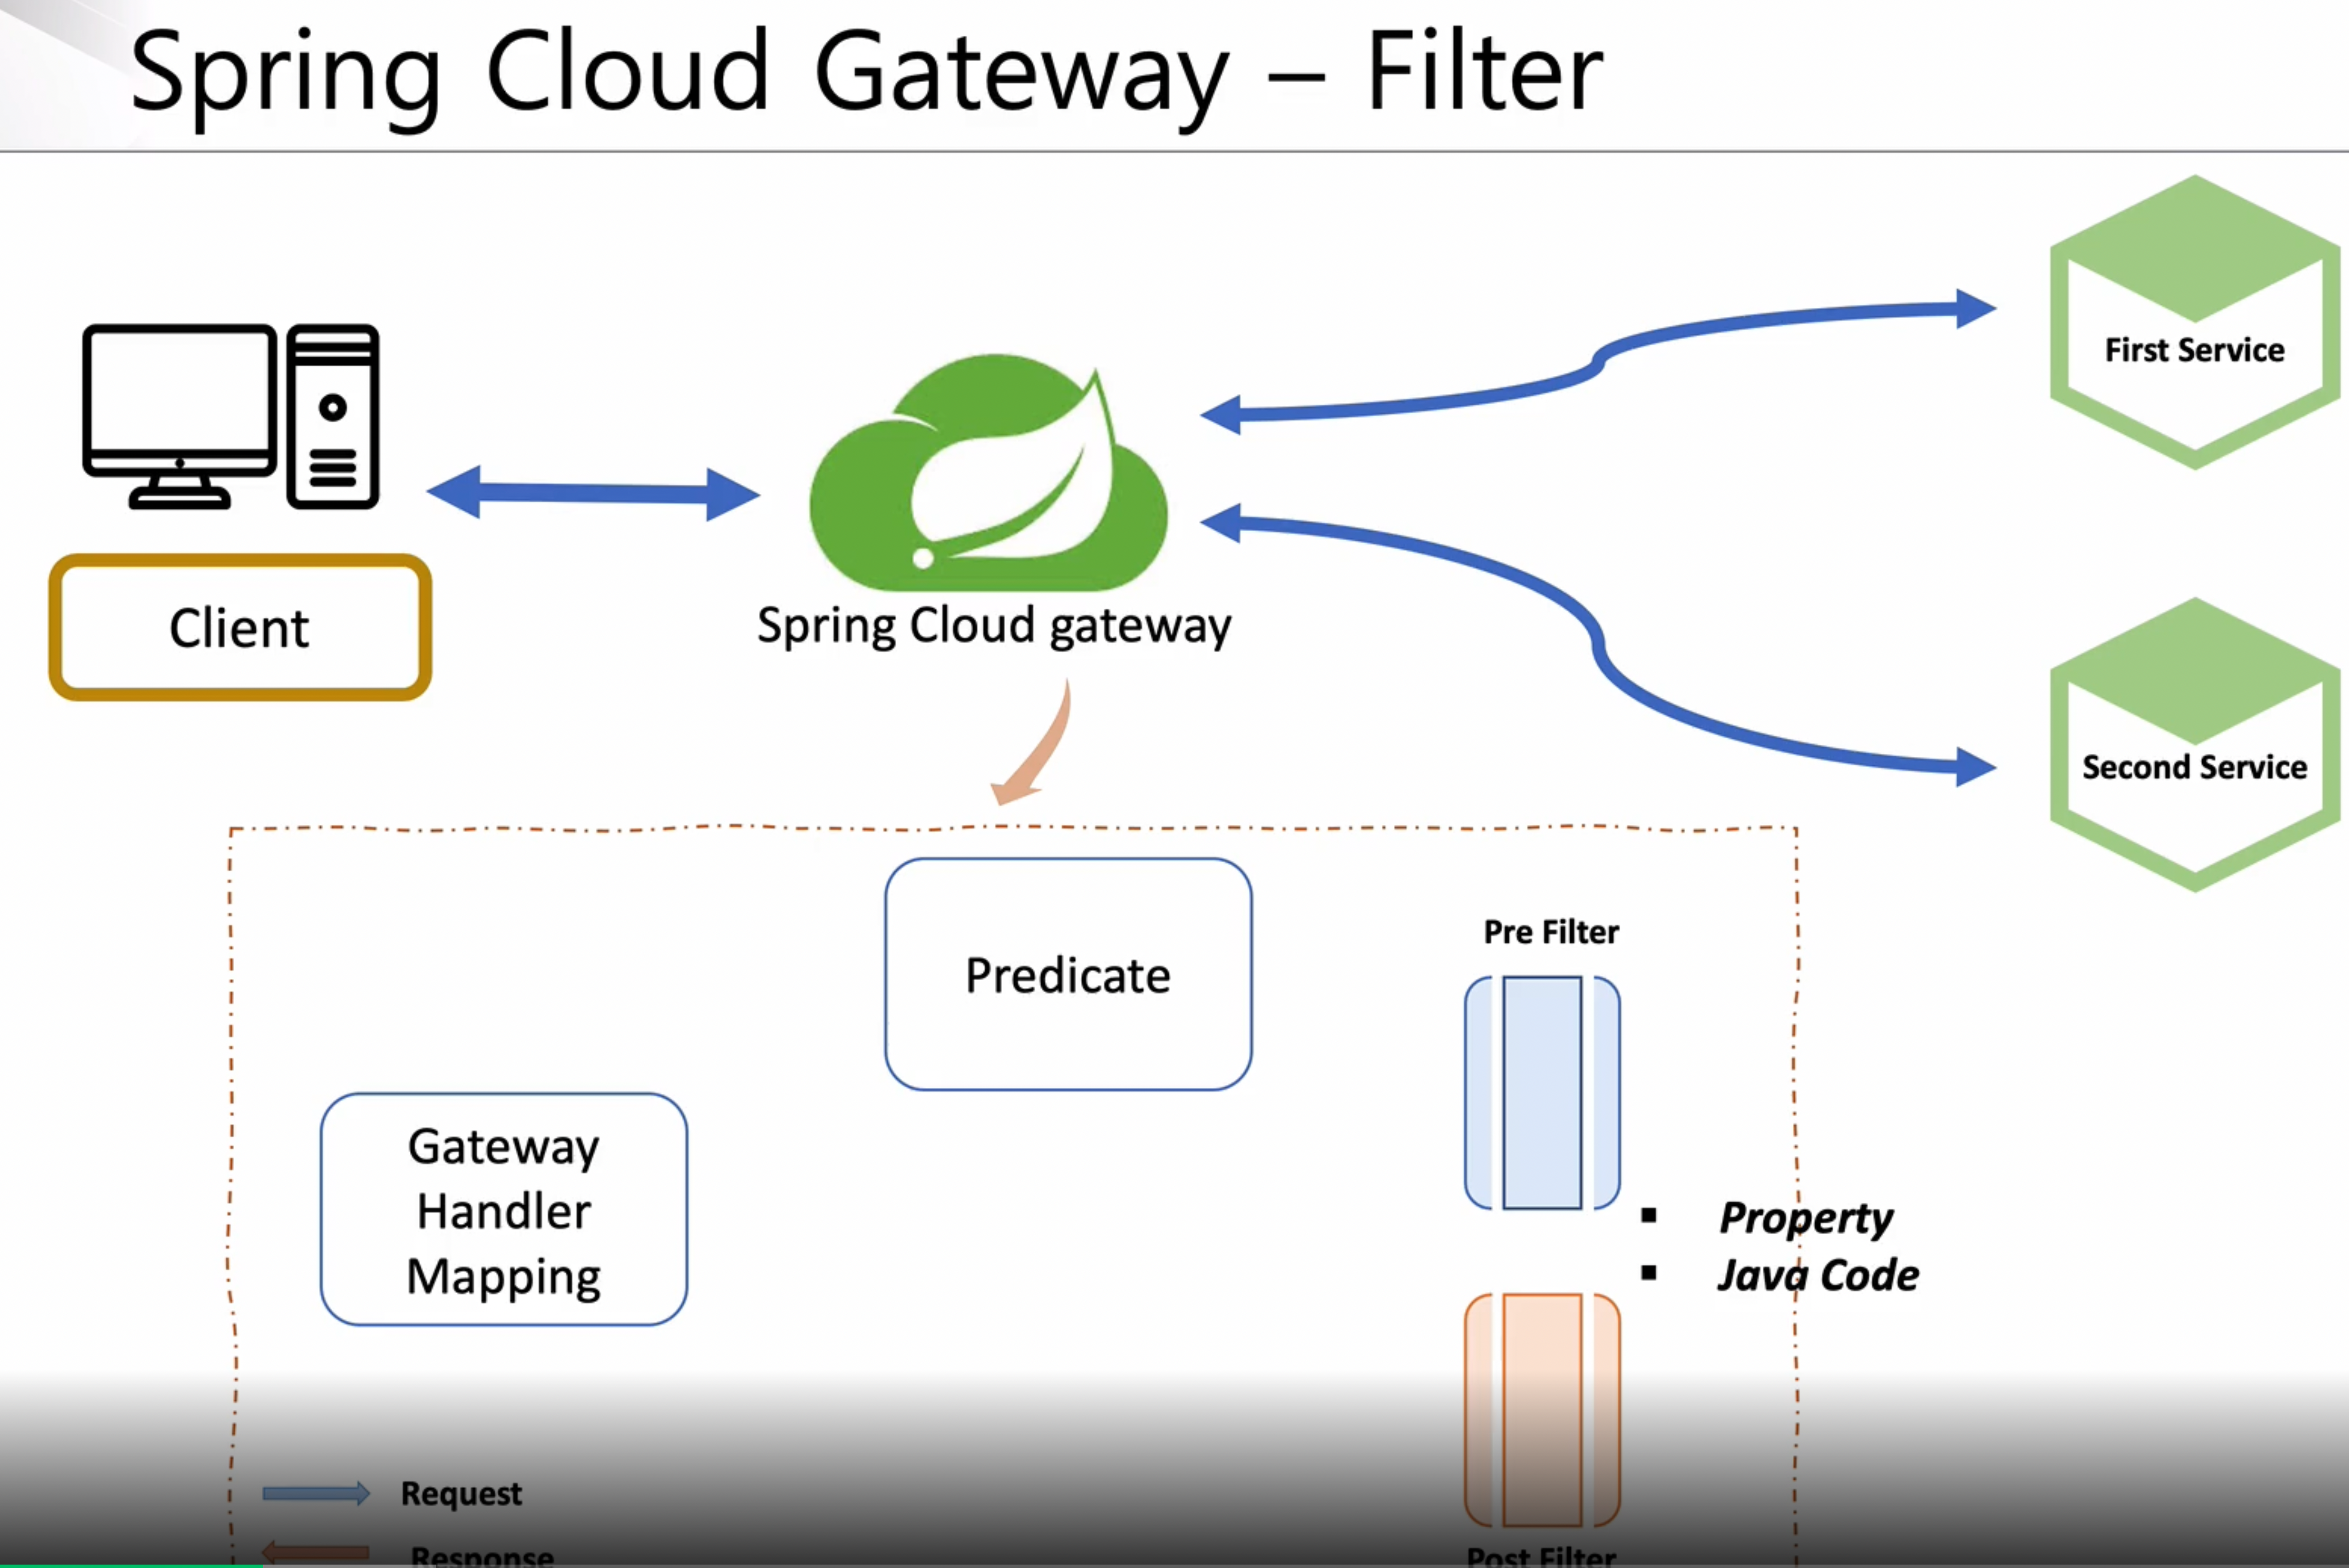
[Sprinc Cloud Gateway 내부 구조]
-
Gateway Handler Mapping 에서 먼저 클라이언 요청을 바든ㄴ다
-
요청에 대한 사전 조건을 Predicate에서 보고 분기 처리를 해준다
여기서 pre filter, post filter의 경우 기존에 yml 파일에서 작업을 했는데 이번에는 java code로 작성해 보겠다
아래와 같이 스프링 클라우드 게이트웨이 필터 Config를 작성
[작업내역]
routes에서 처음에 /first-service/**라는 것이 들어오면 request Header, response Header에 내가 원하는 값을 추가해주고 uri(http://localhost:8081)쪽으로 보낸다음 결과값을 다시 클라이언트쪽에 보내주는 역할을 하겠다
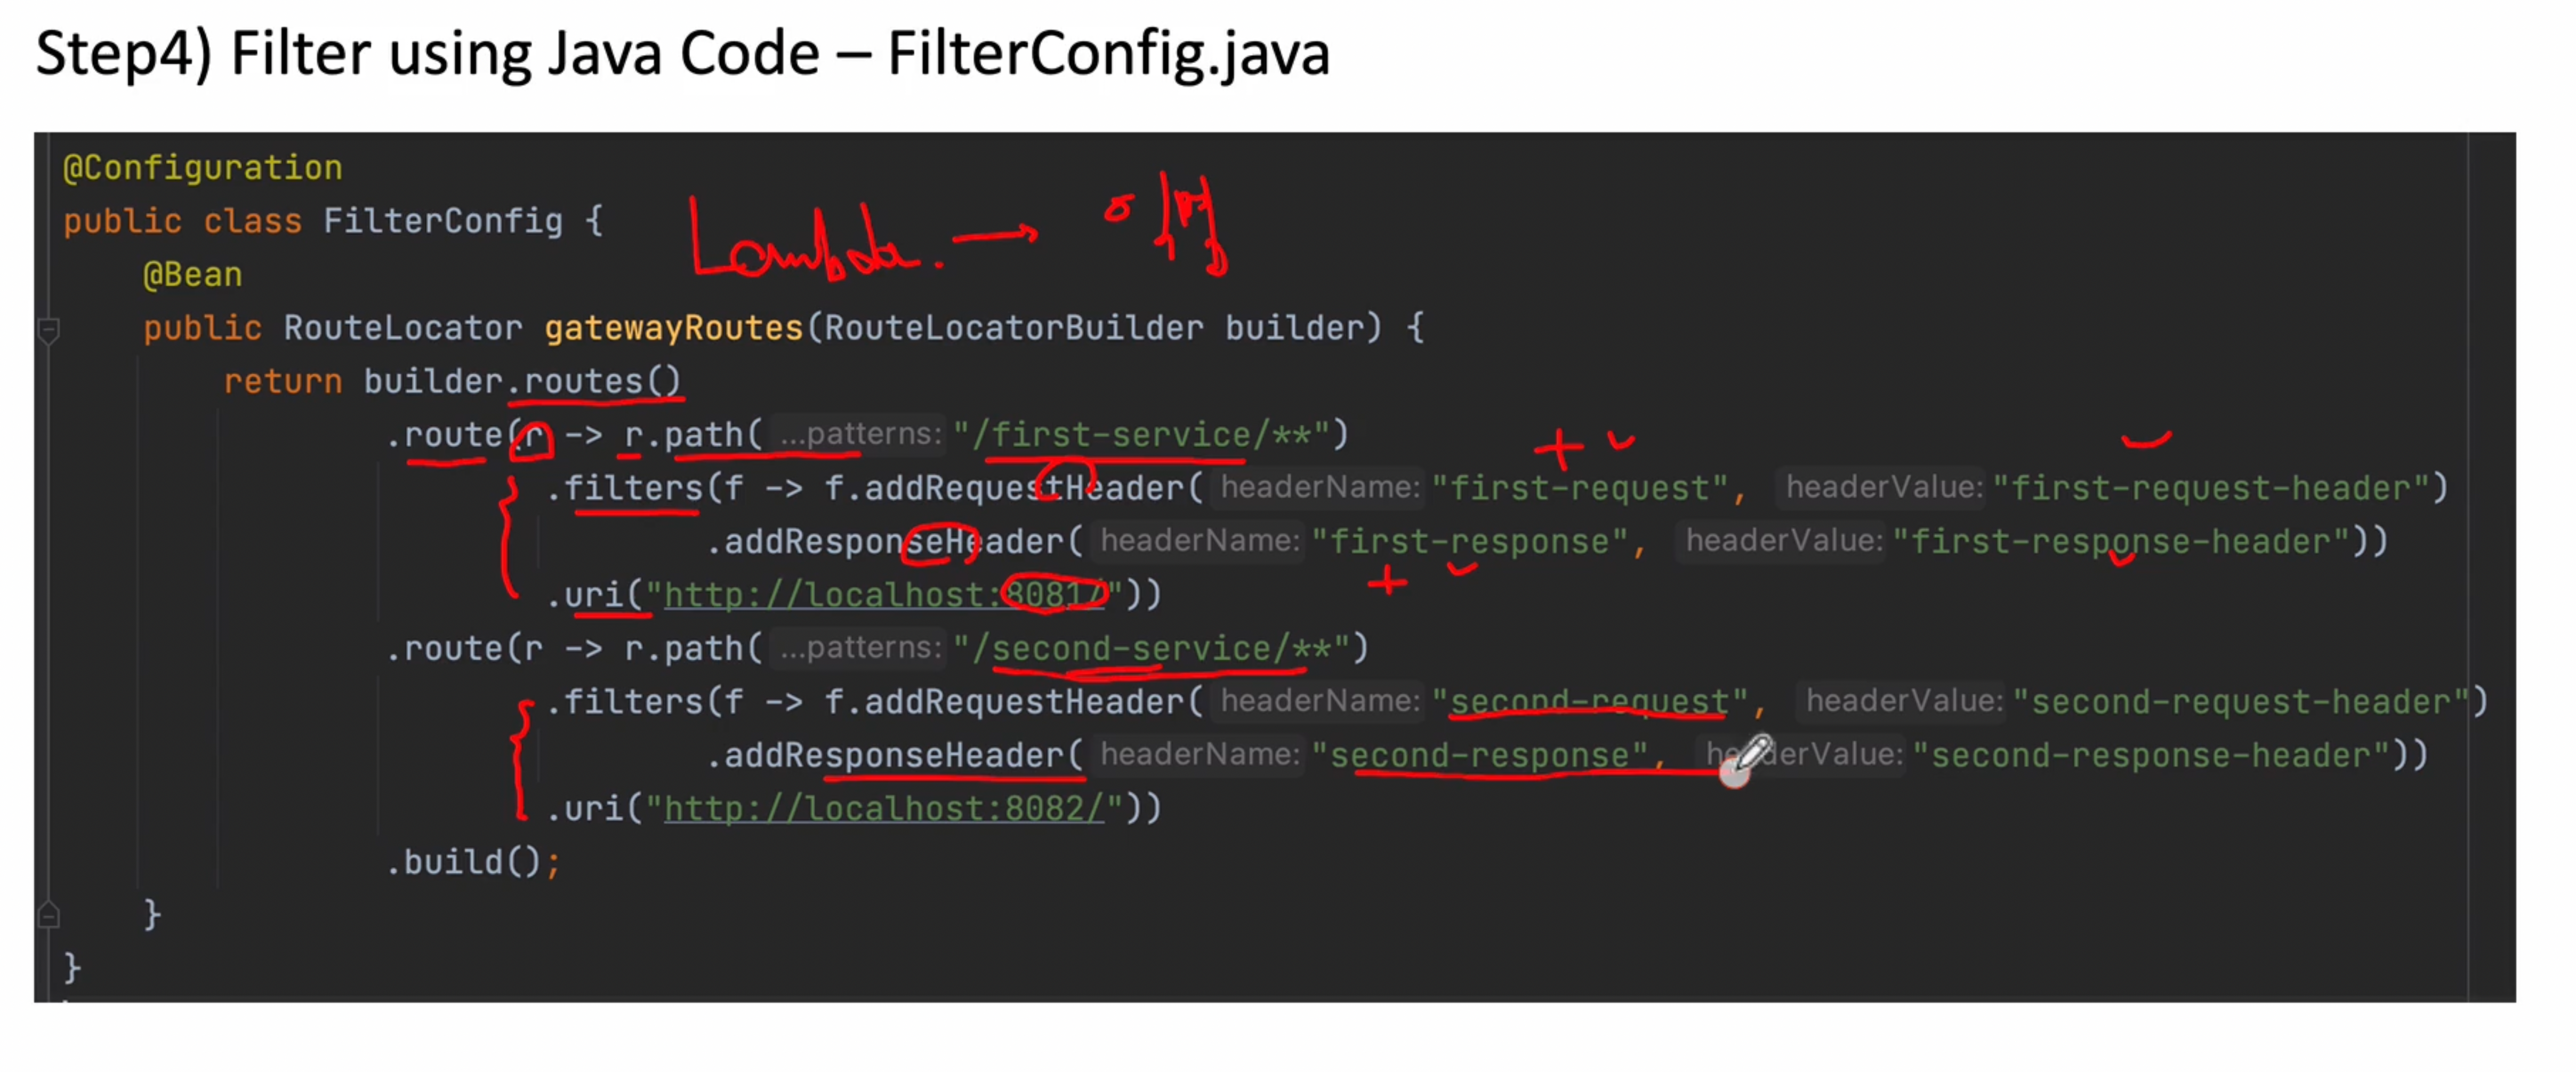
그 이후 마이크로서비스쪽에 작업을 해주면 된다
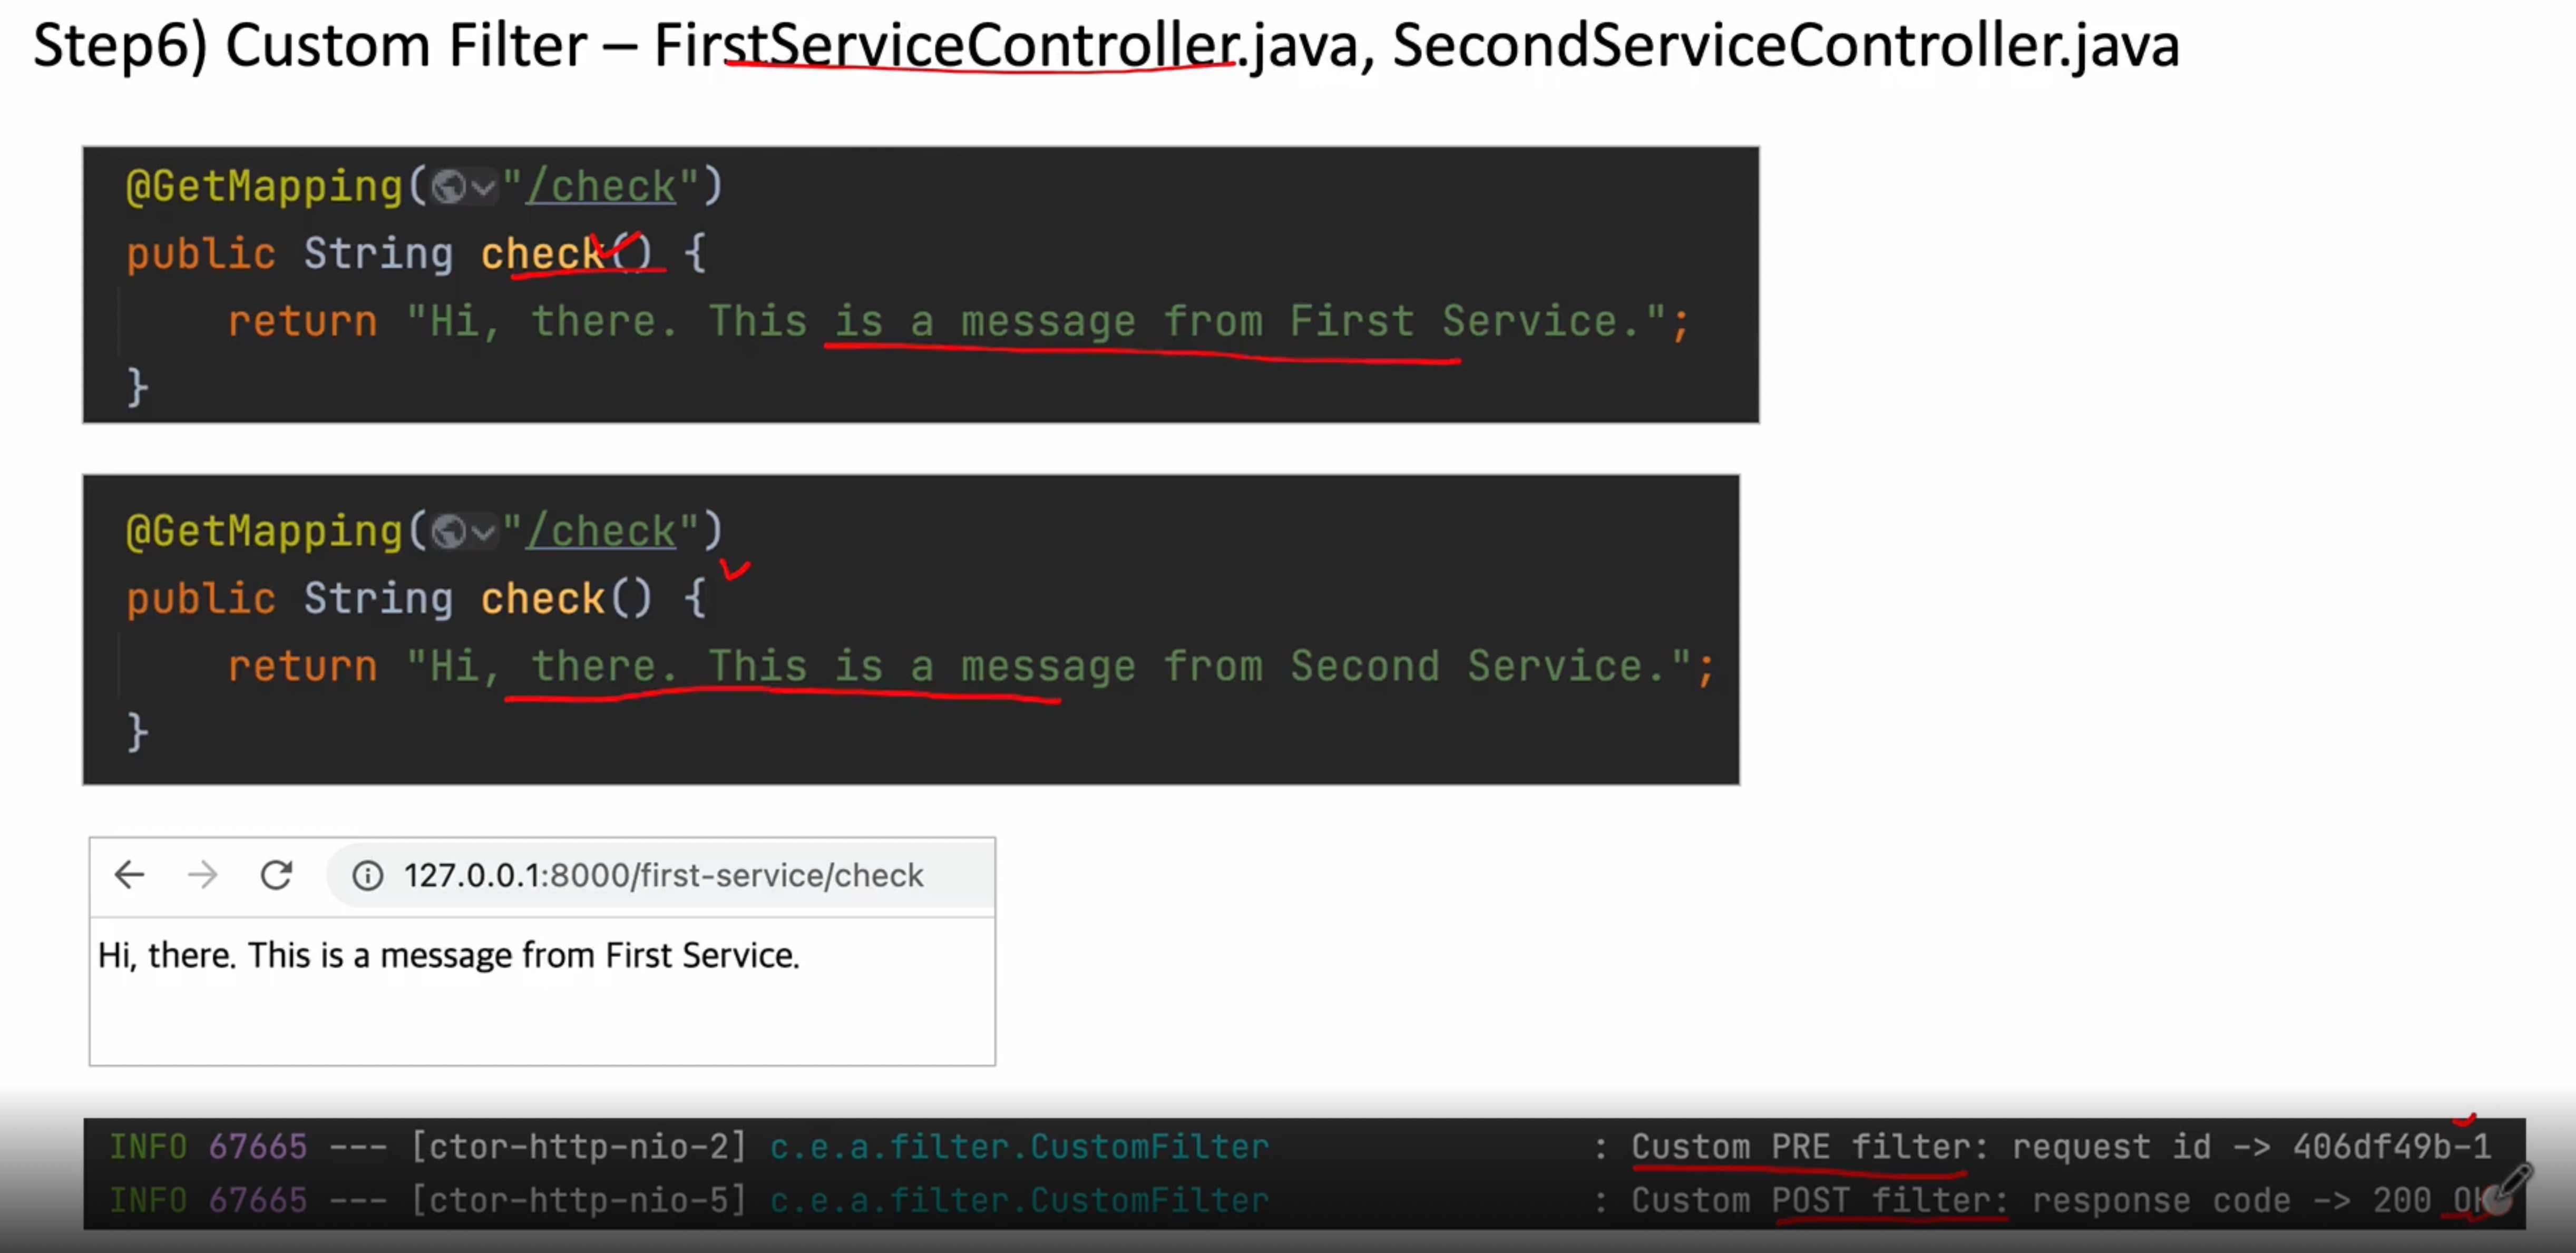
[FirstServiceController.java] , [SecondServiceController.java] 작업 진행
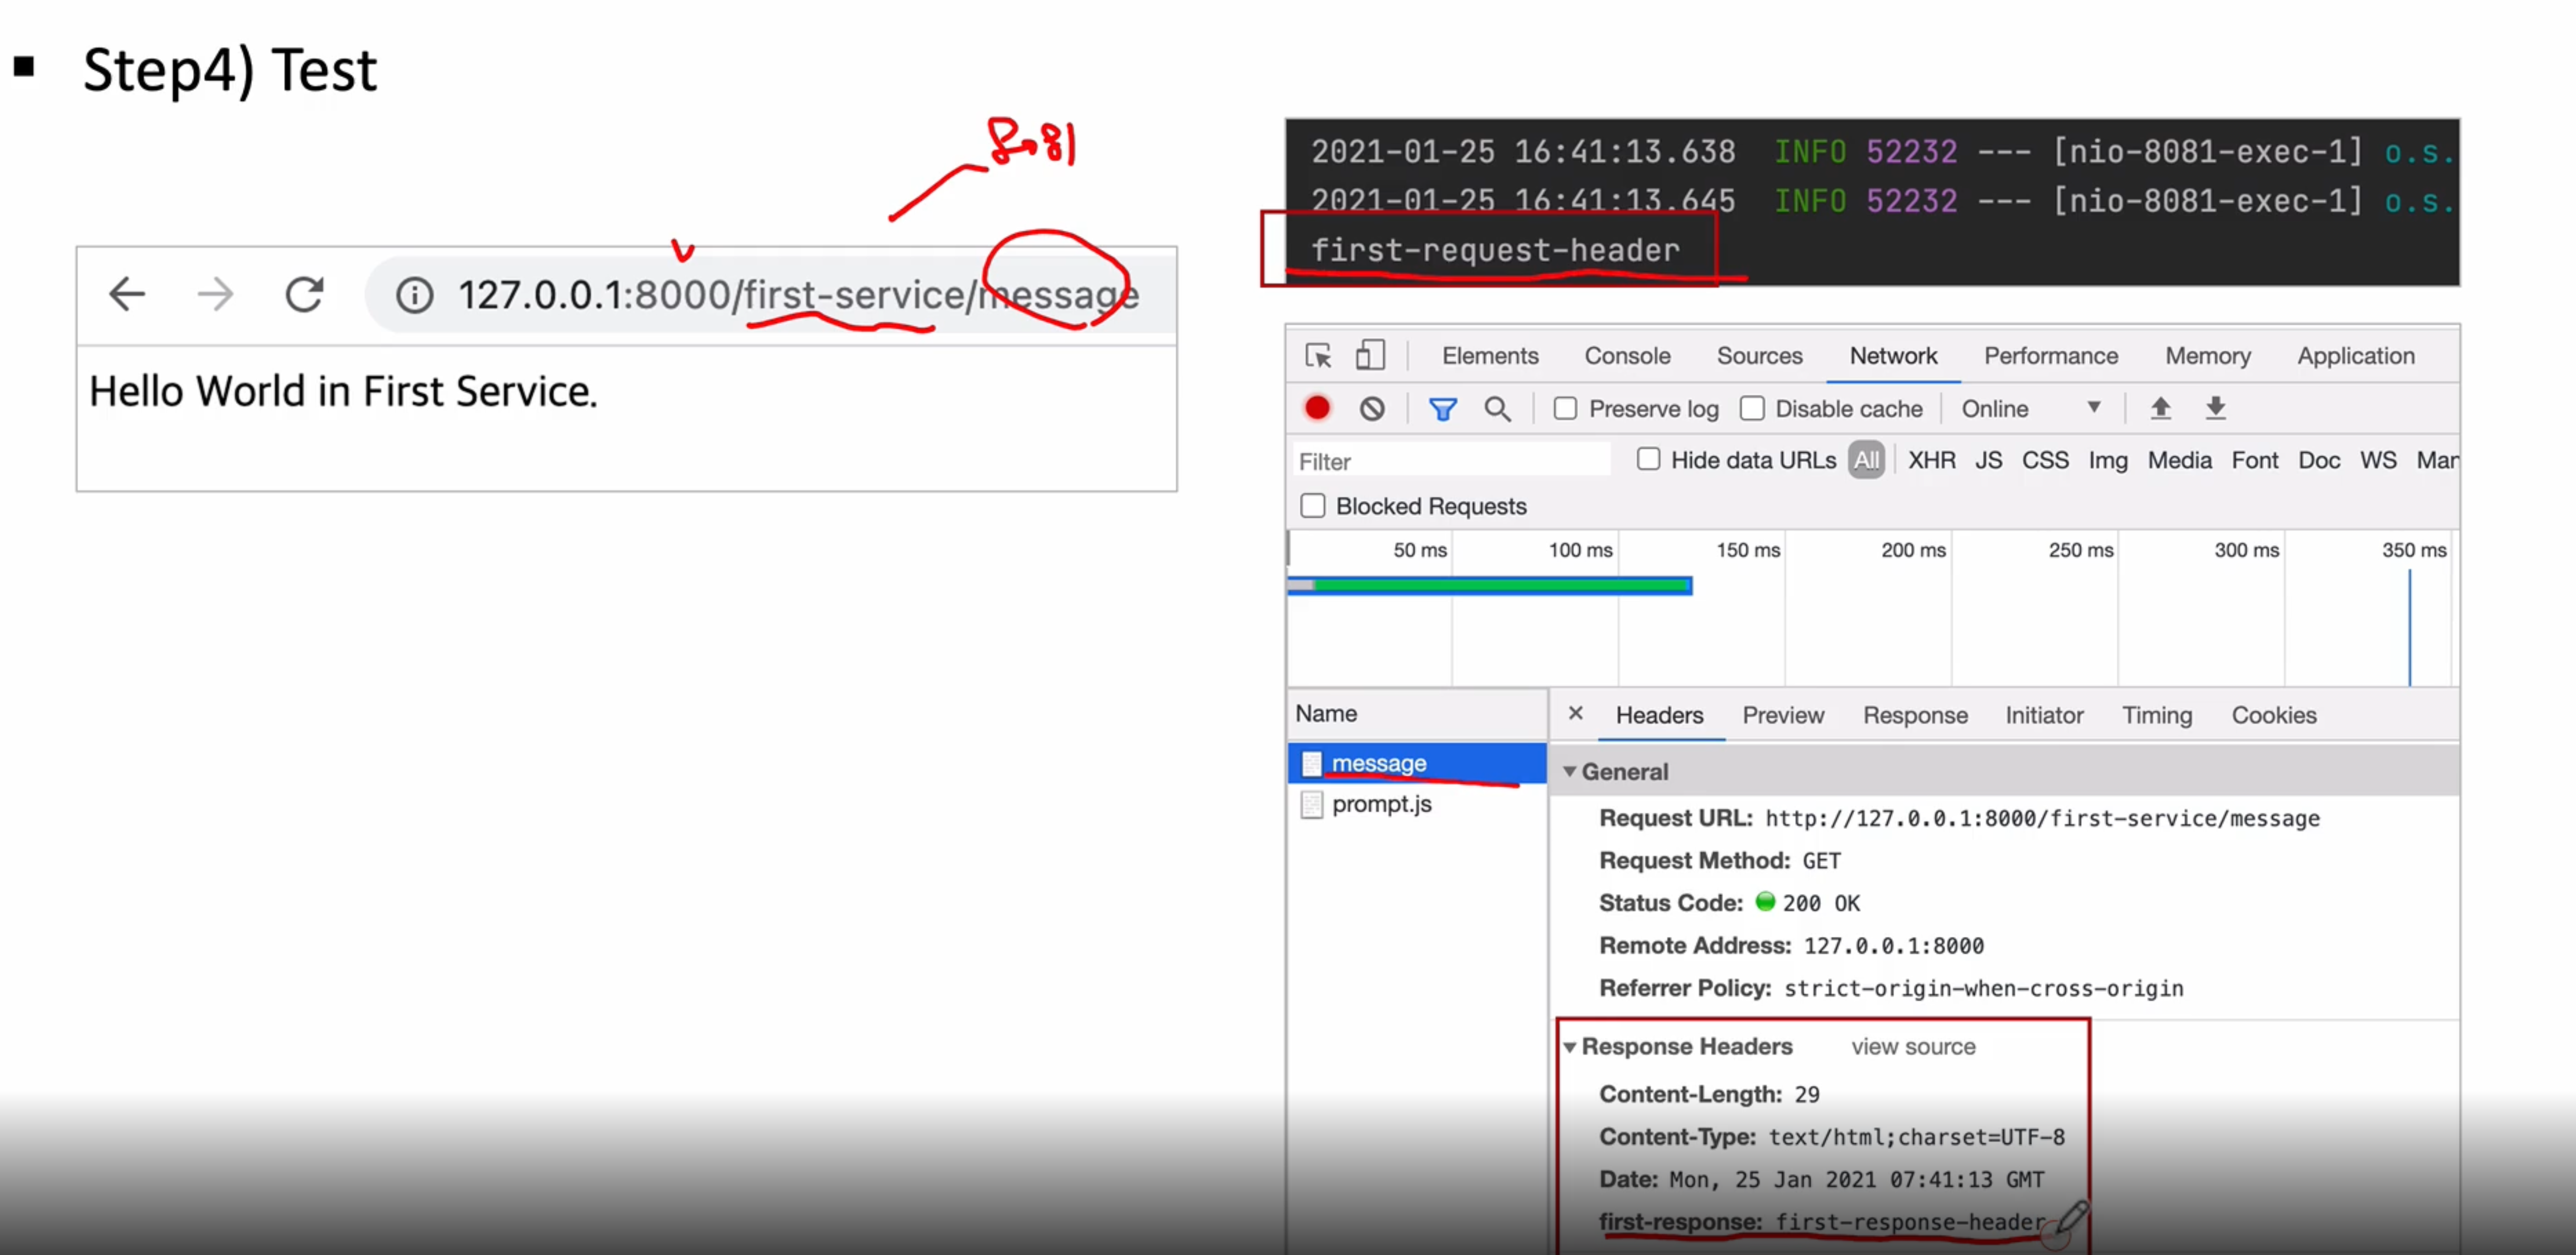
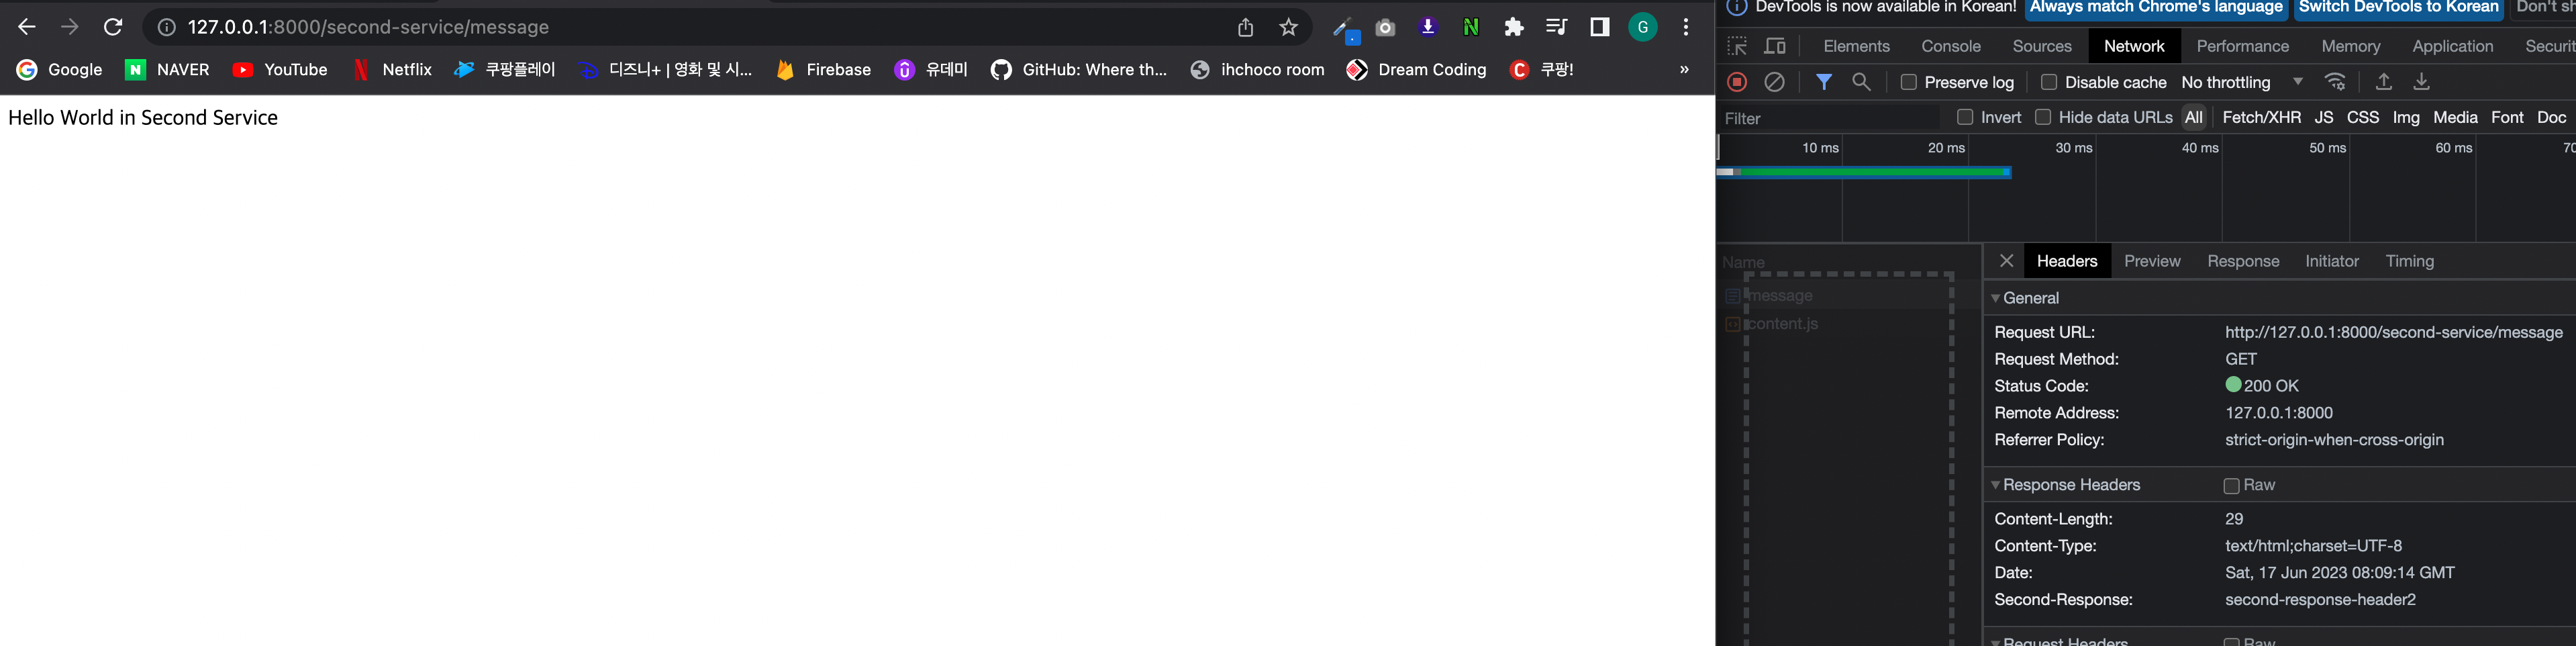
즉 테스트를 해보면 URL(127.0.0.1:8000/first-service/message) 라고 요청을 하면 아래와 같이 출력되도록 하겠다
위 라우팅 작업을 자바 코드에 의해서 진행하도록 하겠다
[기존에 만들었던 프로젝트 apigateway-service에 있는 ]
위에 application.yml 파일에 작성했던 부분 주석 처리
server:
  port: 8000

eureka:
  client:
    register-with-eureka: false
    fetch-registry: false
    service-url:
      defaultZone: http://localhost:8761/eureka

#spring:
#  application:
#    name: apigateway-service
#  cloud:
#    gateway:
#      routes:
#        - id: first-service
#          uri: http://localhost:8081/
#          predicates:
#            - Path=/first-service/**
#        - id: second-service
#          uri: http://localhost:8082/
#          predicates:
#            - Path=/second-service/**
위 부분을 자바 코드로 변환
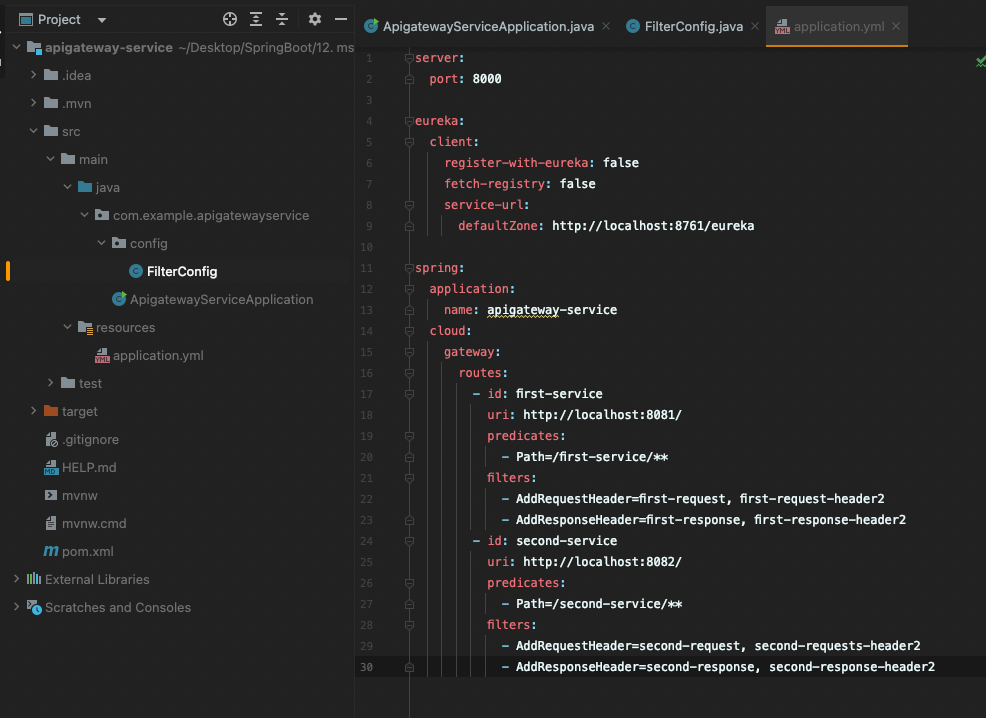
먼저 com.example.apigatewayservice 아래에 config 패키지를 생성 후 FilterConfig 클래스 생성
[기본 구조]
package com.example.apigatewayservice.config;

import org.springframework.cloud.gateway.route.RouteLocator;
import org.springframework.cloud.gateway.route.builder.RouteLocatorBuilder;
import org.springframework.context.annotation.Bean;
import org.springframework.context.annotation.Configuration;

@Configuration
public class FilterConfig {
    @Bean
    public RouteLocator gatewayRoutes(RouteLocatorBuilder builder){
        return builder.routes()
                .route(r -> r.path()
                        .filters()
                        .uri())
                .build();
    }
}
package com.example.apigatewayservice.config;

import org.springframework.cloud.gateway.route.RouteLocator;
import org.springframework.cloud.gateway.route.builder.RouteLocatorBuilder;
import org.springframework.context.annotation.Bean;
import org.springframework.context.annotation.Configuration;

@Configuration
public class FilterConfig {
    @Bean
    public RouteLocator gatewayRoutes(RouteLocatorBuilder builder){
        return builder.routes()
                .route(r -> r.path("/first-service/**")
                        .filters(f -> f.addRequestHeader("", "")
                                      .addResponseHeader("", ""))
                        .uri("http://localhost:8081"))
                .build();
    }
}
filter에 헤더 추가
package com.example.apigatewayservice.config;

import org.springframework.cloud.gateway.route.RouteLocator;
import org.springframework.cloud.gateway.route.builder.RouteLocatorBuilder;
import org.springframework.context.annotation.Bean;
import org.springframework.context.annotation.Configuration;

@Configuration
public class FilterConfig {
    @Bean
    public RouteLocator gatewayRoutes(RouteLocatorBuilder builder){
        return builder.routes()
                .route(r -> r.path("/first-service/**")
                        .filters(f -> f.addRequestHeader("first-request", "first-request-header")
                                      .addResponseHeader("first-response", "first-response-header"))
                        .uri("http://localhost:8081"))
                .build();
    }
}
체이닝을 사용해서 두번째 서비스도 등록
@Configuration
public class FilterConfig {
    @Bean
    public RouteLocator gatewayRoutes(RouteLocatorBuilder builder){
        return builder.routes()
                .route(r -> r.path("/first-service/**")
                        .filters(f -> f.addRequestHeader("first-request", "first-request-header")
                                      .addResponseHeader("first-response", "first-response-header"))
                        .uri("http://localhost:8081"))
                .route(r -> r.path("/second-service/**")
                        .filters(f -> f.addRequestHeader("second-request", "first-request-header")
                                .addResponseHeader("second-response", "first-response-header"))
                        .uri("http://localhost:8082"))
                .build();
    }
}
이렇게 작성 한 후 FirstServiceController를 수정
[기존 코드]
package com.example.firstservice;

import org.springframework.web.bind.annotation.GetMapping;
import org.springframework.web.bind.annotation.RequestMapping;
import org.springframework.web.bind.annotation.RestController;

// http://localhost:8081/welcome 우리가 만든 프로젝트가 받기로 한 URI
// 하지만 API-GATEWAY를 통해서 전달받을 때에는 http://locahost:8081/first-service/welcome 이렇게 받기 때문에 에러가 발생
@RestController
@RequestMapping("/first-service")
public class FirstServiceController {
    @GetMapping("/welcome")
    public String welcome(){
       return "Welcome to the First Service";
    }
}
[추가 코드]
@RestController
@RequestMapping("/first-service")
public class FirstServiceController {
    @GetMapping("/welcome")
    public String welcome(){
       return "Welcome to the First Service";
    }

    //이 부분 추가
    @GetMapping("/message")
    public String message(@RequestHeader("first-rquest") String header){


    }
}
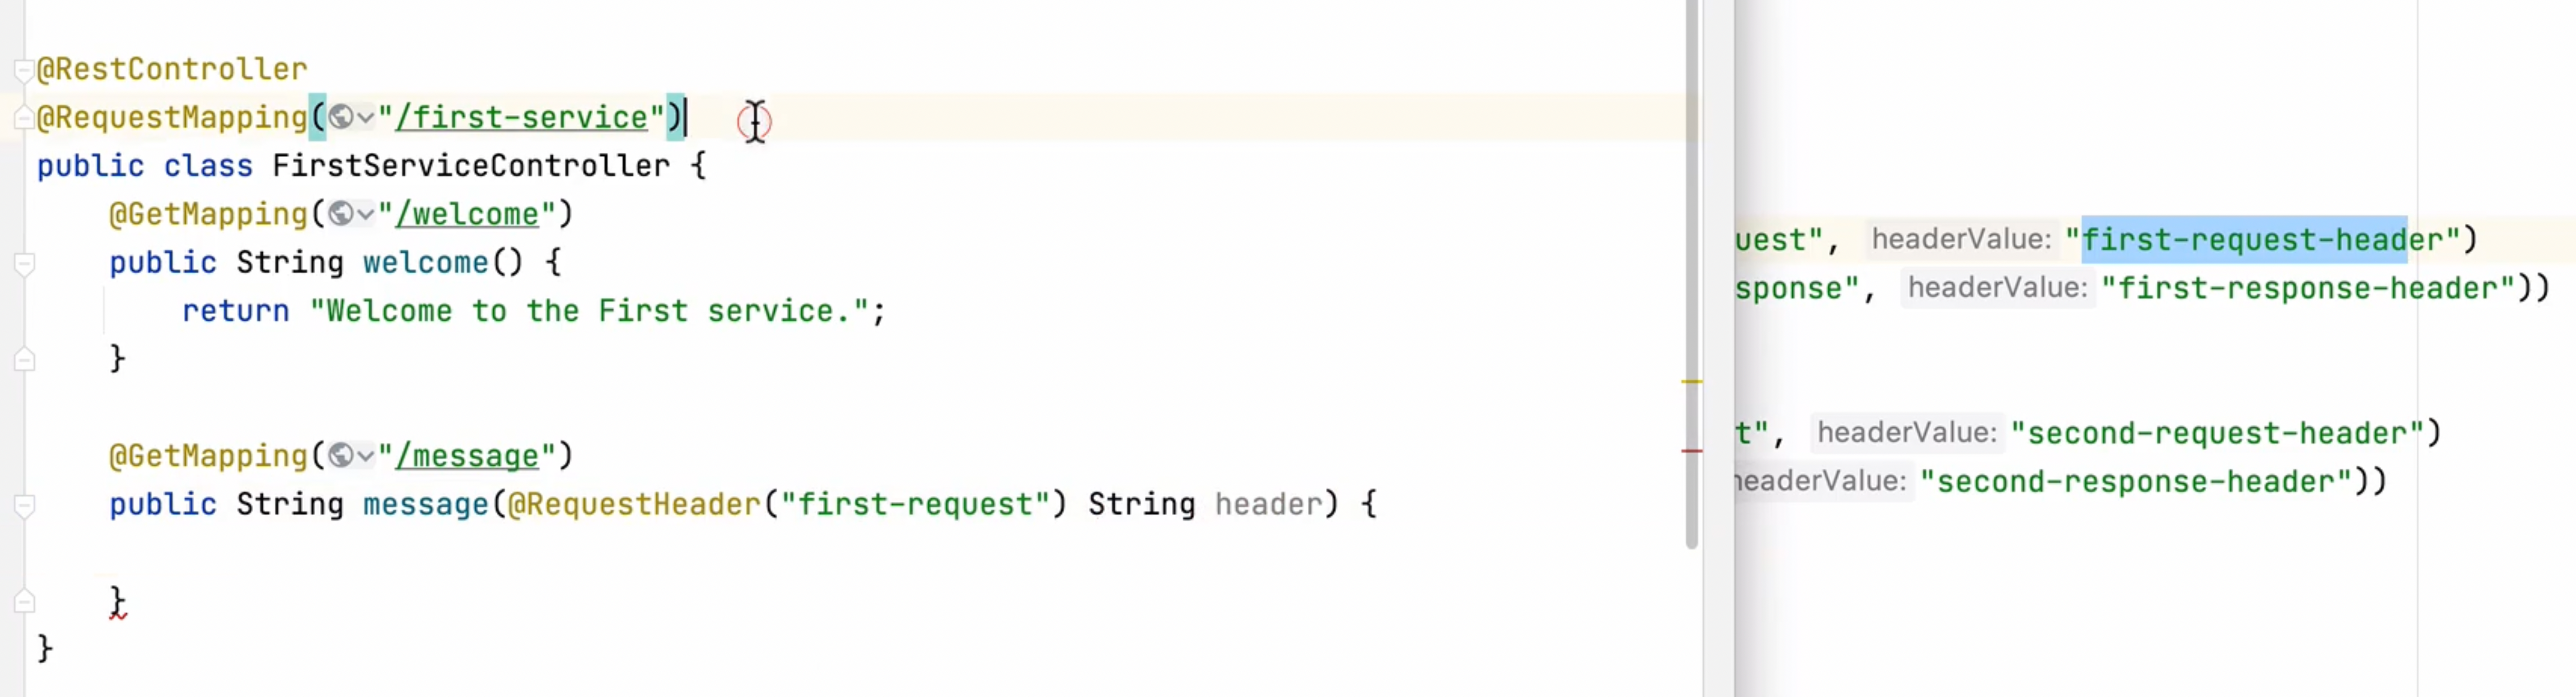
여기서 아까 만들었던 headerValue가 public String message(@RequestHeader(“first-request”) String header) 부분에 들어간다
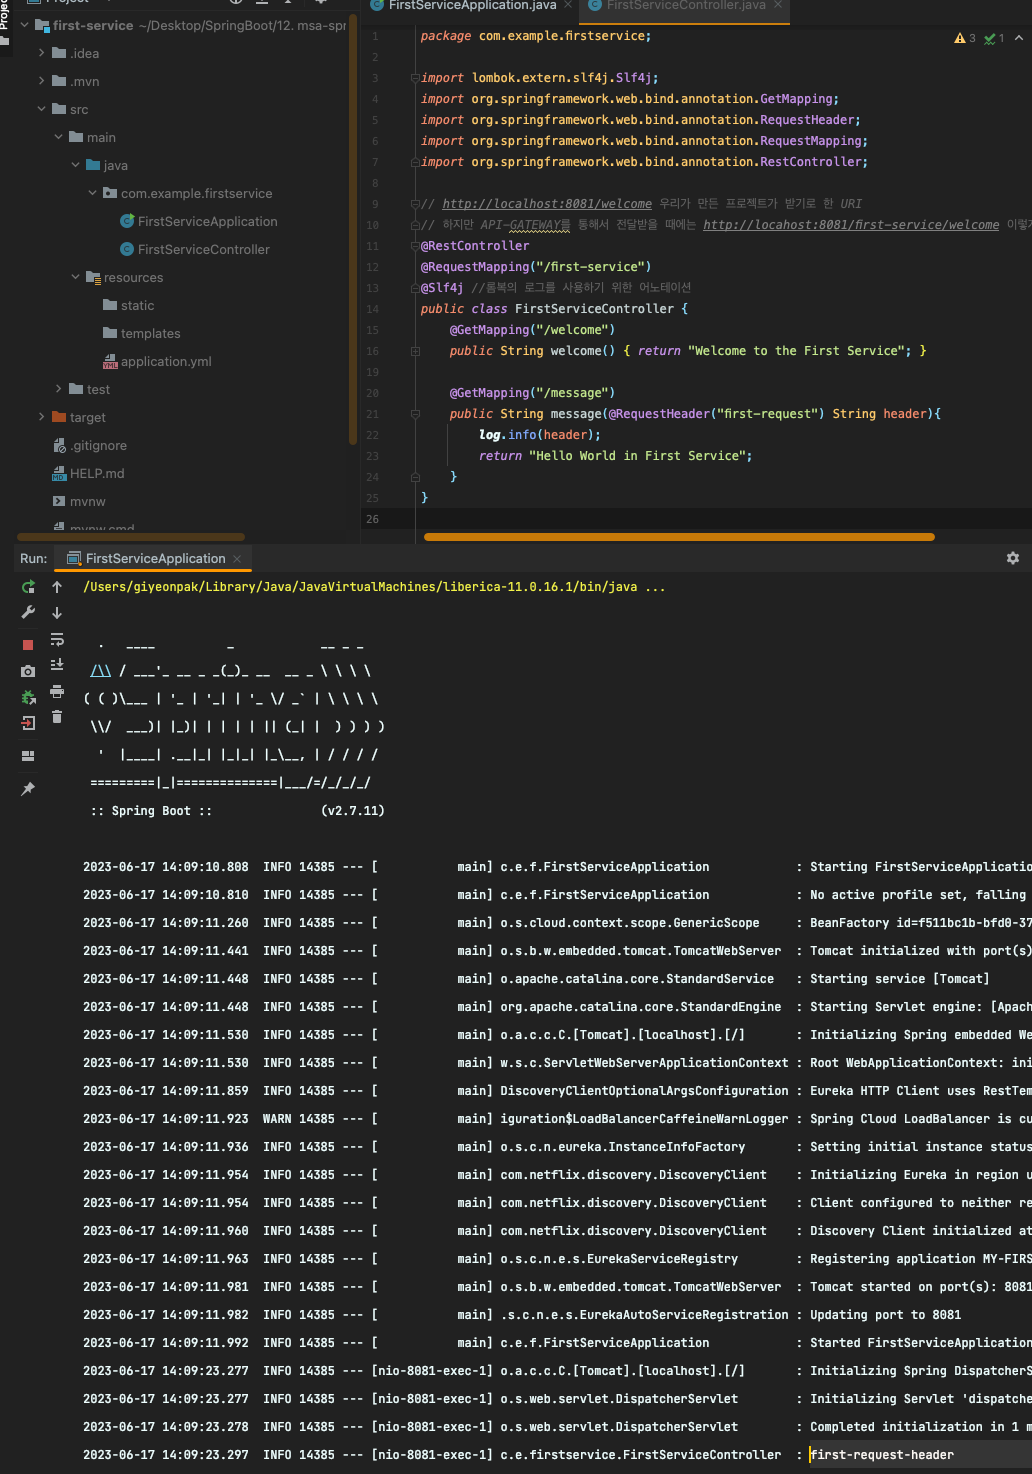
[참고] @Slf4j //롬복의 로그를 사용하기 위한 어노테이션
메세지 로그를 남기기 위해 사용
package com.example.firstservice;

import lombok.extern.slf4j.Slf4j;
import org.springframework.web.bind.annotation.GetMapping;
import org.springframework.web.bind.annotation.RequestHeader;
import org.springframework.web.bind.annotation.RequestMapping;
import org.springframework.web.bind.annotation.RestController;

// http://localhost:8081/welcome 우리가 만든 프로젝트가 받기로 한 URI
// 하지만 API-GATEWAY를 통해서 전달받을 때에는 http://locahost:8081/first-service/welcome 이렇게 받기 때문에 에러가 발생
@RestController
@RequestMapping("/first-service")
@Slf4j //롬복의 로그를 사용하기 위한 어노테이션
public class FirstServiceController {
    @GetMapping("/welcome")
    public String welcome(){
       return "Welcome to the First Service";
    }

    @GetMapping("/message")
    public String message(@RequestHeader("first-request") String header){
        log.info(header);
        return "Hello World in First Service";
    }
}
위와 동일하게 SecondService쪽도 작업 해주기
package com.example.secondservice;

import lombok.extern.slf4j.Slf4j;
import org.springframework.web.bind.annotation.GetMapping;
import org.springframework.web.bind.annotation.RequestHeader;
import org.springframework.web.bind.annotation.RequestMapping;
import org.springframework.web.bind.annotation.RestController;

@RestController
@RequestMapping("/second-service")
@Slf4j
public class SecondServiceController {
    @GetMapping("/welcome")
    public String welcome(){
       return "Welcome to the Second Service";
    }

    @GetMapping("/message")
    public String message(@RequestHeader("second-request") String header){
        log.info(header);
        return "Hello World in Second Service";
    }

}

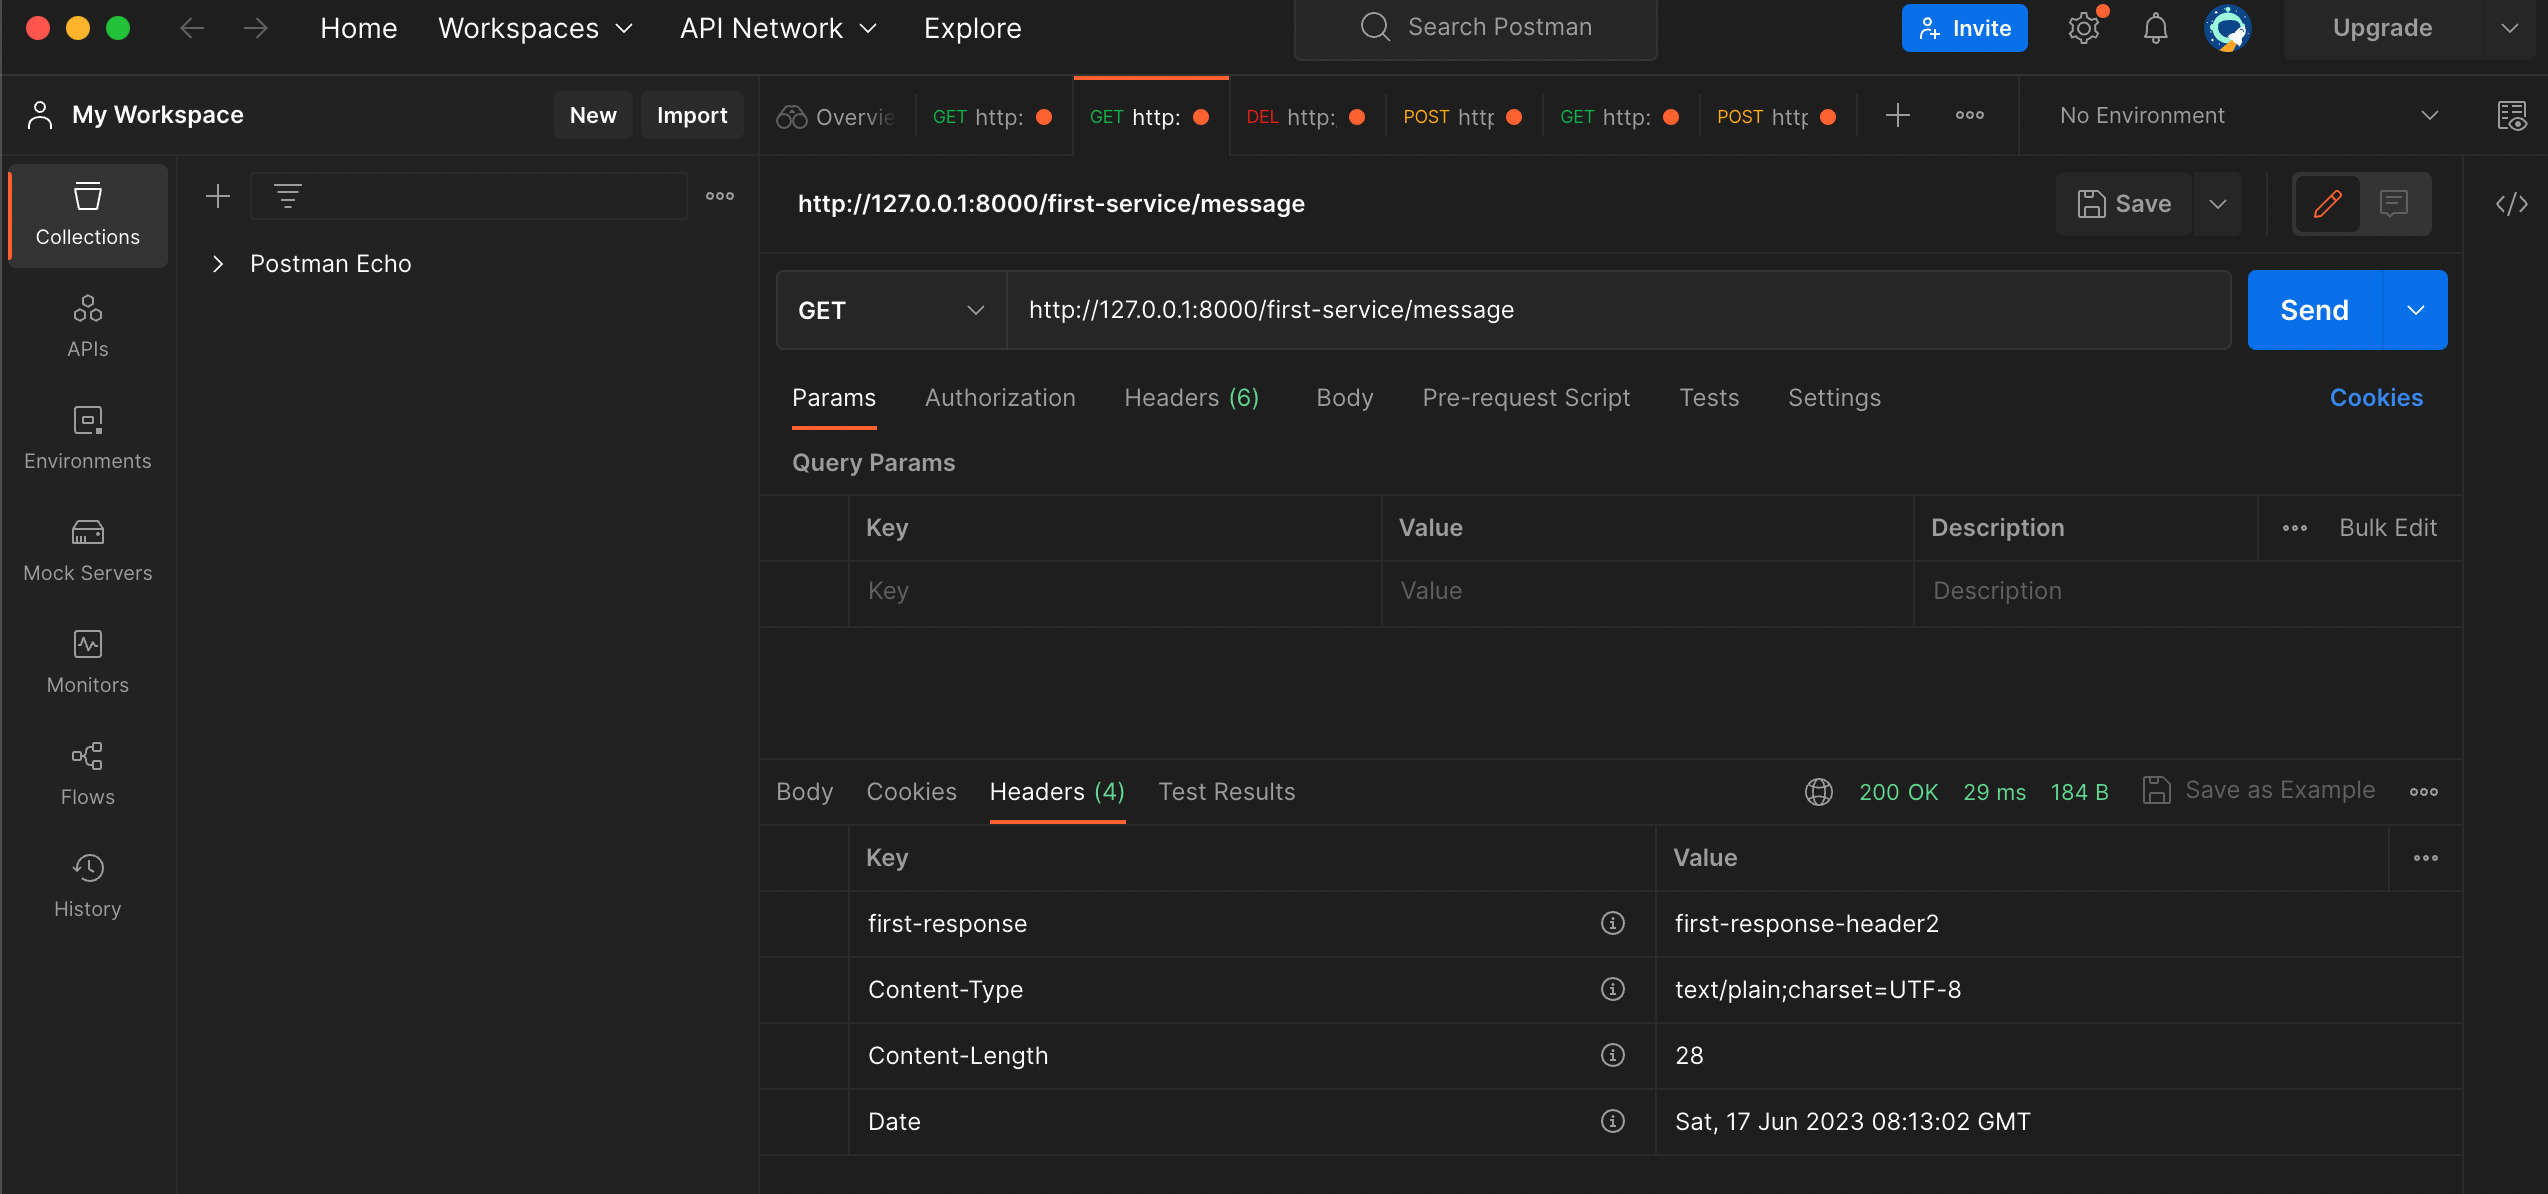
이렇게 하면 정상적으로 출력 되는 것을 확인할 수 있다
로그에 first-request-header도 정상적으로 출력
그런데 위에 FilterConfig 클래스는 이런게 있다 정도만 쓰는거고 사용X => 때문에 일단 @Configuration, @Bean을 주석 처리 하자
// @Configuration
public class FilterConfig {
    //Bean
    public RouterLocator gatewayRoutes(RouteLocatorBuilder builder){

    }
}
이 상태로 실행해보면 똑같은 URI 입력해도 아무것도 안나오는것을 확인 할 수 있다
[기존 코드]
server:
  port: 8000

eureka:
  client:
    register-with-eureka: false
    fetch-registry: false
    service-url:
      defaultZone: http://localhost:8761/eureka

#spring:
#  application:
#    name: apigateway-service
#  cloud:
#    gateway:
#      routes:
#        - id: first-service
#          uri: http://localhost:8081/
#          predicates:
#            - Path=/first-service/**
#        - id: second-service
#          uri: http://localhost:8082/
#          predicates:
#            - Path=/second-service/**
주석 풀고 filters 추가해주자
server:
  port: 8000

eureka:
  client:
    register-with-eureka: false
    fetch-registry: false
    service-url:
      defaultZone: http://localhost:8761/eureka

spring:
  application:
    name: apigateway-service
  cloud:
    gateway:
      routes:
        - id: first-service
          uri: http://localhost:8081/
          predicates:
            - Path=/first-service/**
          filters:
            - AddRequestHeader=first-request, first-request-header2
            - AddResponseHeader=first-response, first-response-header2
        - id: second-service
          uri: http://localhost:8082/
          predicates:
            - Path=/second-service/**
          filters:
            - AddRequestHeader=second-request, second-requests-header2
            - AddResponseHeader=second-response, second-response-header2
이렇게 해주면 위 자바 코드와 동일하게 header에 추가되는것을 확인 할 수 있다
7장. Spring Cloud Gateway - Custom Filter
커스텀 필터 = 자유롭게 로그남기기, 인증 처리, 키 등 처리를 할 수 있는것
- @Component
- Slf4j
- AbstractGatewayFilterFactory 상속
- public GatewayFilter apply(Config config) 오버라이드
우리가 작성하고자 하는 내용을 apply에 작성하면 된다
사용자가 로그인 했을때 토큰을 받고 그것을 계속 JSON으로 가지고 다니는 것을 JWT라고 하는데 이것을 잘 작동하고 있는지 확인하는것을 만들어보자
기존에 사용했던 ServletRquest, ServletResponse를 스프링 5 부터는 더이상 사용하지 않고 ServerHttpRequest, response를 사용한다
이제 실제 코드를 완성하러 가자
apigateway에서 com.example.apigatewayservice아래에 filter 패키지를 만들고 CustomFilter 클래스를 생성
package com.example.apigatewayservice.filter;
import lombok.extern.slf4j.Slf4j;
import org.springframework.cloud.gateway.filter.GatewayFilter;
import org.springframework.cloud.gateway.filter.factory.AbstractGatewayFilterFactory;
import org.springframework.http.server.reactive.ServerHttpRequest;
import org.springframework.http.server.reactive.ServerHttpResponse;
import org.springframework.stereotype.Component;
import reactor.core.publisher.Mono;
@Component
@Slf4j
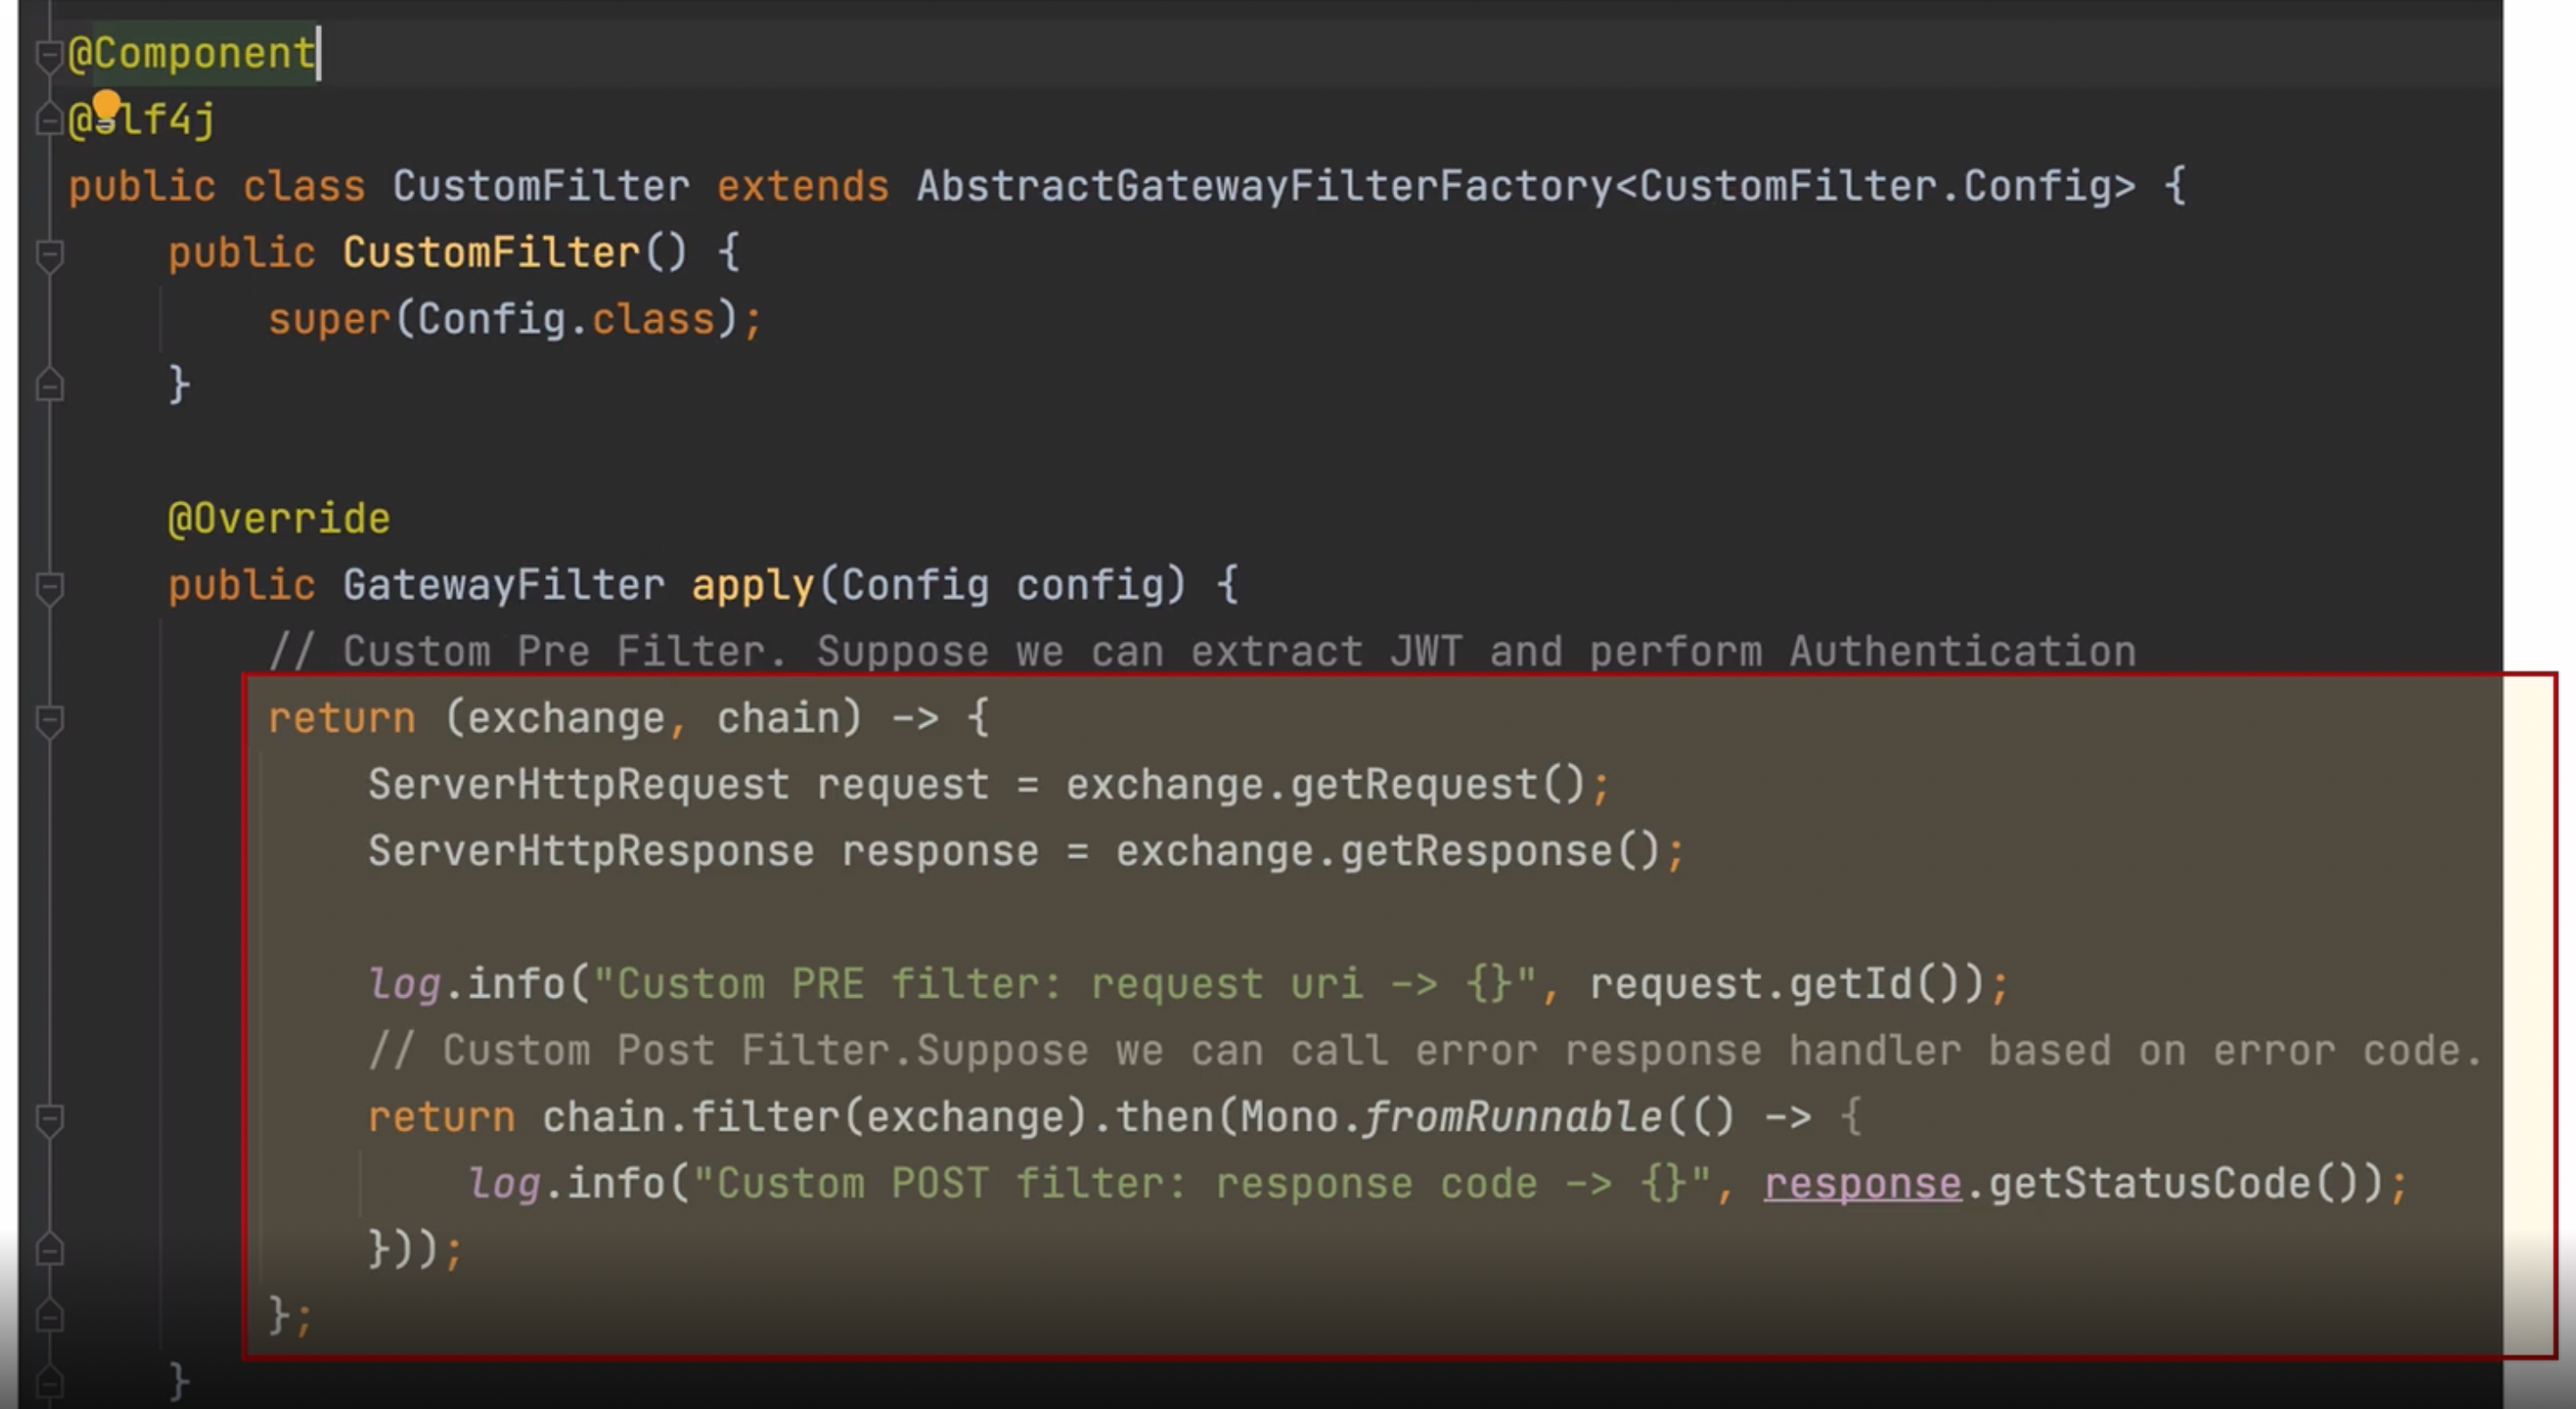
public class CustomFilter extends AbstractGatewayFilterFactory<CustomFilter.Config> {
public CustomFilter(){
super(Config.class);
}
@Override
public GatewayFilter apply(Config config) {
return (exchange, chain) -> {
//import시 org.springframework.http.server.reactive.ServerHttpRequest;
ServerHttpRequest request = exchange.getRequest();
ServerHttpResponse response = exchange.getResponse();
log.info("Custom PRE Filter : request id -> {}", request.getId());
// Custom Post Filter
return chain.filter(exchange).then(Mono.fromRunnable(() -> {
log.info("Custom Post Filter : response code -> {}", response.getStatusCode());
}));
};
/*
그러면 gateway 필터라는 빈을 하나 등록하고 이 부분은 프리필터, 포스트필터 방식으로 나눠서 작용
람다식에 exchange, chain 객체를 받고
exchange 객체로부터 ServerHttpRequest, response 객체를 받을수 있다
포스트 필터에 반환하는곳 Mono라는 것은 웹플럭스에서 사용하는 것으로 비동기 방식으로 단일 값 전달할때 사용하는것
*/
}
public static class Config{
}
}
이렇게 작업 한 후 기존에 만들었던 yml 파일을 아래와 같이 수정
filters 기존 코드는 주석처리 하고 새로운 커스텀 필터 추가
server:
port: 8000
eureka:
client:
register-with-eureka: false
fetch-registry: false
service-url:
defaultZone: http://localhost:8761/eureka
spring:
application:
name: apigateway-service
cloud:
gateway:
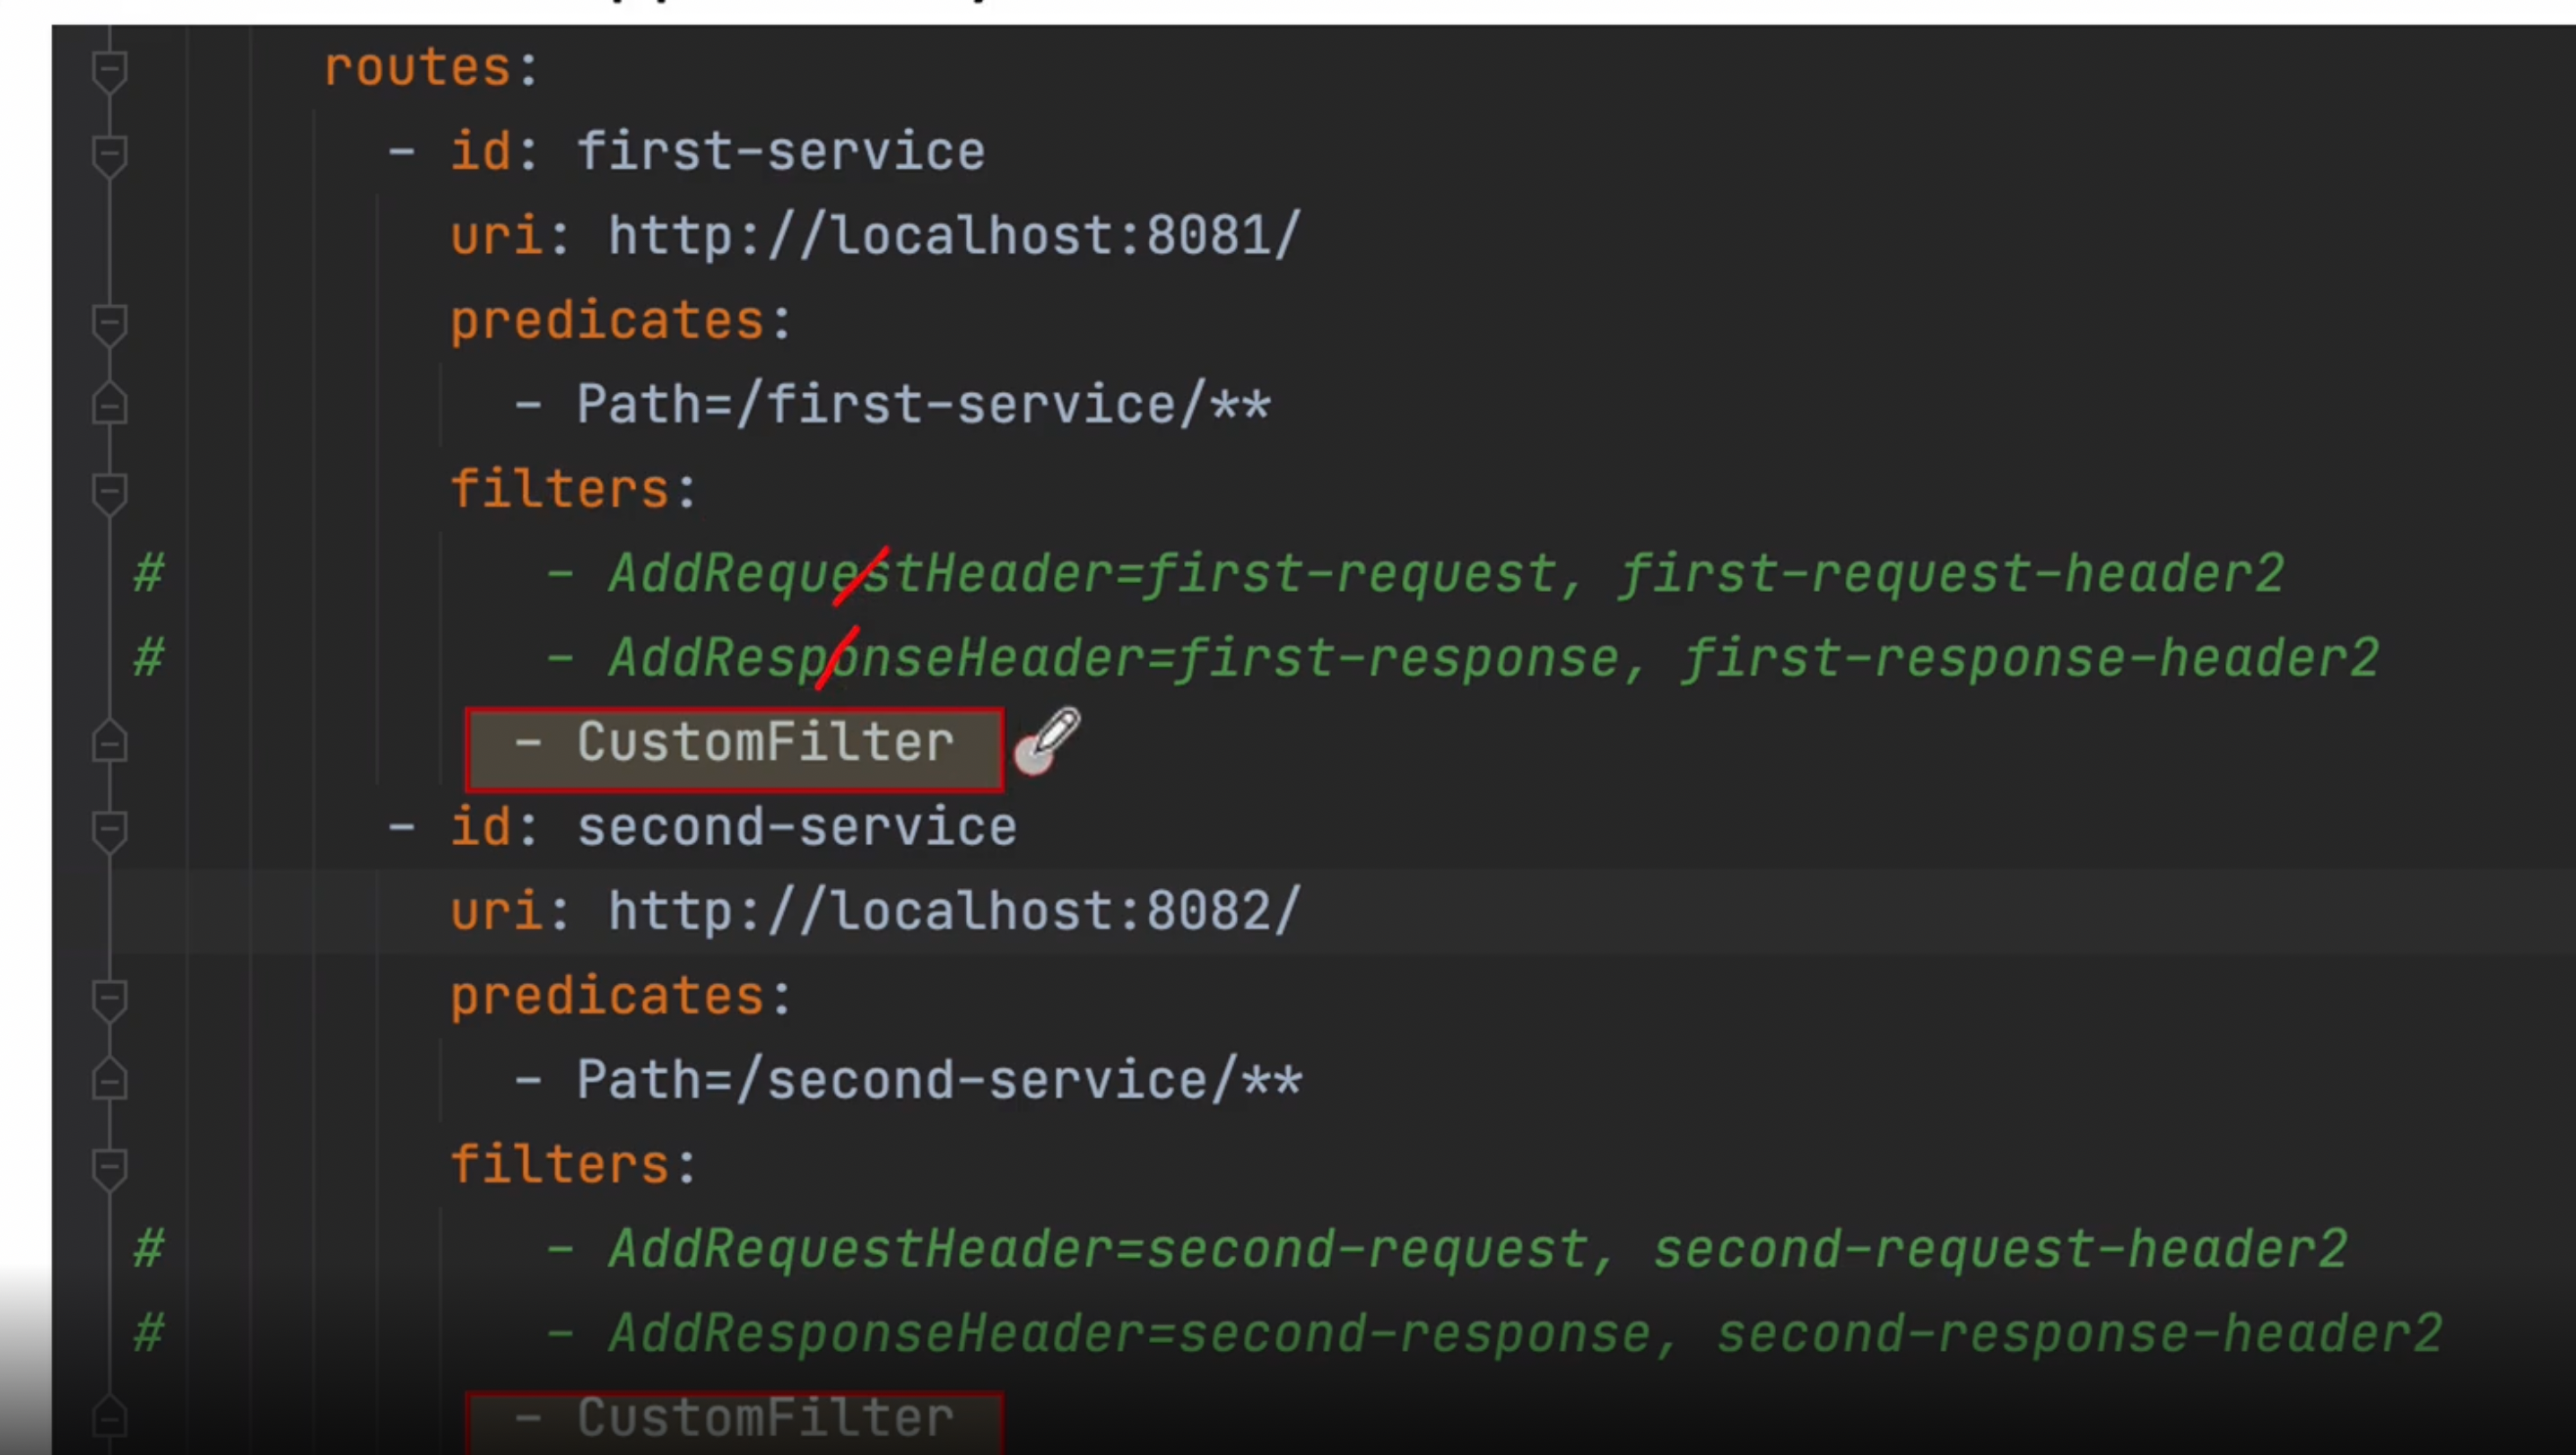
routes:
- id: first-service
uri: http://localhost:8081/
predicates:
- Path=/first-service/**
filters:
# - AddRequestHeader=first-request, first-request-header2
# - AddResponseHeader=first-response, first-response-header2
- CustomFilter
- id: second-service
uri: http://localhost:8082/
predicates:
- Path=/second-service/**
filters:
# - AddRequestHeader=second-request, second-requests-header2
# - AddResponseHeader=second-response, second-response-header2
- CustomFilter
기존 FirstServiceController.java, Second쪽에도 아래에 추가 메서드 생성 필요
package com.example.firstservice;

import lombok.extern.slf4j.Slf4j;
import org.springframework.web.bind.annotation.GetMapping;
import org.springframework.web.bind.annotation.RequestHeader;
import org.springframework.web.bind.annotation.RequestMapping;
import org.springframework.web.bind.annotation.RestController;

// http://localhost:8081/welcome 우리가 만든 프로젝트가 받기로 한 URI
// 하지만 API-GATEWAY를 통해서 전달받을 때에는 http://locahost:8081/first-service/welcome 이렇게 받기 때문에 에러가 발생
@RestController
@RequestMapping("/first-service")
@Slf4j //롬복의 로그를 사용하기 위한 어노테이션
public class FirstServiceController {
    @GetMapping("/welcome")
    public String welcome(){
       return "Welcome to the First Service";
    }

    @GetMapping("/message")
    public String message(@RequestHeader("first-request") String header){
        log.info(header);
        return "Hello World in First Service";
    }

    //여기 추가
    @GetMapping("/check")
    public String check(){
        return "Hi, there. This is a message from Second Service";
    }

}
second에도 동일하게 추가 필요
이렇게 하고 재기동 하면 정상적으로 동작하는 것을 확인 할 수 있음
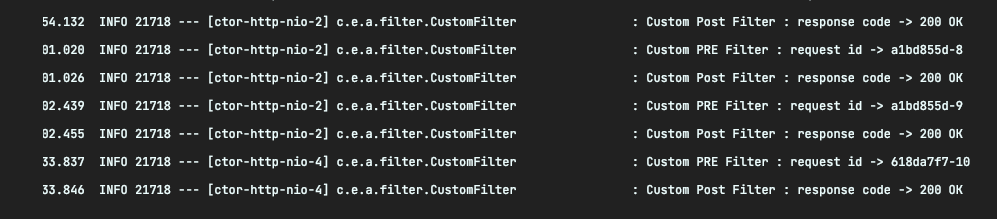
프리 필터 : 사전에 수행
포스트 필터 : 사후에 수행
차후에는 필터를 이용해서 사용자 로그인 기능을 수행해보자
8장. Spring Cloud Gateway - Global Filter
커스텀 필터와 글로벌 필터는 비슷하지만 다르다
커스텀 필터는 만든다음 필요한 부분에 yml과 같이 추가해주어야 하지만
글로벌 필터는 추가하지 않아도 모두 한테 동작한다
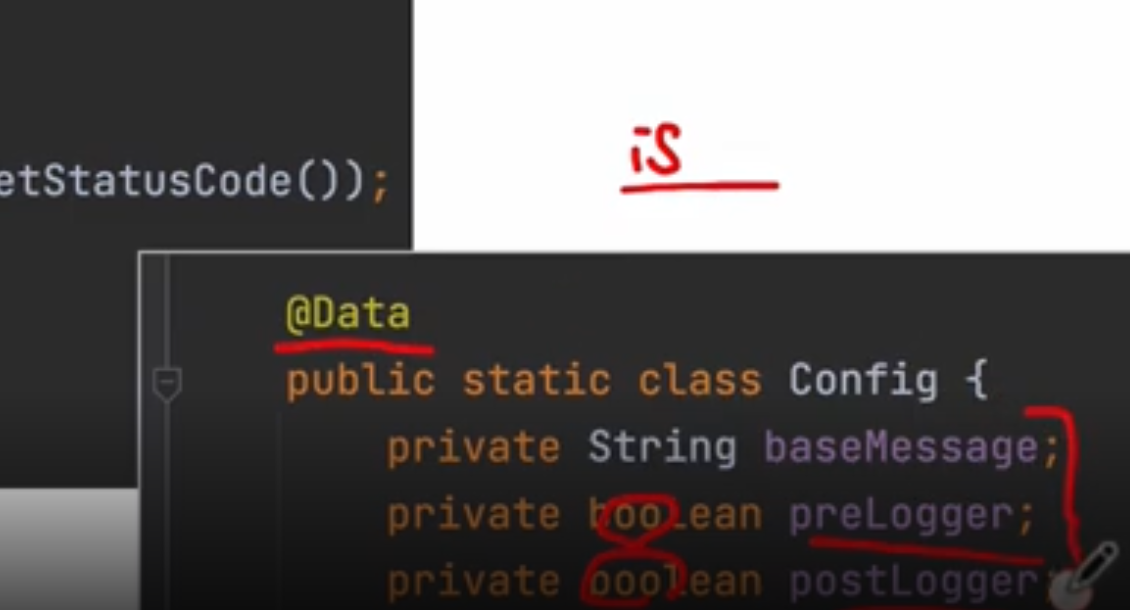
여기서 기초 상식 : @Date, @Setter, @Getter에서 String 타입이 아닌 Boolean타입인 경우 get대신에 is를 앞에 붙인다
isPreLogger();
isPostLogger();
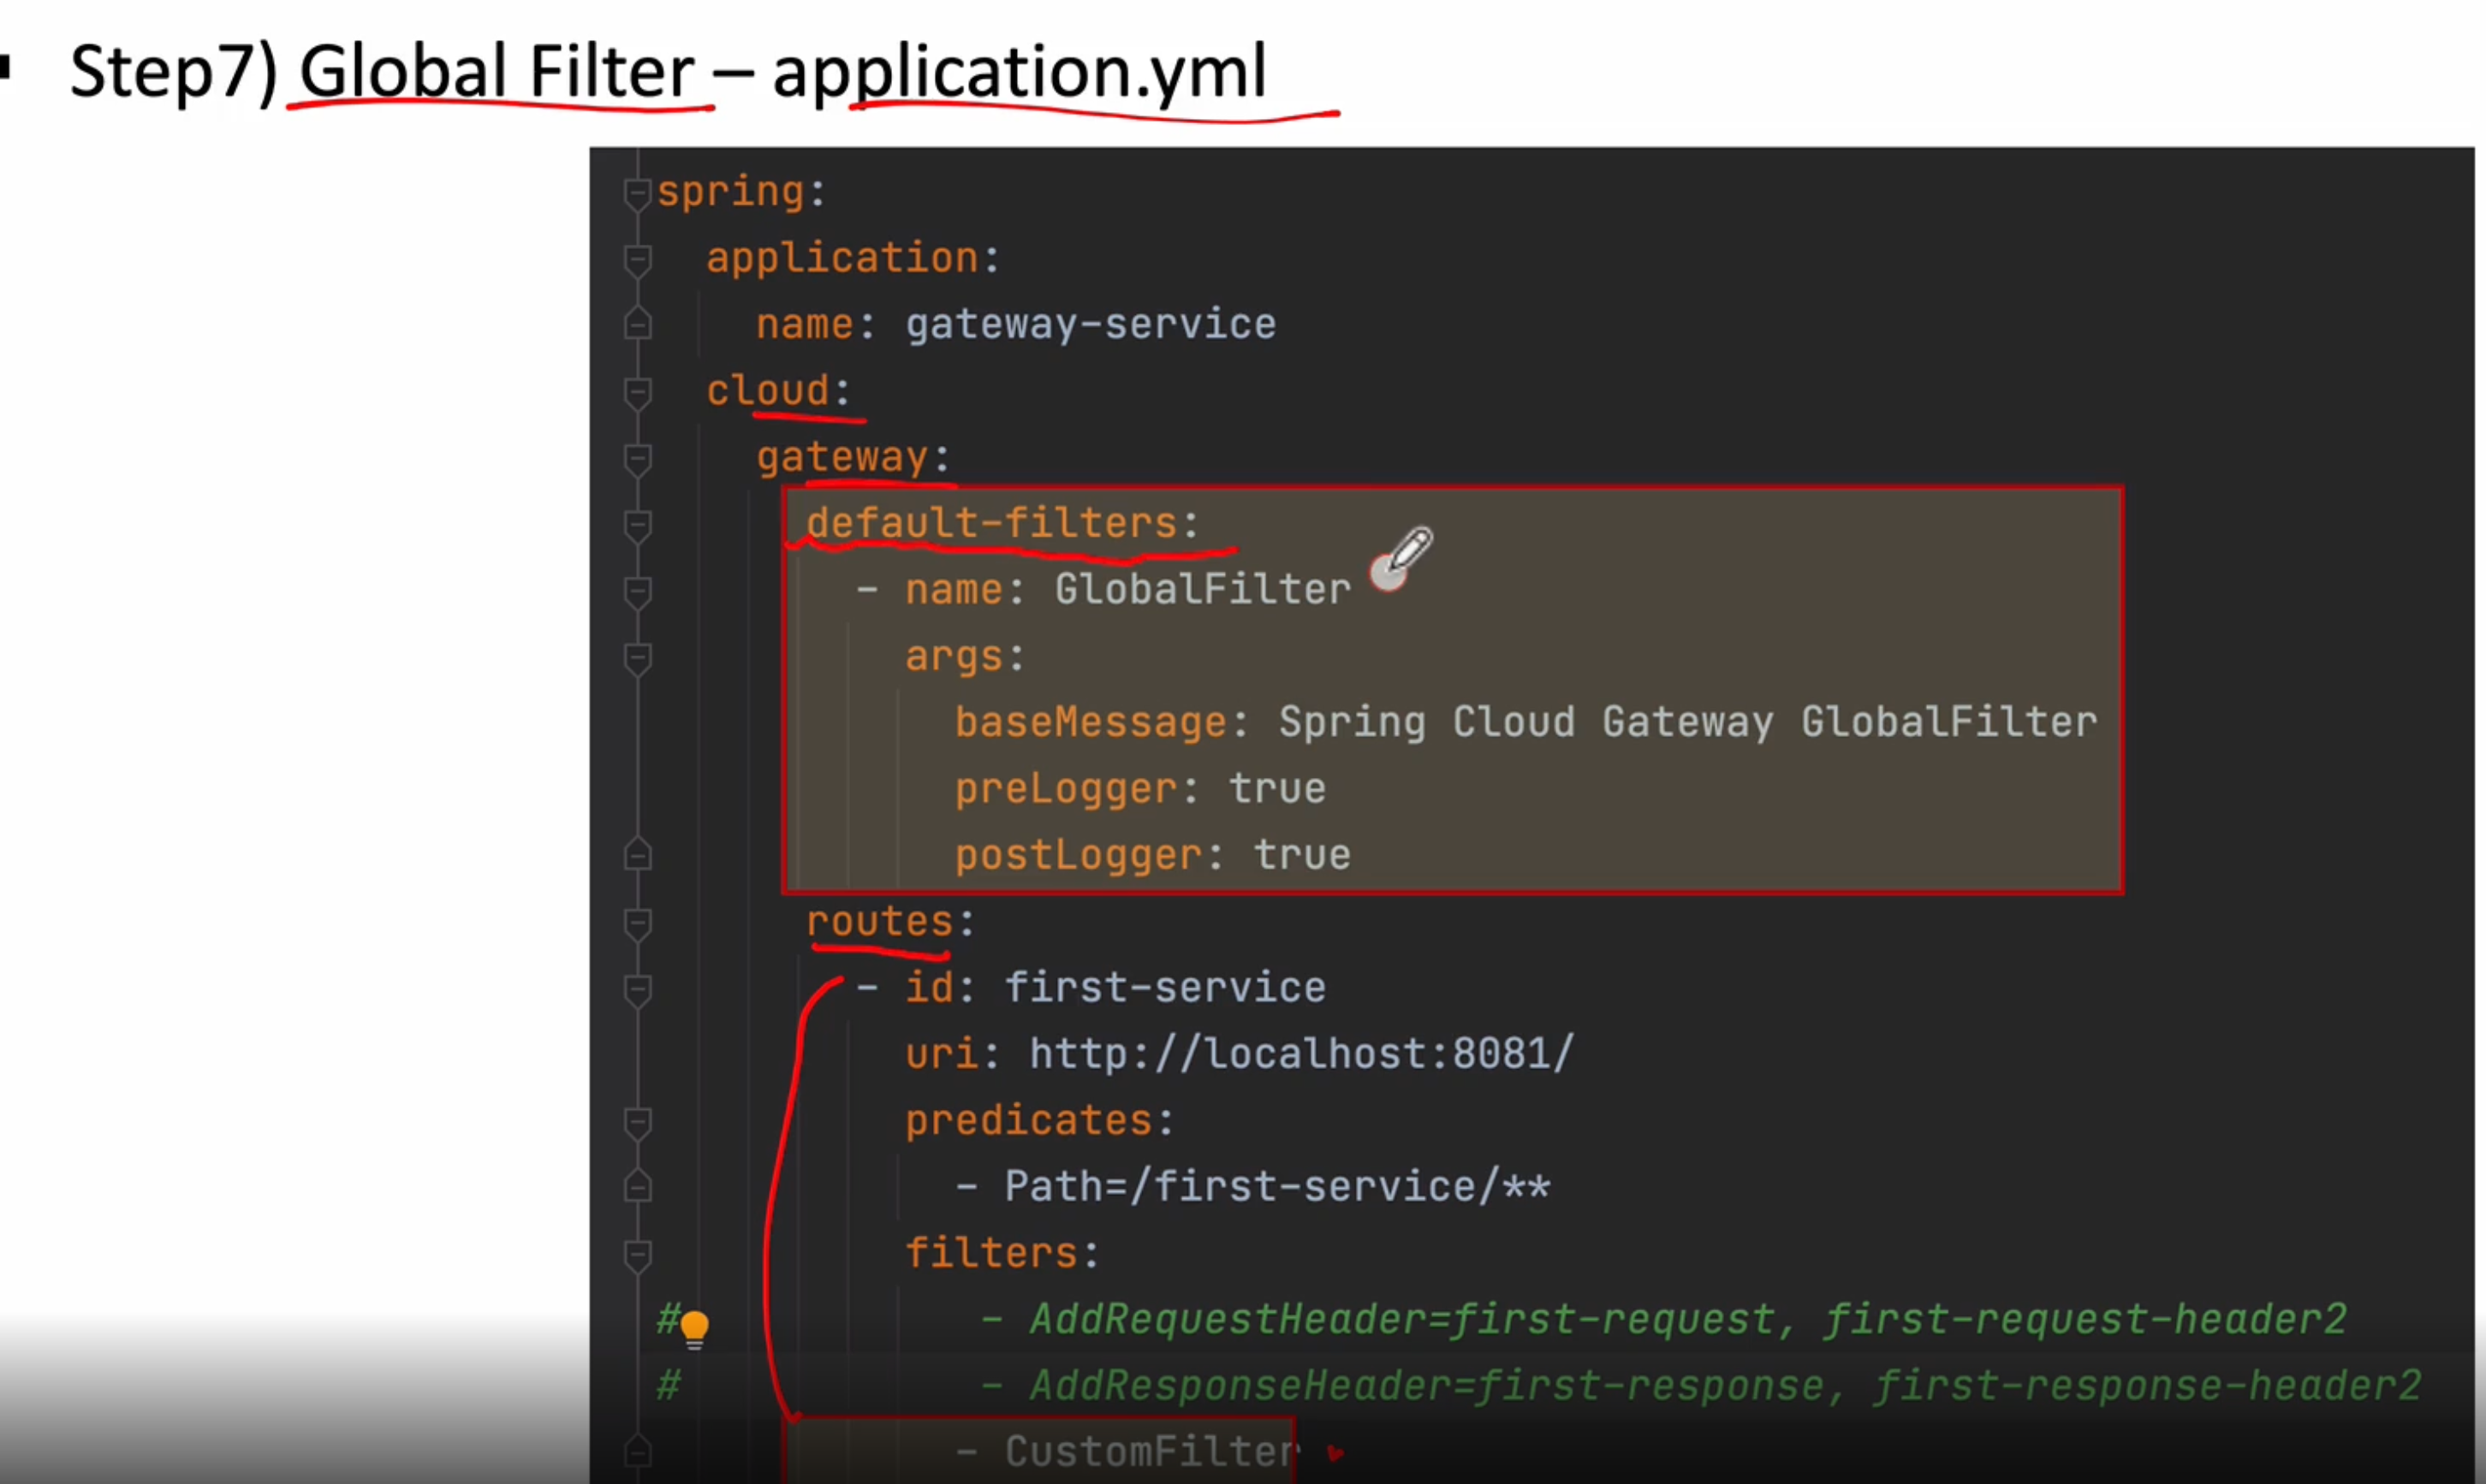
application.yml 파일에 글로벌 필터 적용시킬때 routes 위에 default-filters를 추가하고 위와 같이 해주면 된다(전체 적용)
args에는 기본적으로 들어갈 매개변수들을 나타낸다
-name : 이름
-preLogger : true
-postLogger : true
설정 초기에 기본값들을 셋팅할 수 있다
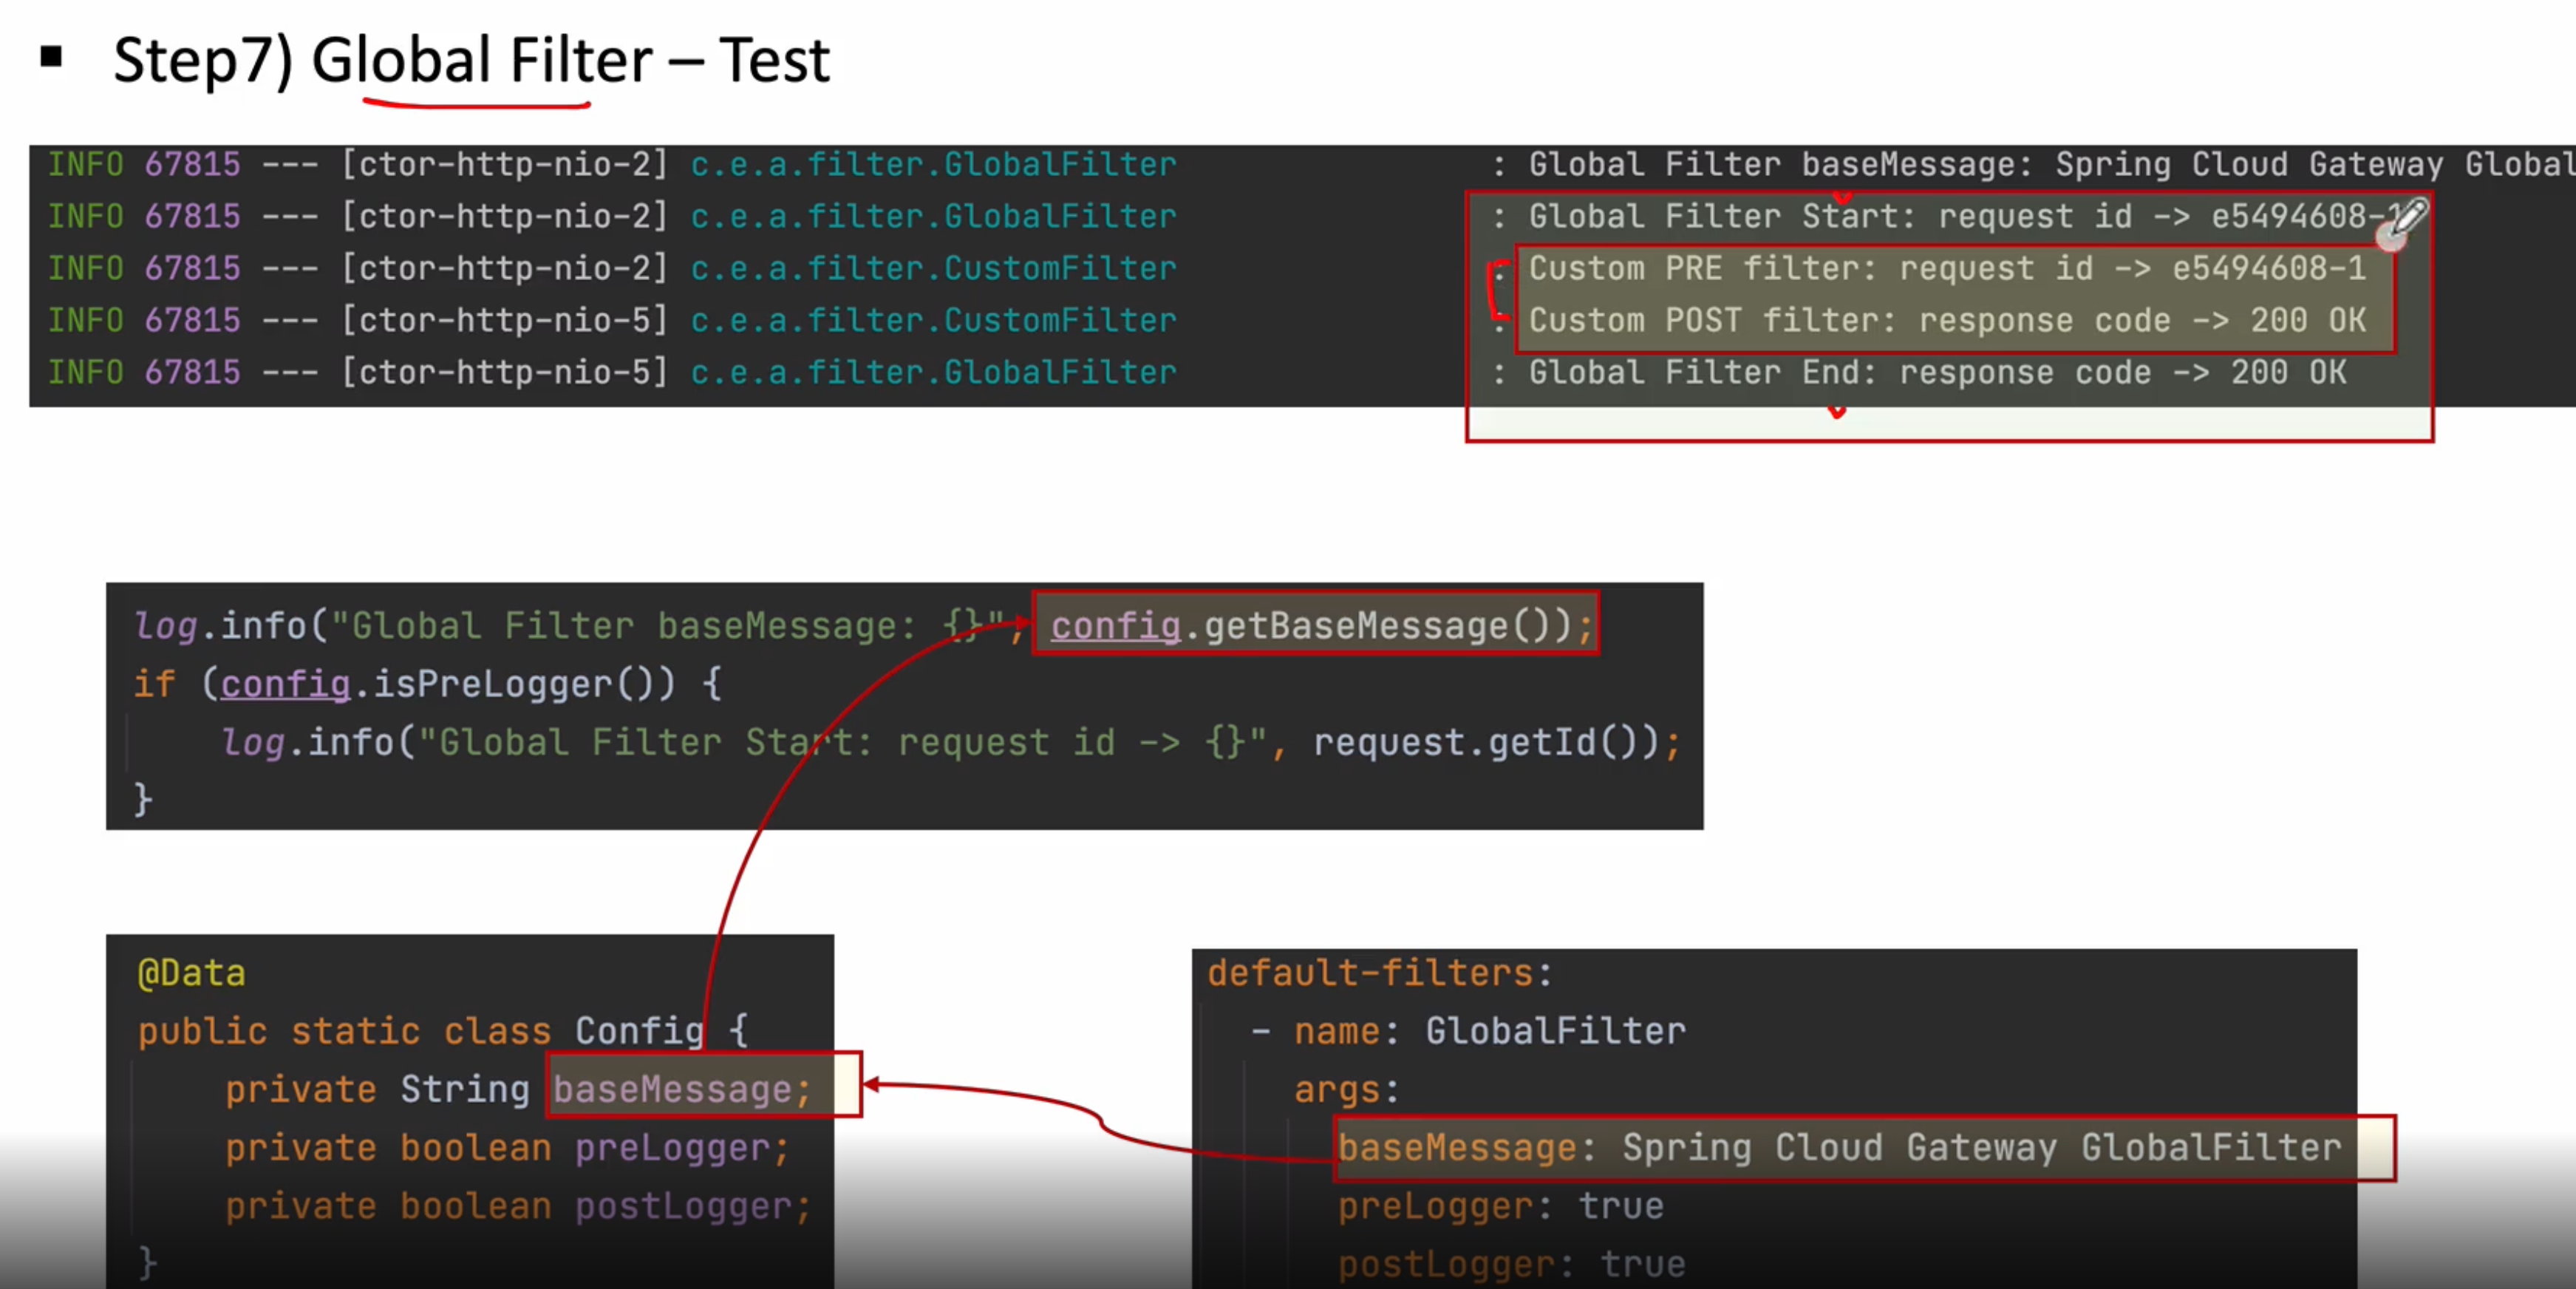
apllication.yml에 baseMessage는 Config파일에 baseMessage에 들어가게 되고 이 정보는 우리가 log를 찍을떼 나타난다
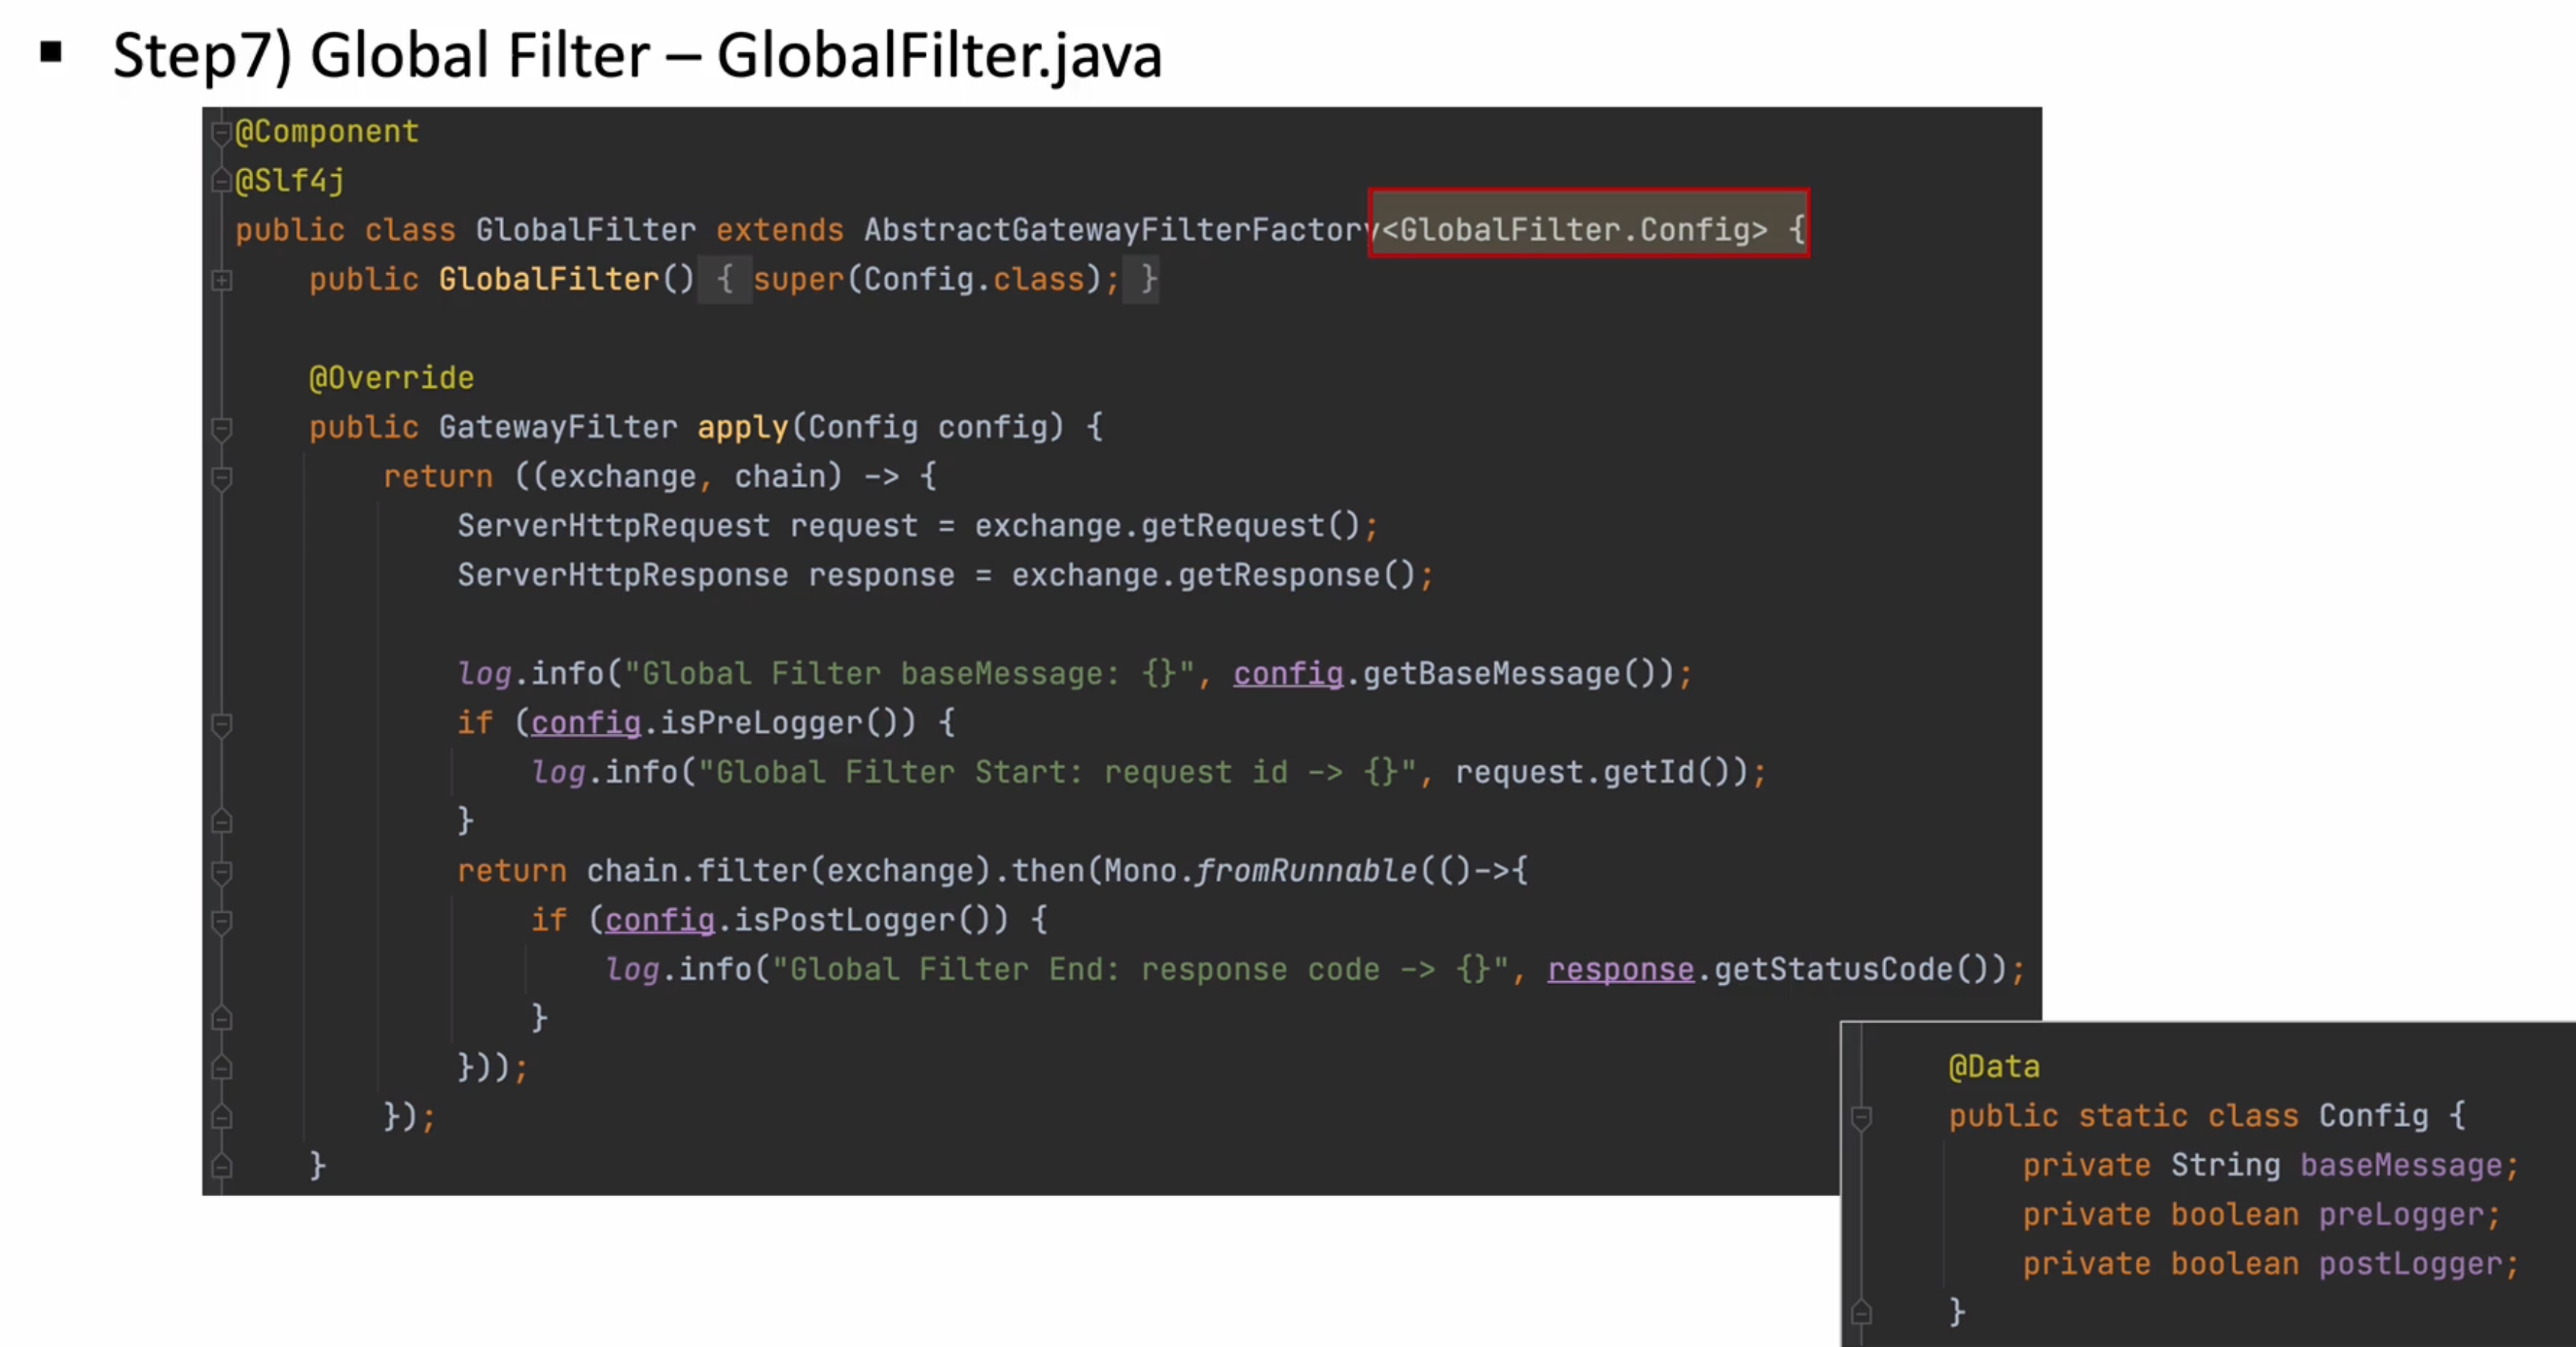
apigateway filter 패키지 아래에 GlobalFilter 추가
package com.example.apigatewayservice.filter;

import lombok.Data;
import lombok.extern.slf4j.Slf4j;
import org.springframework.cloud.gateway.filter.GatewayFilter;
import org.springframework.cloud.gateway.filter.factory.AbstractGatewayFilterFactory;
import org.springframework.http.server.reactive.ServerHttpRequest;
import org.springframework.http.server.reactive.ServerHttpResponse;
import org.springframework.stereotype.Component;
import reactor.core.publisher.Mono;

@Component
@Slf4j
public class GlobalFilter extends AbstractGatewayFilterFactory<GlobalFilter.Config> {

    public GlobalFilter(){
        super(Config.class);
    }

    @Override
    public GatewayFilter apply(Config config) {
        return (exchange, chain) -> {
            //import시 org.springframework.http.server.reactive.ServerHttpRequest;
            ServerHttpRequest request = exchange.getRequest();
            ServerHttpResponse response = exchange.getResponse();

            //log.info("Custom PRE Filter : request id -> {}", request.getId());
            log.info("Custom PRE Filter : request id -> {}", config.getBaseMessage());

            if(config.isPreLogger()){
                log.info("Global Filter start : request id -> {}", request.getId());
            }

            // Custom Post Filter
            return chain.filter(exchange).then(Mono.fromRunnable(() -> {
                if(config.isPostLogger()){
                    log.info("Global Post Filter : response code -> {}", response.getStatusCode());
                }
            }));
        };

        /*
            그러면 gateway 필터라는 빈을 하나 등록하고 이 부분은 프리필터, 포스트필터 방식으로 나눠서 작용

            람다식에 exchange, chain 객체를 받고

            exchange 객체로부터 ServerHttpRequest, response 객체를 받을수 있다

            포스트 필터에 반환하는곳 Mono라는 것은 웹플럭스에서 사용하는 것으로 비동기 방식으로 단일 값 전달할때 사용하는것
         */
    }

    @Data
    public static class Config{
        private String baseMessage;
        private boolean preLogger;
        private boolean postLogger;
    }
}
이렇게 한 다음 application.yml에 가서 globalFilter 추가 작업
server:
  port: 8000

eureka:
  client:
    register-with-eureka: false
    fetch-registry: false
    service-url:
      defaultZone: http://localhost:8761/eureka

spring:
  application:
    name: apigateway-service
  cloud:
    gateway:
      default-filters:
        - name: GlobalFilter
          args:
            baseMessage: Spring CLoud Gateway Global Filter
            preLogger: true
            postLogger: true
      routes:
        - id: first-service
          uri: http://localhost:8081/
          predicates:
            - Path=/first-service/**
          filters:
#            - AddRequestHeader=first-request, first-request-header2
#            - AddResponseHeader=first-response, first-response-header2
            - CustomFilter
        - id: second-service
          uri: http://localhost:8082/
          predicates:
            - Path=/second-service/**
          filters:
#            - AddRequestHeader=second-request, second-requests-header2
#            - AddResponseHeader=second-response, second-response-header2
            - CustomFilter
이렇게 한다음 재기동 하면 된다

정상적으로 동작하는것을 확인 할 수 있다
9장. Spring Cloud Gateway - Logging Filter
글로벌 필터 적용 방법
loggin 필터는 second-service에만 적용시켜 보겠다
이렇게 적용하고 나면 아래와 같이 정상적으로 출력되는 것을 확인 가능
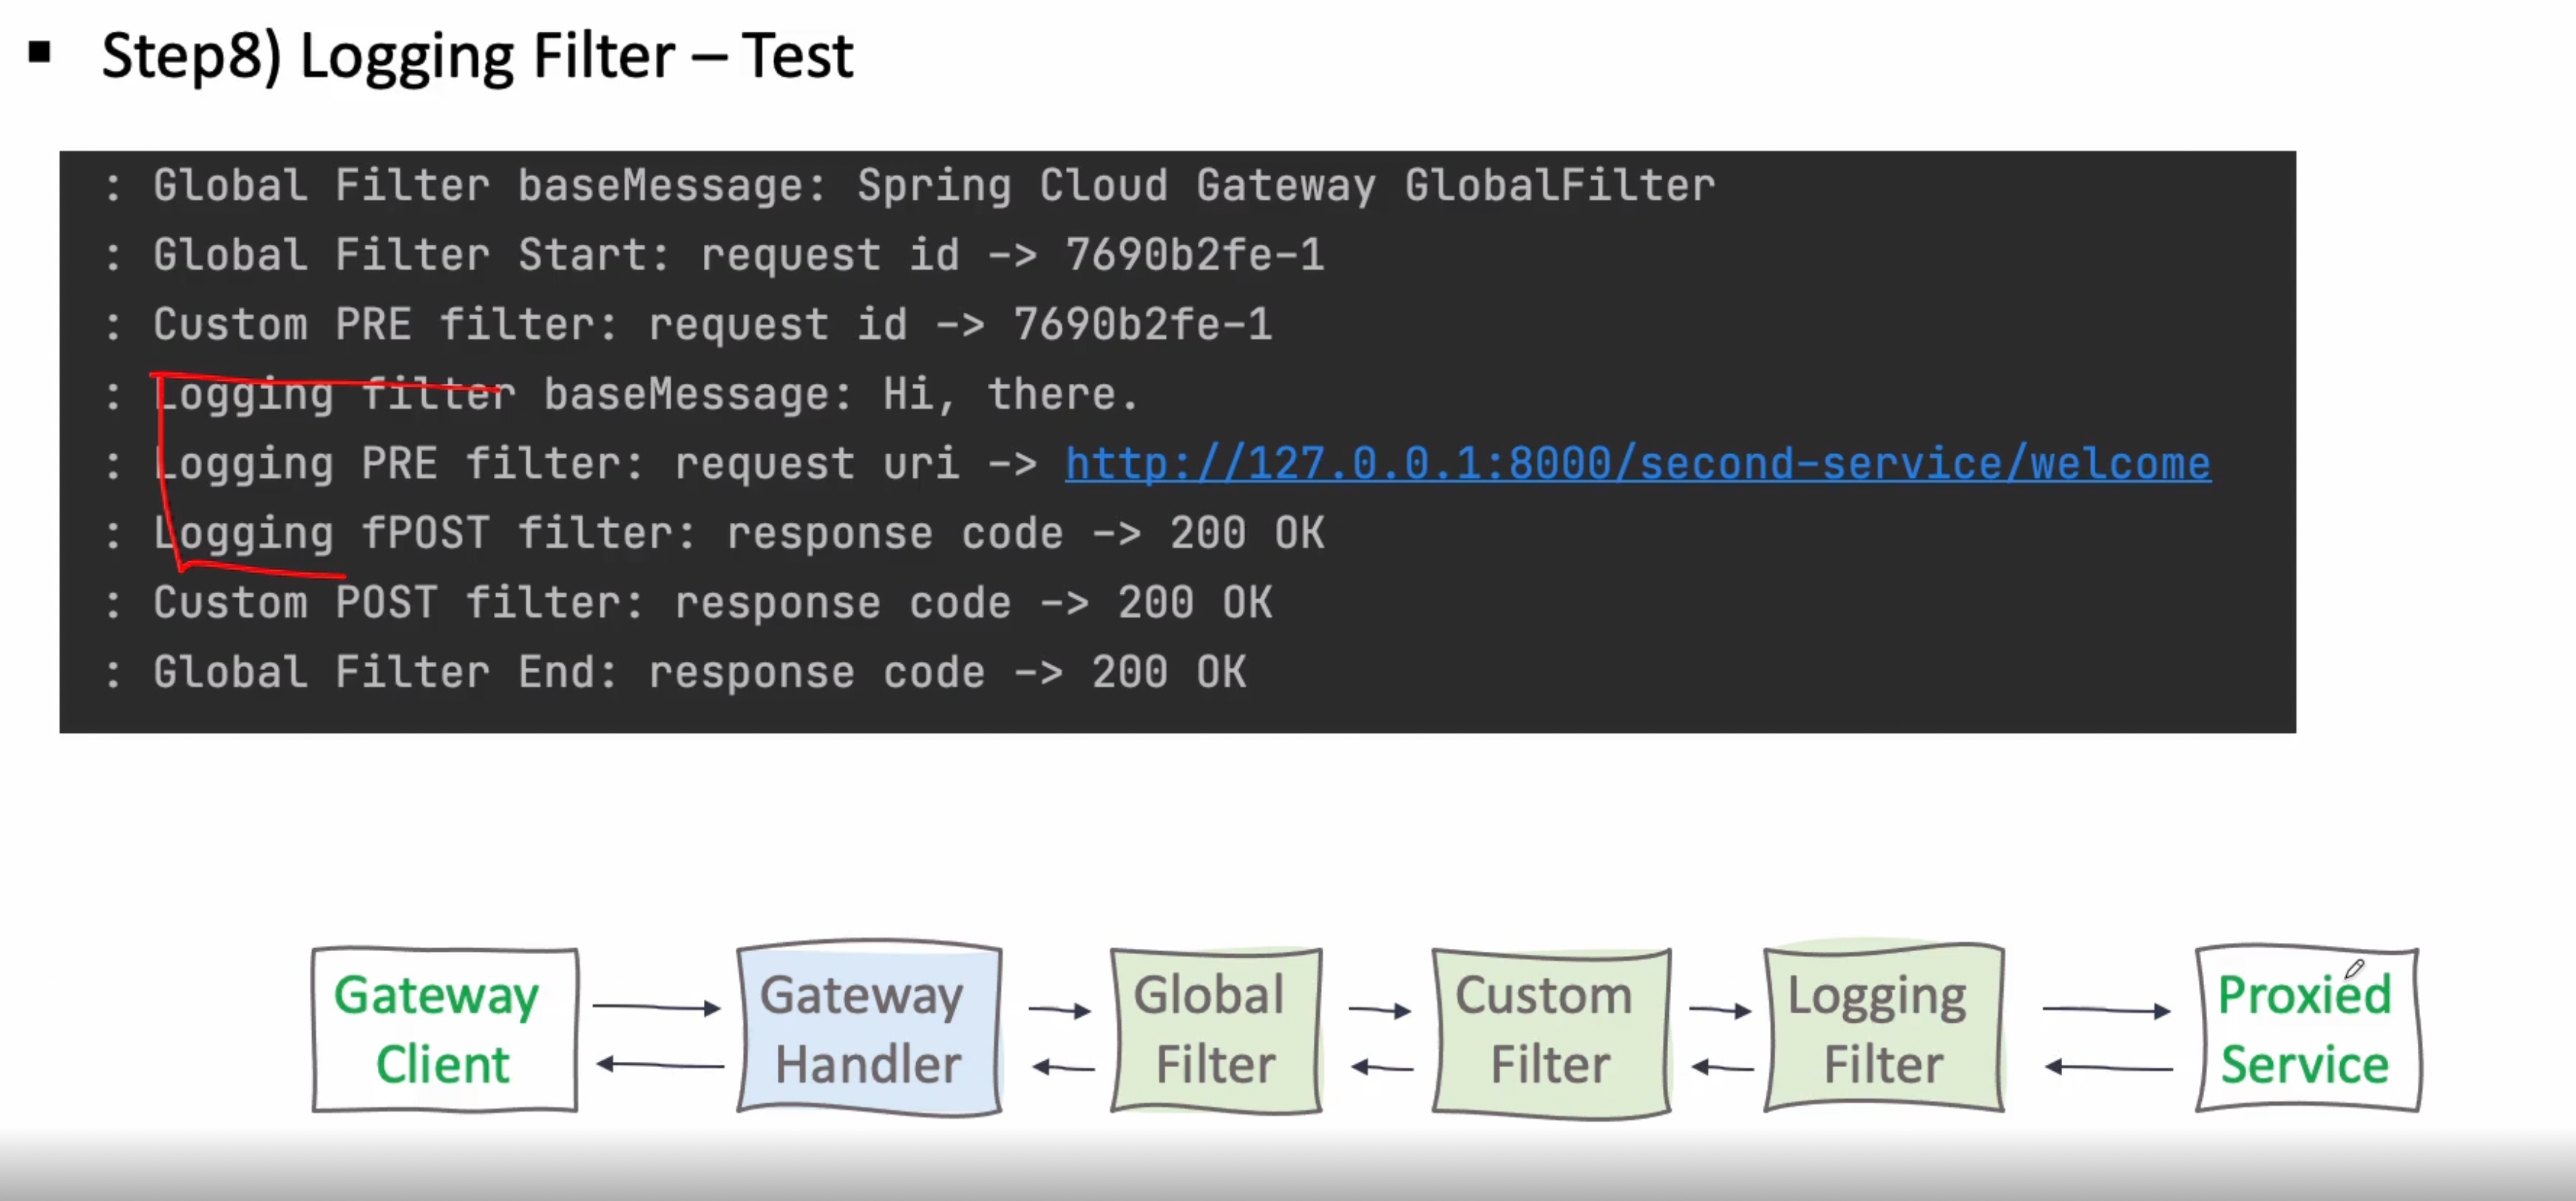
[순서]
-
Global Filter
-
Custom Filter
-
Logging Filter
이제 구현을 해보자
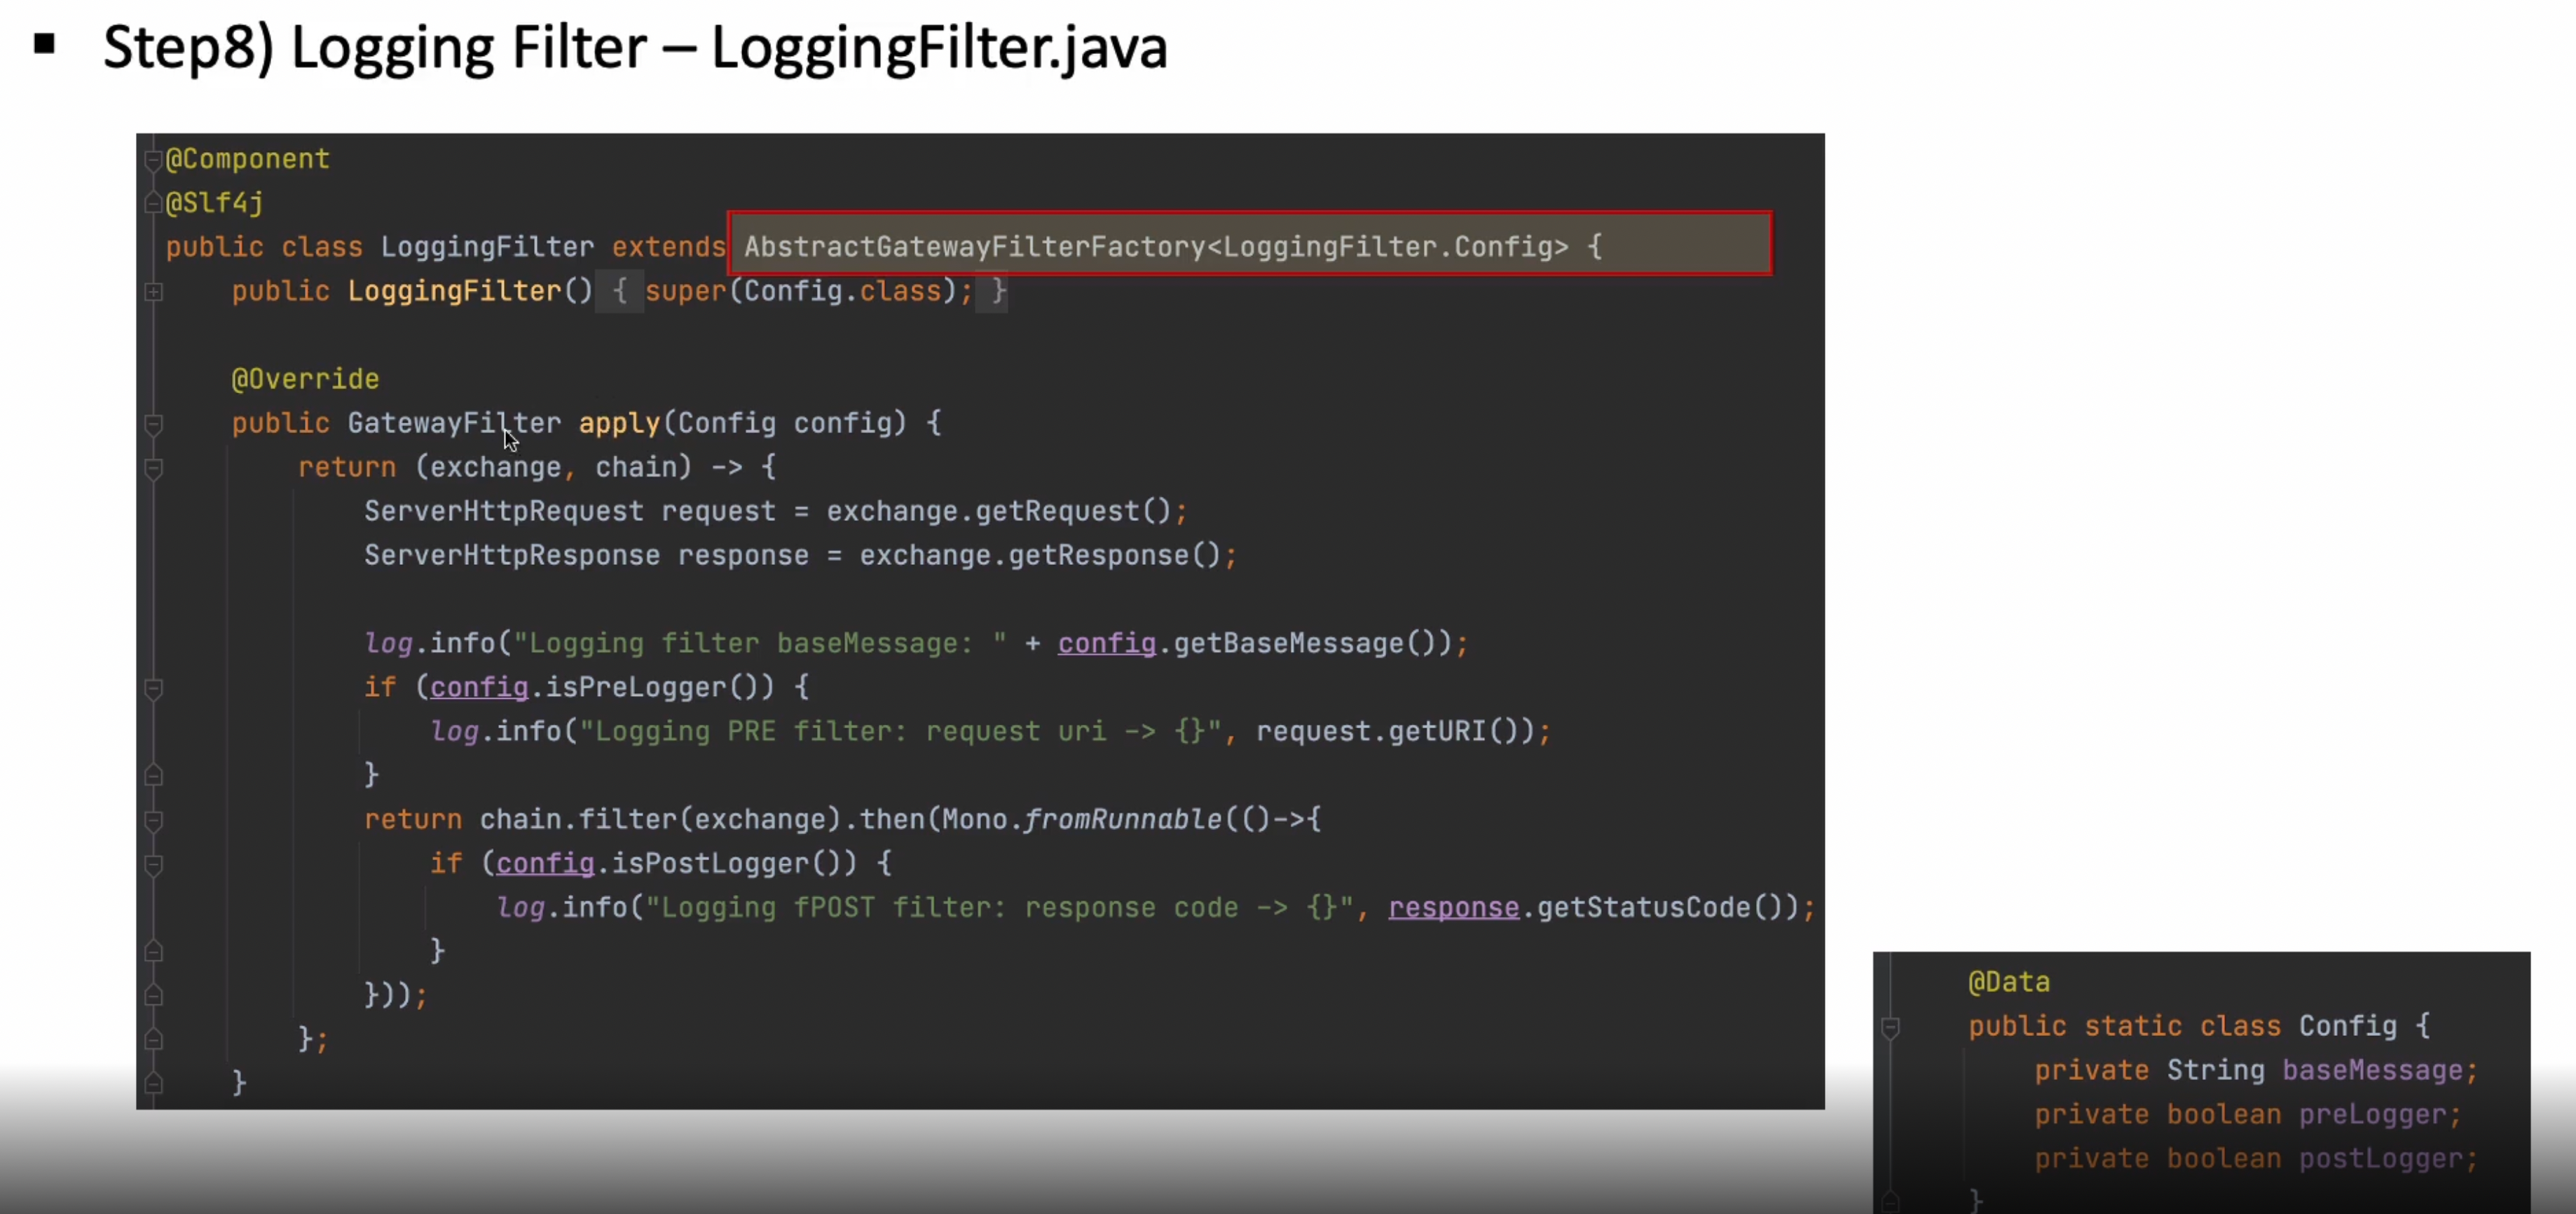
api-gateway 프로젝트에서 GlobalFilter를 복사해서 동일 패키지(filter) 아래에 붙여주고 LogginFilter 클래스라고 지어주자
package com.example.apigatewayservice.filter;

import lombok.Data;
import lombok.extern.slf4j.Slf4j;
import org.springframework.cloud.gateway.filter.GatewayFilter;
import org.springframework.cloud.gateway.filter.OrderedGatewayFilter;
import org.springframework.cloud.gateway.filter.factory.AbstractGatewayFilterFactory;
import org.springframework.core.Ordered;
import org.springframework.http.server.reactive.ServerHttpRequest;
import org.springframework.http.server.reactive.ServerHttpResponse;
import org.springframework.stereotype.Component;
import reactor.core.publisher.Mono;

@Component
@Slf4j
public class LoggingFilter extends AbstractGatewayFilterFactory<LoggingFilter.Config> {

    public LoggingFilter(){
        super(Config.class);
    }

    @Override
    public GatewayFilter apply(Config config) {

            GatewayFilter filter = new OrderedGatewayFilter((exchange, chain) -> {
                ServerHttpRequest request = exchange.getRequest();
                ServerHttpResponse response = exchange.getResponse();

                //log.info("Custom PRE Filter : request id -> {}", request.getId());
                log.info("Logging Filter baseMessage -> {}", config.getBaseMessage());

                if(config.isPreLogger()){
                    log.info("Logging PRE Filter : request id -> {}", request.getId());
                }

                // Custom Post Filter
                return chain.filter(exchange).then(Mono.fromRunnable(() -> {
                    if(config.isPostLogger()){
                        log.info("Logging Post Filter : response code -> {}", response.getStatusCode());
                    }
                }));
            }, Ordered.HIGHEST_PRECEDENCE);

            return filter;
        };
        /*
            그러면 gateway 필터라는 빈을 하나 등록하고 이 부분은 프리필터, 포스트필터 방식으로 나눠서 작용

            람다식에 exchange, chain 객체를 받고

            exchange 객체로부터 ServerHttpRequest, response 객체를 받을수 있다

            포스트 필터에 반환하는곳 Mono라는 것은 웹플럭스에서 사용하는 것으로 비동기 방식으로 단일 값 전달할때 사용하는것
         */


    @Data
    public static class Config{
        private String baseMessage;
        private boolean preLogger;
        private boolean postLogger;
    }
}
그다음 application.yml 파일을 변경해주면 된다
[기존 코드]
server:
  port: 8000

eureka:
  client:
    register-with-eureka: false
    fetch-registry: false
    service-url:
      defaultZone: http://localhost:8761/eureka

spring:
  application:
    name: apigateway-service
  cloud:
    gateway:
      default-filters:
        - name: GlobalFilter
          args:
            baseMessage: Spring CLoud Gateway Global Filter
            preLogger: true
            postLogger: true
      routes:
        - id: first-service
          uri: http://localhost:8081/
          predicates:
            - Path=/first-service/**
          filters:
#            - AddRequestHeader=first-request, first-request-header2
#            - AddResponseHeader=first-response, first-response-header2
            - CustomFilter
        - id: second-service
          uri: http://localhost:8082/
          predicates:
            - Path=/second-service/**
          filters:
#            - AddRequestHeader=second-request, second-requests-header2
#            - AddResponseHeader=second-response, second-response-header2
            - CustomFilter
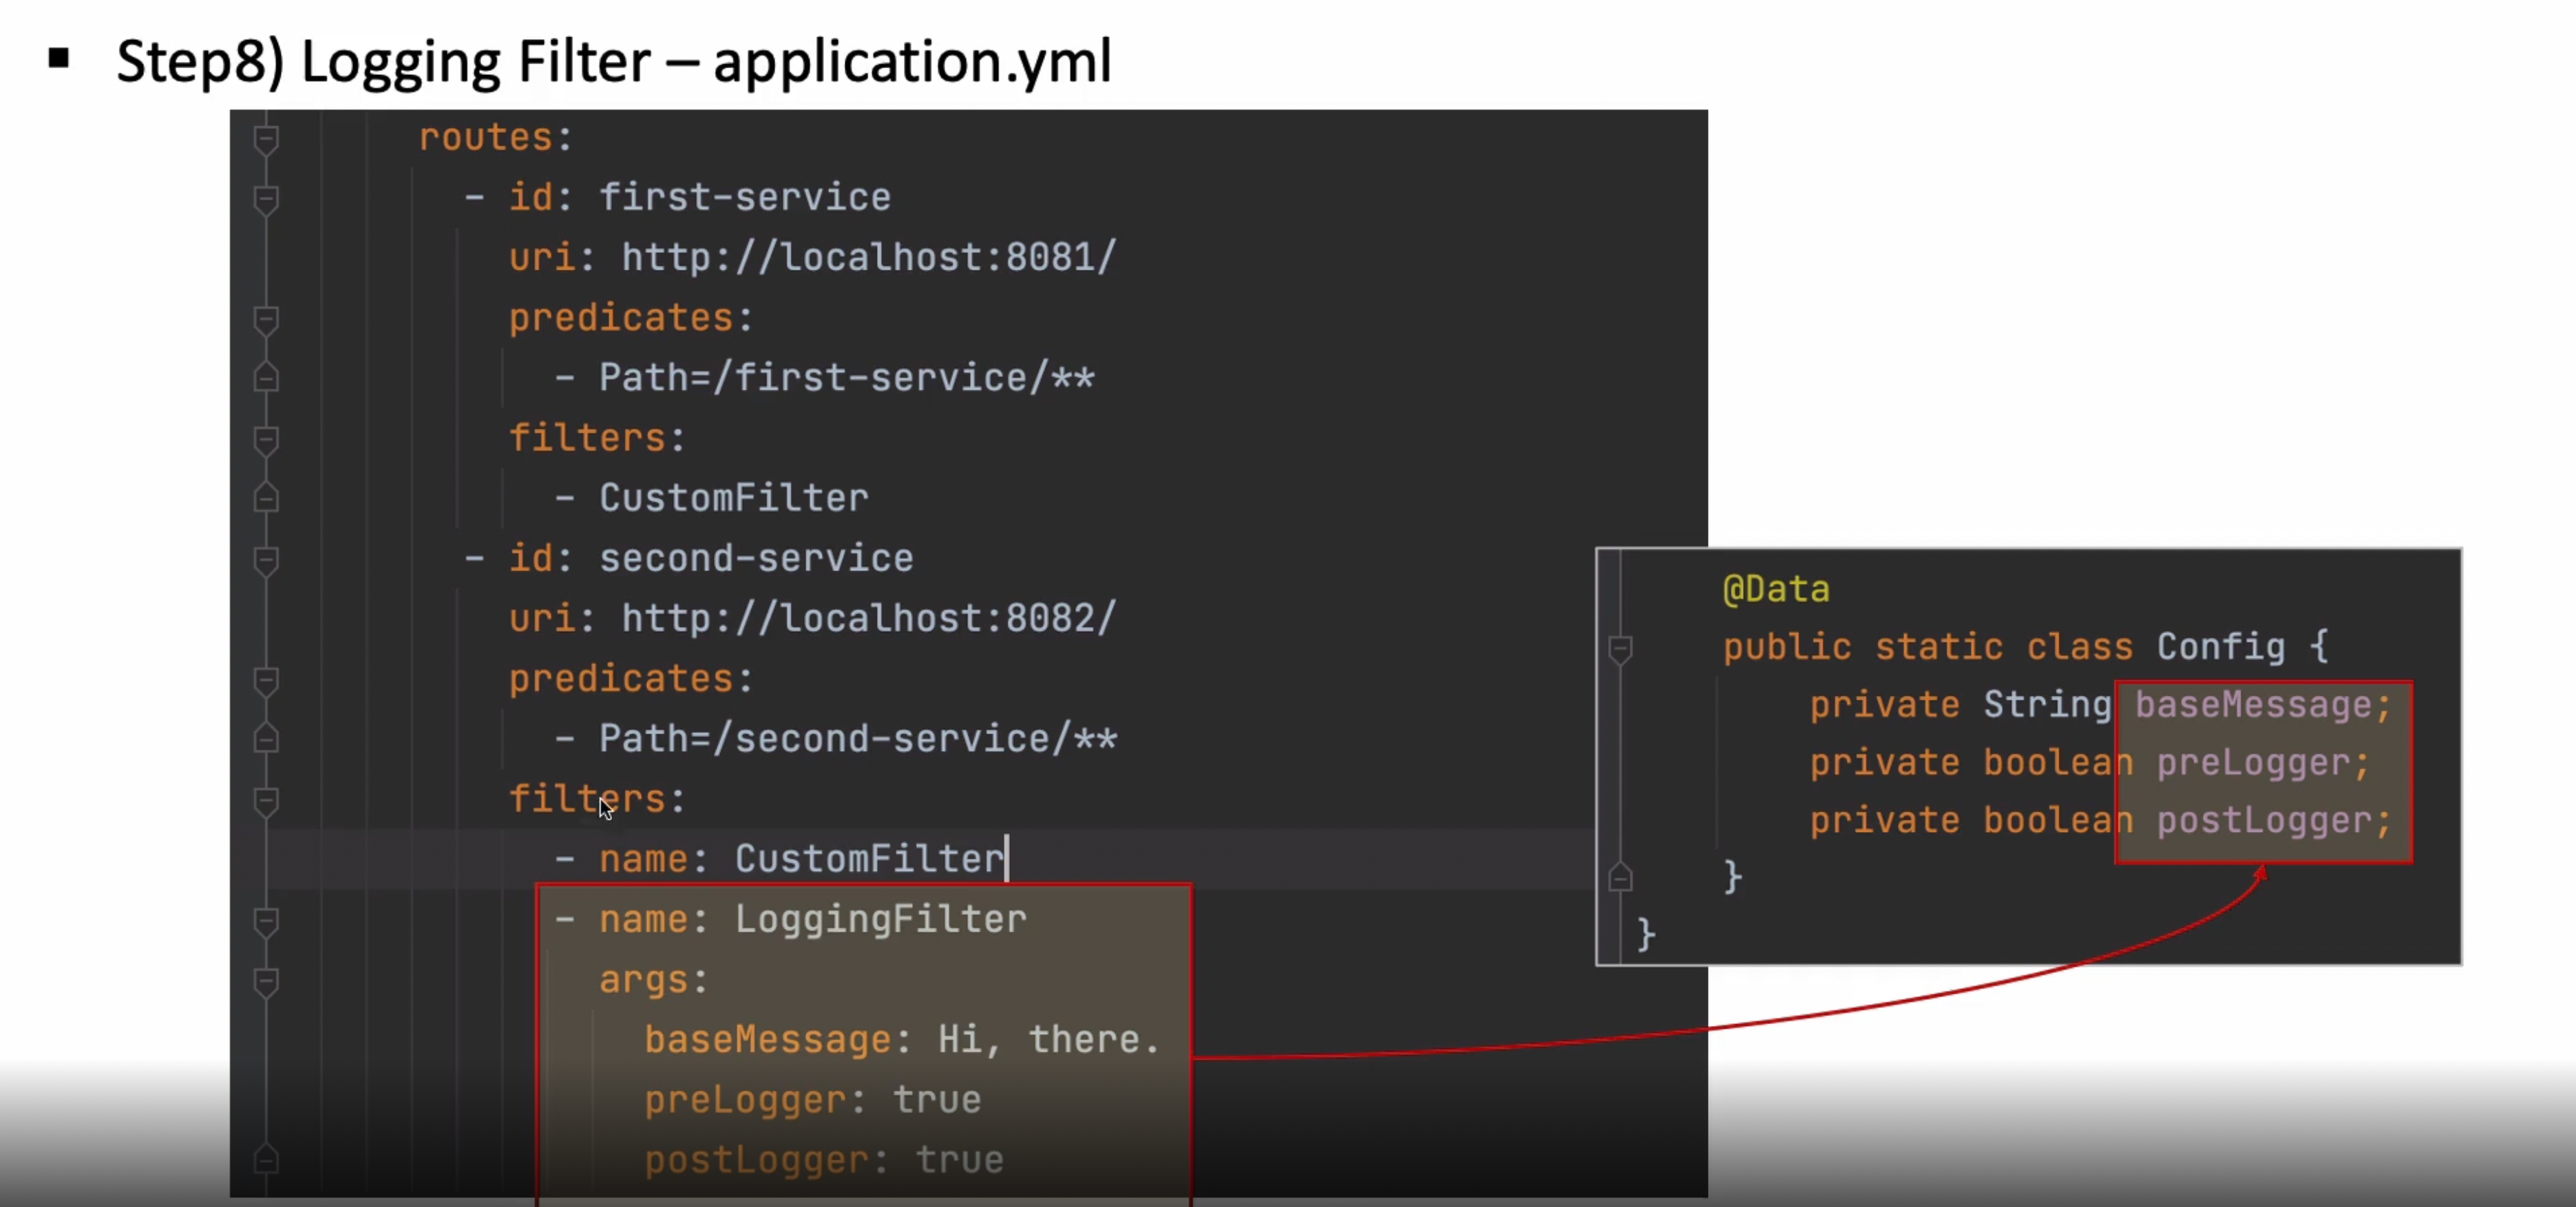
[수정코드]
server:
  port: 8000

eureka:
  client:
    register-with-eureka: false
    fetch-registry: false
    service-url:
      defaultZone: http://localhost:8761/eureka

spring:
  application:
    name: apigateway-service
  cloud:
    gateway:
      default-filters:
        - name: GlobalFilter
          args:
            baseMessage: Spring CLoud Gateway Global Filter
            preLogger: true
            postLogger: true
      routes:
        - id: first-service
          uri: http://localhost:8081/
          predicates:
            - Path=/first-service/**
          filters:
#            - AddRequestHeader=first-request, first-request-header2
#            - AddResponseHeader=first-response, first-response-header2
            - CustomFilter
        - id: second-service
          uri: http://localhost:8082/
          predicates:
            - Path=/second-service/**
          filters:
#            - AddRequestHeader=second-request, second-requests-header2
#            - AddResponseHeader=second-response, second-response-header2
            - name: CustomFilter
            - name: LoggingFilter
              args:
                baseMessage: Hi, there.
                preLogger: true
                postLogger: true
첫번째 서비스는 커스텀 필터만 가지고 있고, 세컨드 서비스는 커스텀 필터, 로깅필터 2개를 가지고 있다
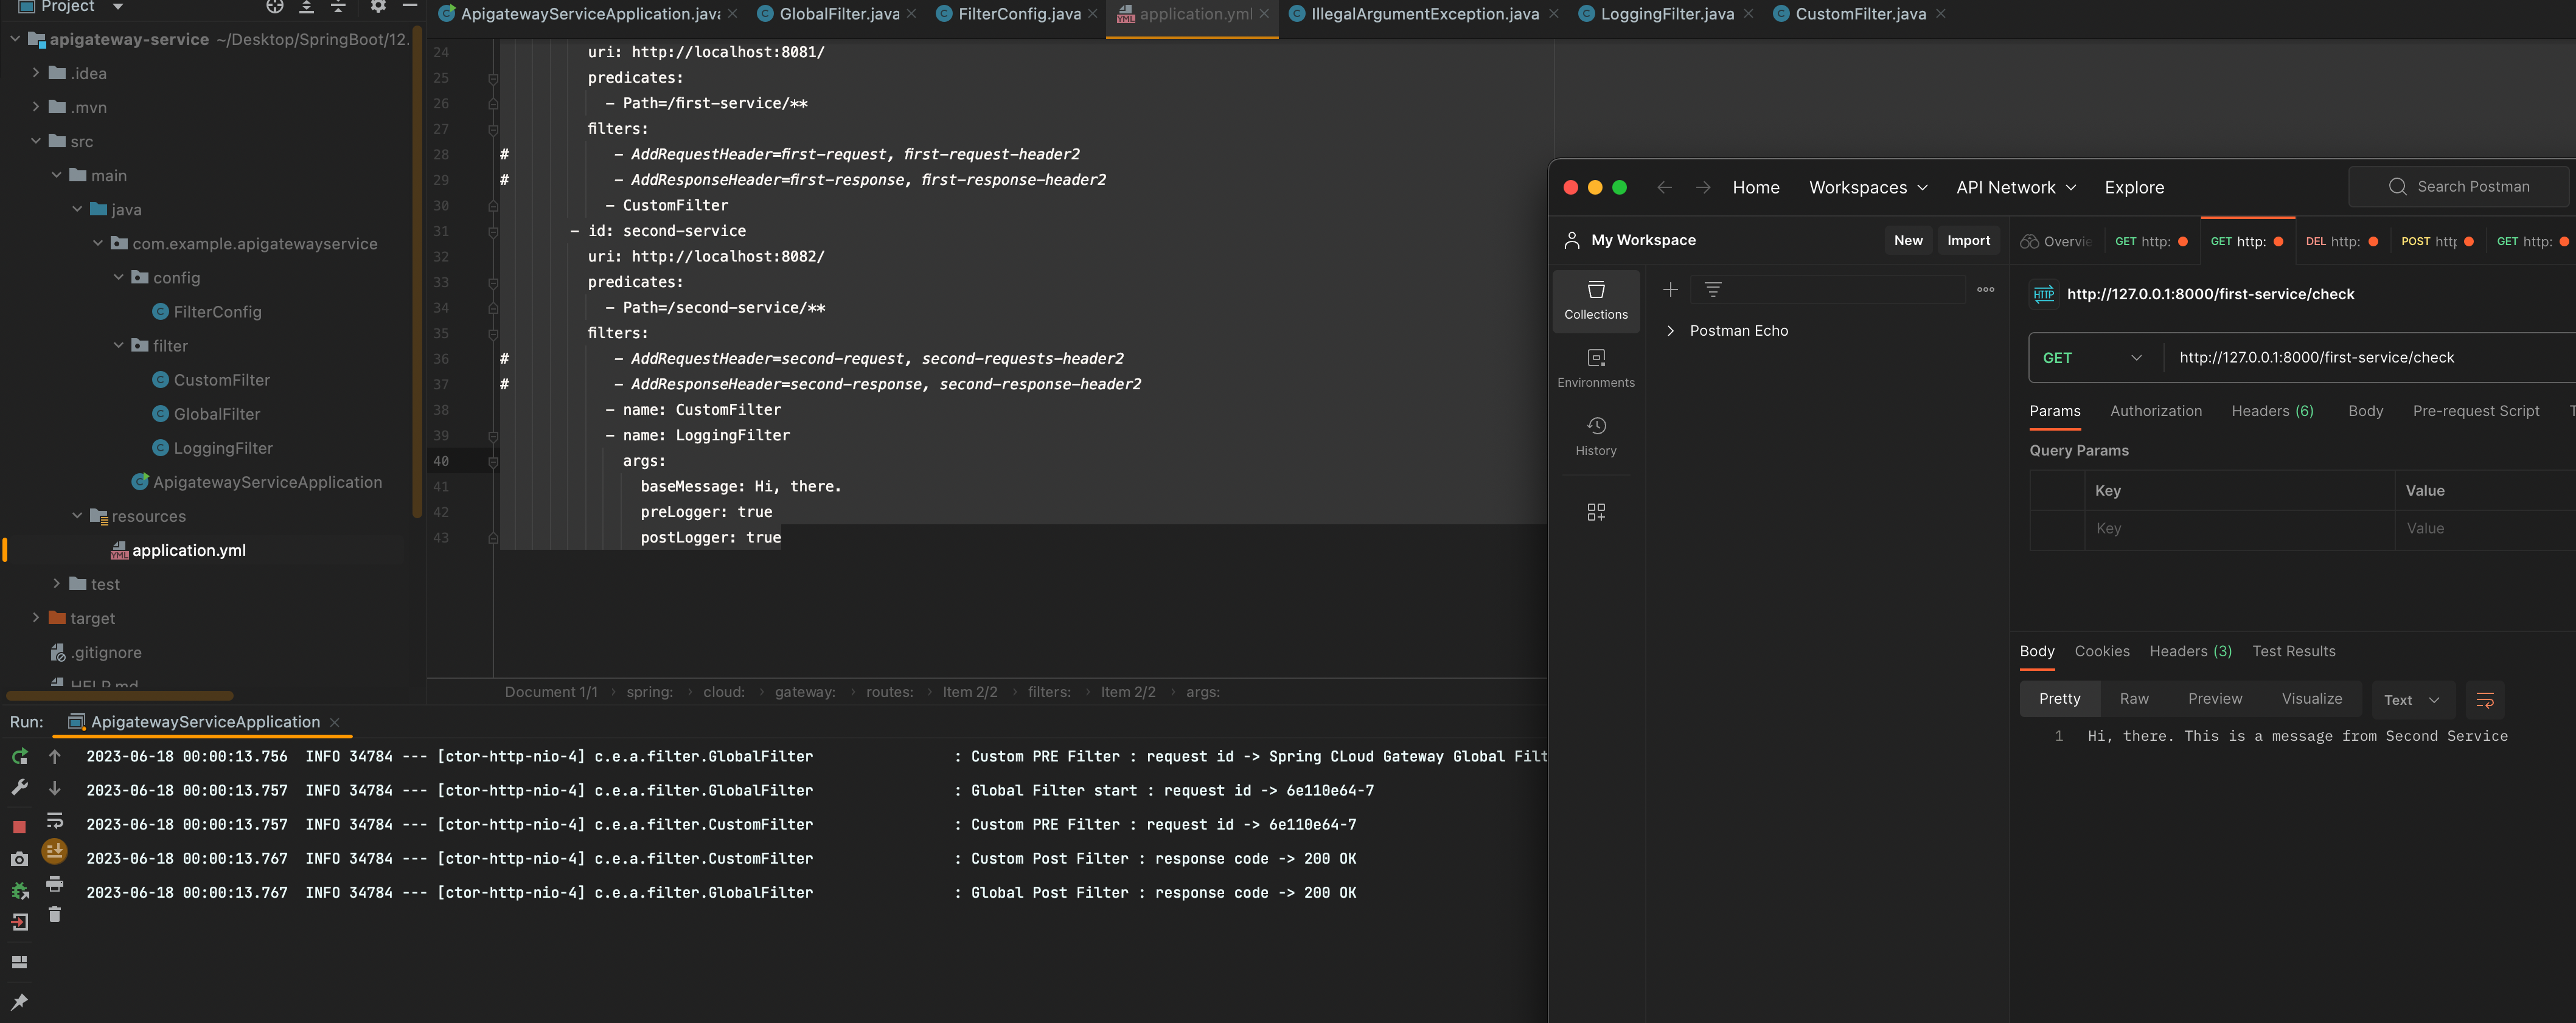
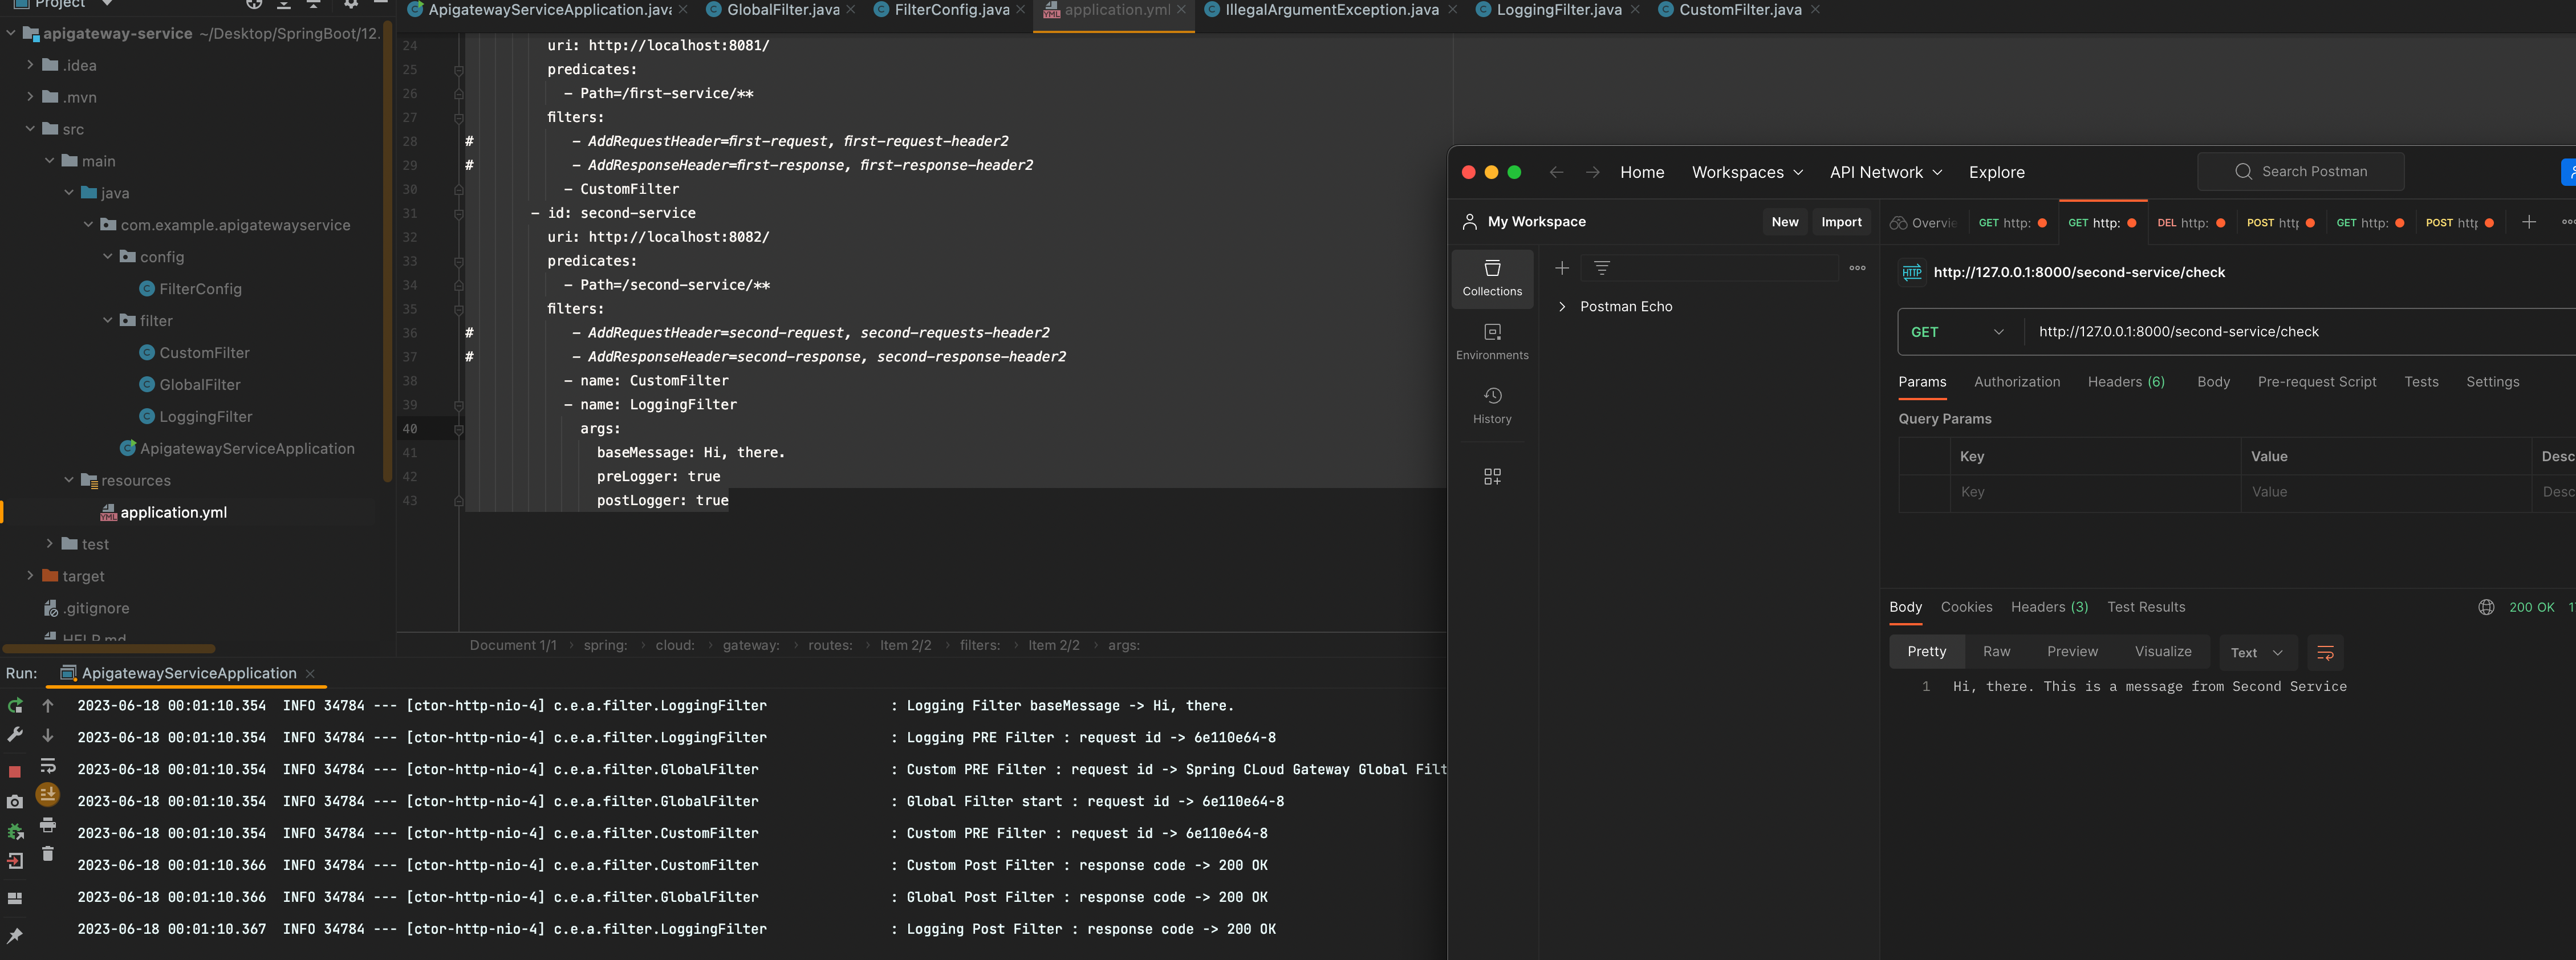
Ordered.HIGHEST_PRECEDENCE, Ordered.LOWEST_PRECEDENCE 이 부분을 바꿔주면 필터의 순서를 조정할 수 있다
10장. Spring Cloud Gateway - Load Balancer
Spring Cloud Gateway와 Eureka 연동 방법
유레카라는 네이밍 서비스에 스프링클라우드라는 게이트웨이를 등록하고 지금까지 테스트했던 첫번째, 두번째 서비스를 모두 등록
유레카 서비스 역할 : 서비스 디스커버리, 서비스 등록
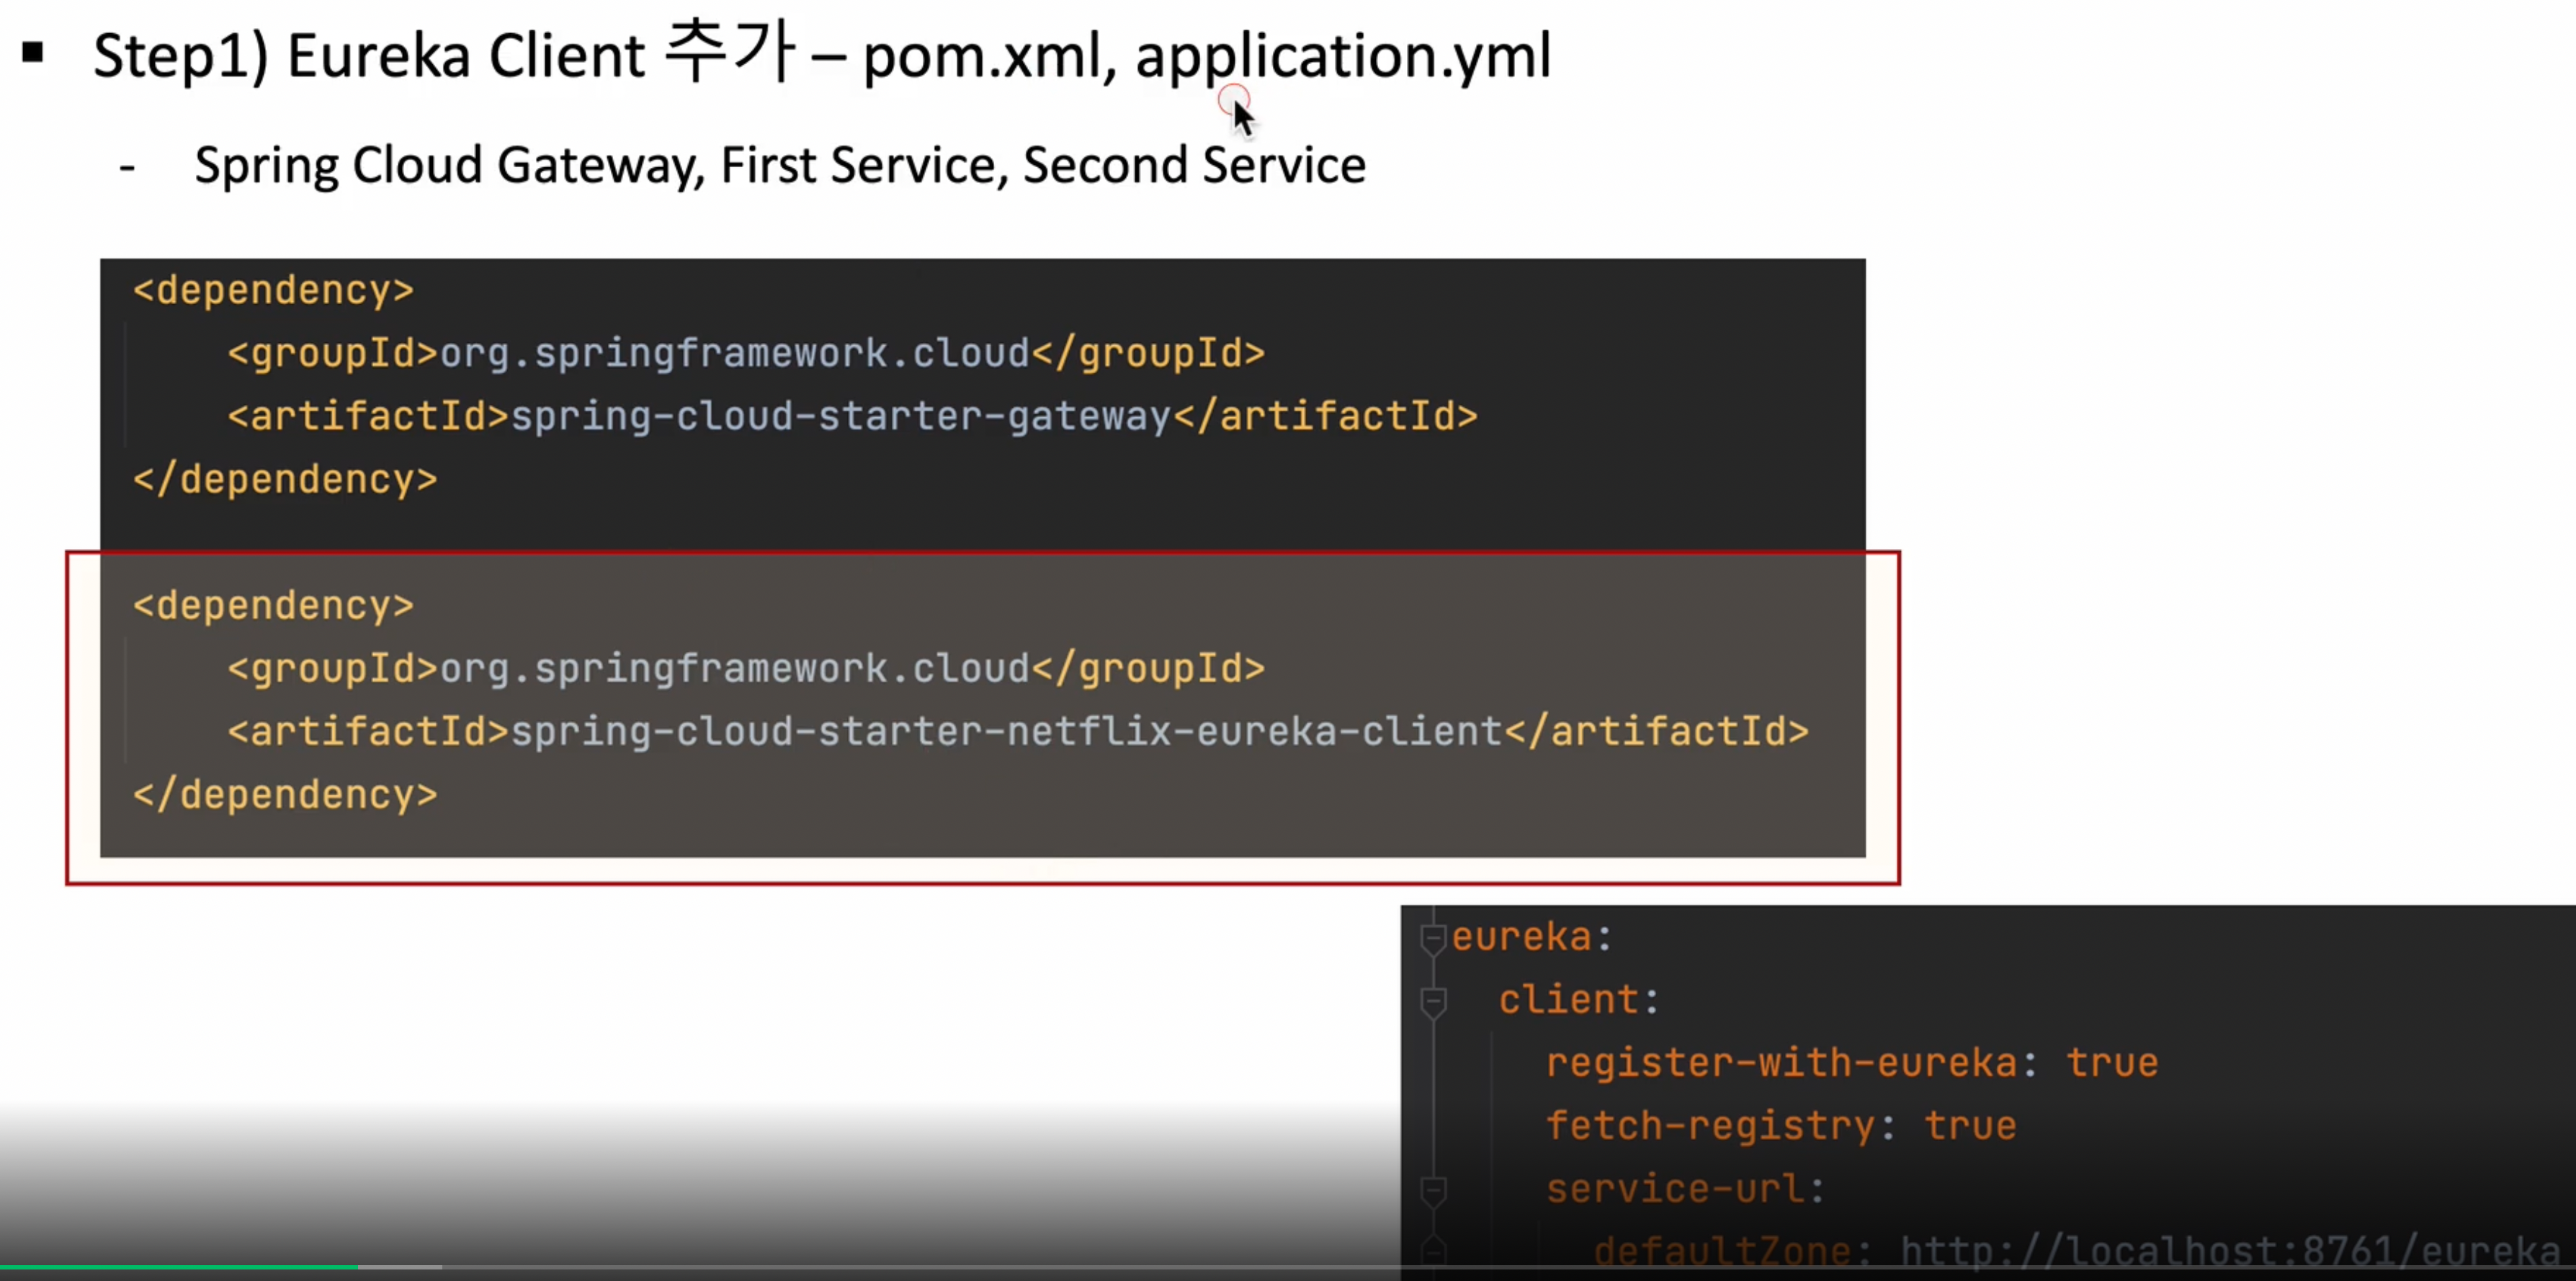
스텝1 : 스프링 게이트웨이, 마이크로 서비스(첫번째, 두번째서비스)쪽에 유레카 클라이언트 추가(pom.xml, application.yml)
기존에는 api-gateway application.yml에 직접 uri : http://localhost:8081/ 이런식으로 등록되어 있었는데
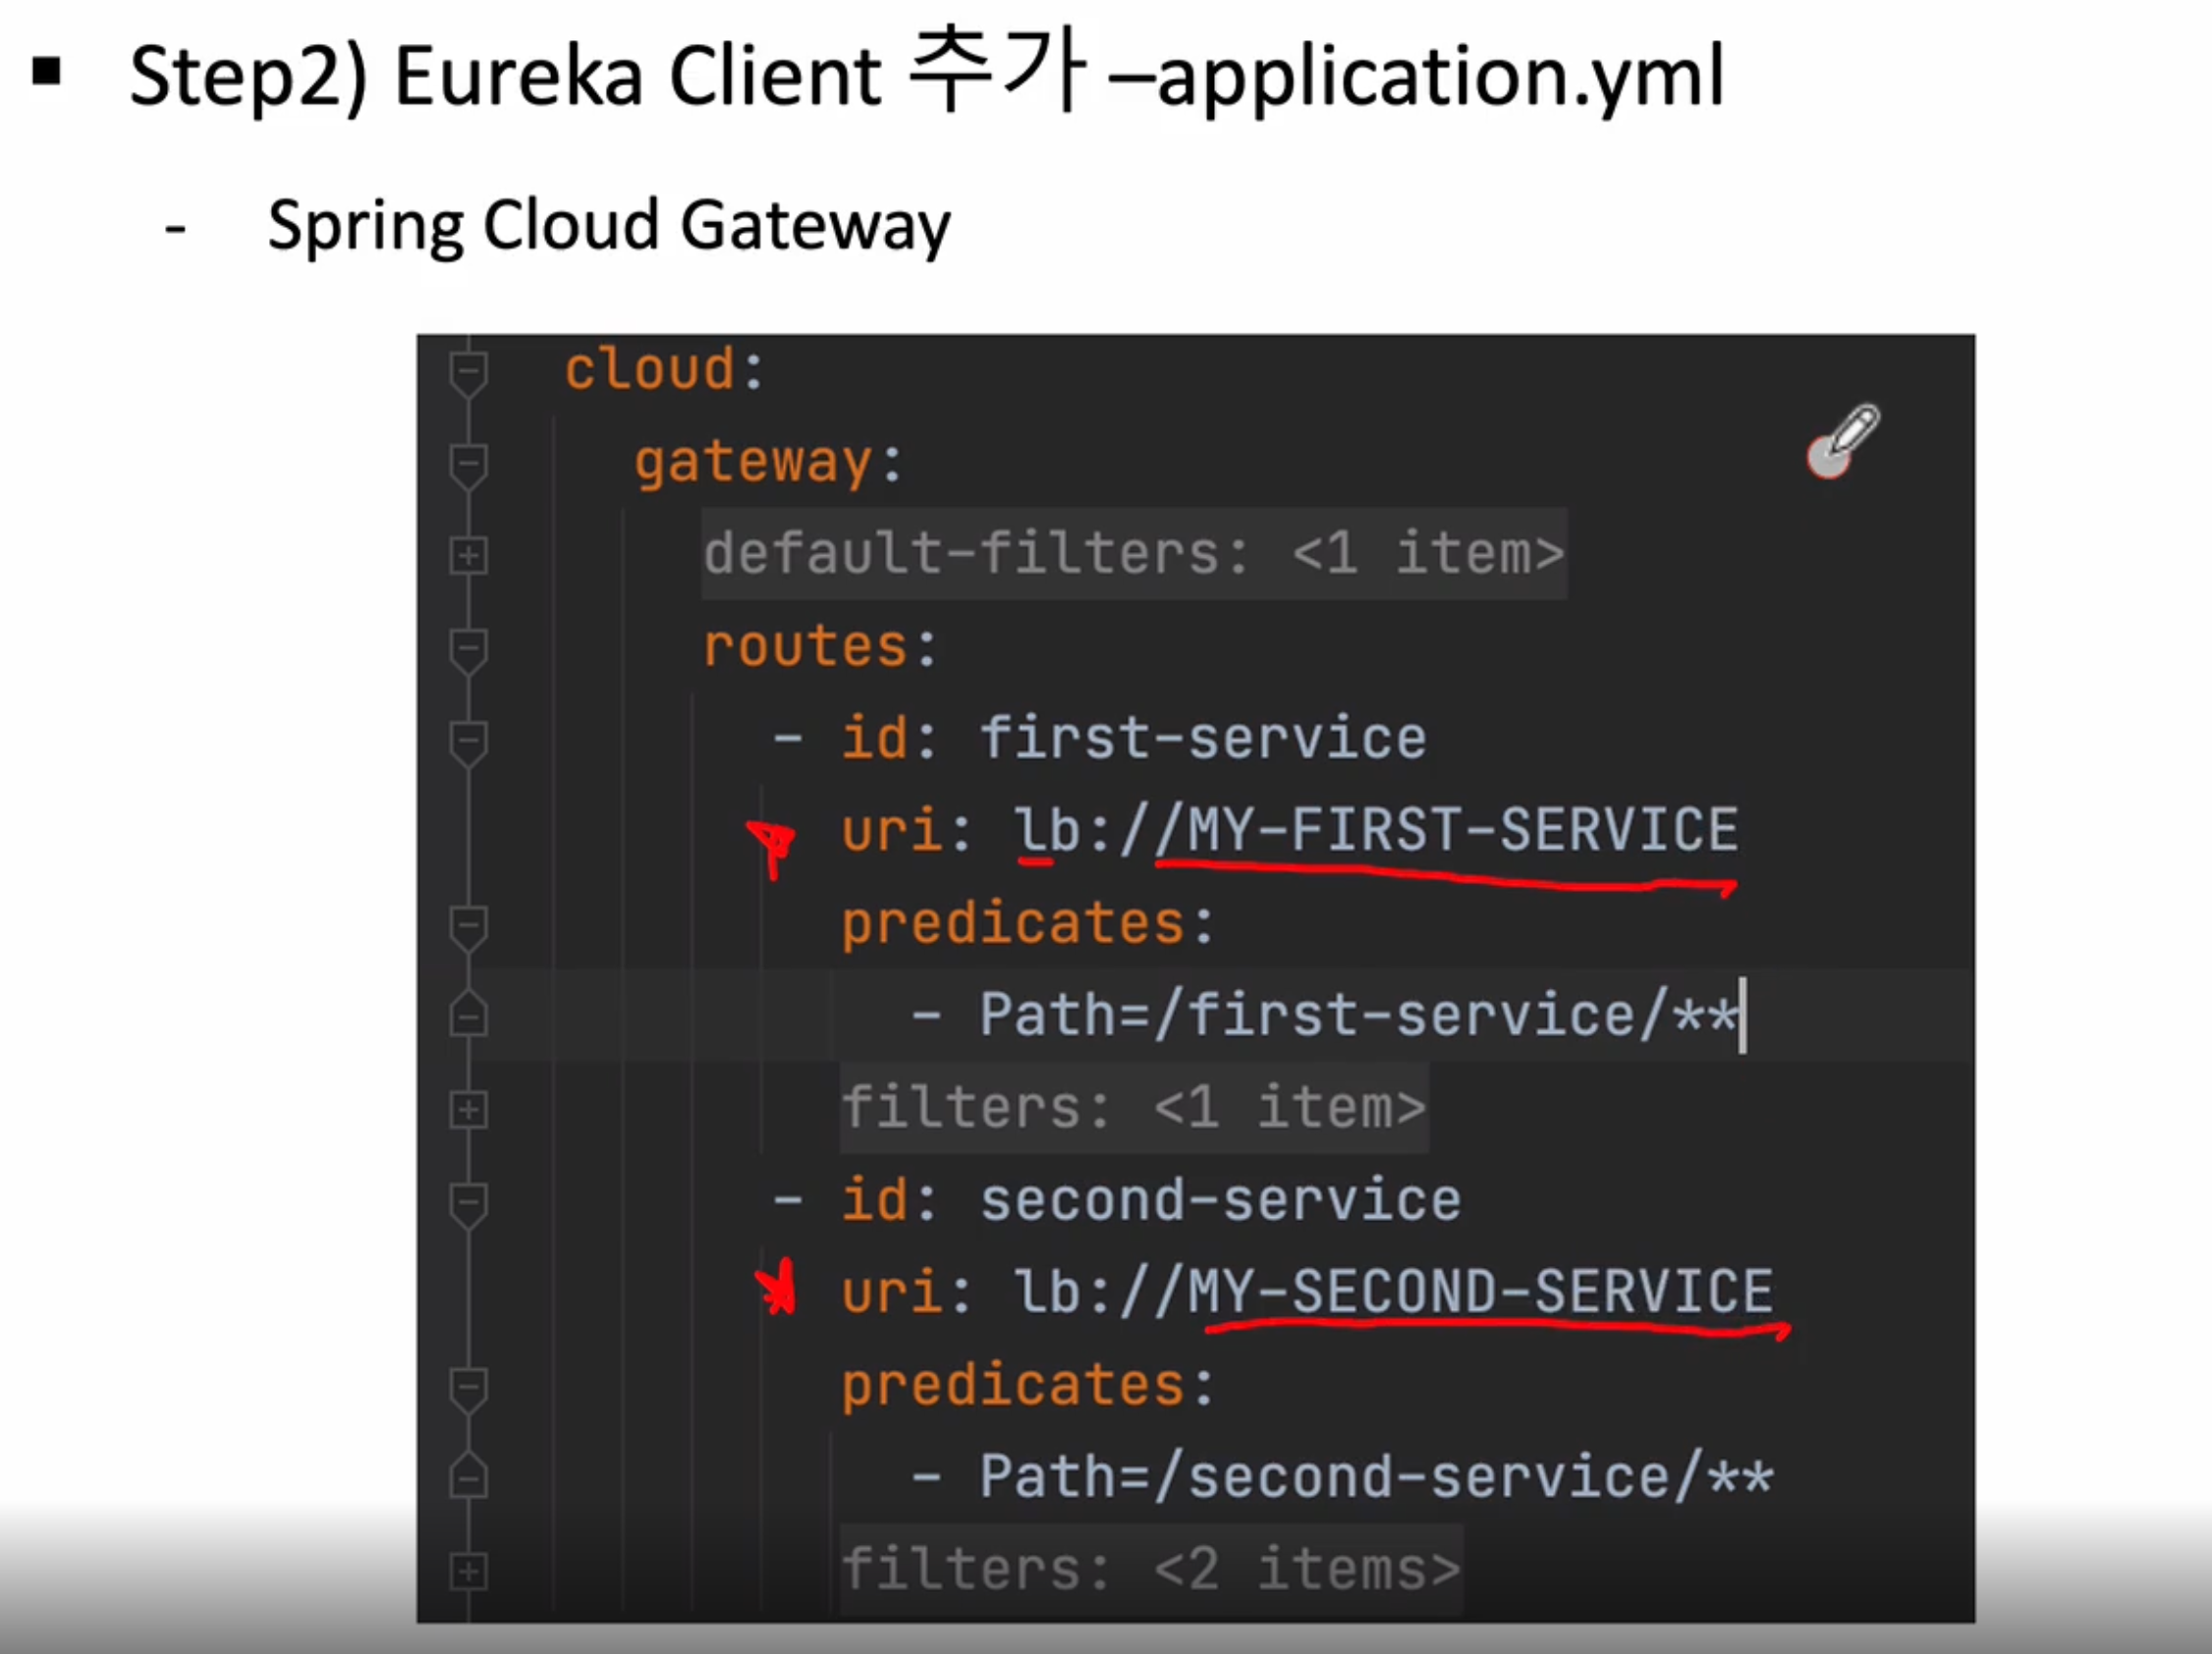
이제는 lb://MY-FIRST-SERVICE => (로드밸런서)://(유레카에 등록된 이름) 이렇게 작성해주어야 한다
클라이언트로부터 predicates쪽(/first-service/**)로 요청이 오면 uri(lb://MY-FIRST-SERVICE) 디스커버리쪽에 MY-FIRST-SERVICE 등록된 곳으로 요청을 보내준다
스템3 : Eureka Server - Service 등록 확인
- Spring Cloud Gateway, First Service, Second Service

그럼 이제 작업을 진행해보자
- Eureka 등록 진행
apigateway-service 프로젝트에 pom.xml에 아래 dependency를 추가
<dependency>
  <groupId>org.springframework.cloud</groupId>
  <artifactId>spring-cloud-starter-netflix-eureka-client</artifactId>
</dependency>
마찬가지로 first-service, second-service에도 같이 추가
이미 기존에 등록해두었음
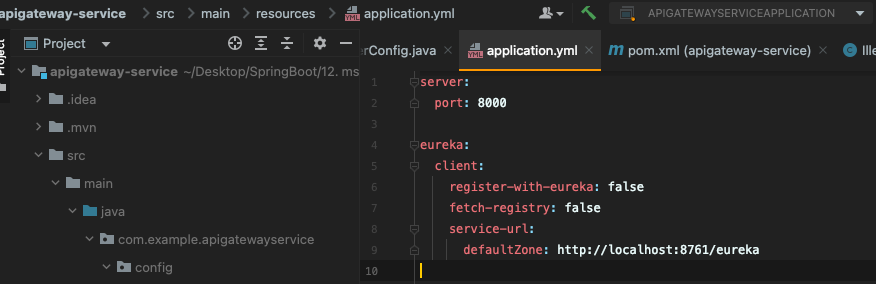
apigateway쪽 application.yml 파일을 수정
eureka:
  client:
    register-with-eureka: false
    fetch-registry: false
    service-url:
      defaultZone: http://localhost:8761/eureka
지금 위에 false 처리되어 있는 부분을 true로 변경
server:
  port: 8000

eureka:
  client:
    register-with-eureka: false
    fetch-registry: false
    service-url:
      defaultZone: http://localhost:8761/eureka

spring:
  application:
    name: apigateway-service
  cloud:
    gateway:
      default-filters:
        - name: GlobalFilter
          args:
            baseMessage: Spring CLoud Gateway Global Filter
            preLogger: true
            postLogger: true
      routes:
        - id: first-service
          uri: http://localhost:8081/
          predicates:
            - Path=/first-service/**
          filters:
#            - AddRequestHeader=first-request, first-request-header2
#            - AddResponseHeader=first-response, first-response-header2
            - CustomFilter
        - id: second-service
          uri: http://localhost:8082/
          predicates:
            - Path=/second-service/**
          filters:
#            - AddRequestHeader=second-request, second-requests-header2
#            - AddResponseHeader=second-response, second-response-header2
            - name: CustomFilter
            - name: LoggingFilter
              args:
                baseMessage: Hi, there.
                preLogger: true
                postLogger: true
그 다음 first-service와 second-service application.yml에 보면 eureka 등록이 되다가 말았는데 정상적으로 등록해주자
[first-service, second-service]
[기존 코드]
server:
  port: 8081

spring:
  application:
    name: my-first-service

eureka:
  client:
    fetch-registry: false
    register-with-eureka: false
[수정 코드]
server:
  port: 8081

spring:
  application:
    name: my-first-service

eureka:
  client:
    register-with-eureka: true
    fetch-registry: true
    service-url:
      defaultZone: http://localhost:8761/eureka
server:
  port: 8082

spring:
  application:
    name: my-second-service

eureka:
  client:
    register-with-eureka: true
    fetch-registry: true
    service-url:
      defaultZone: http://localhost:8761/eureka
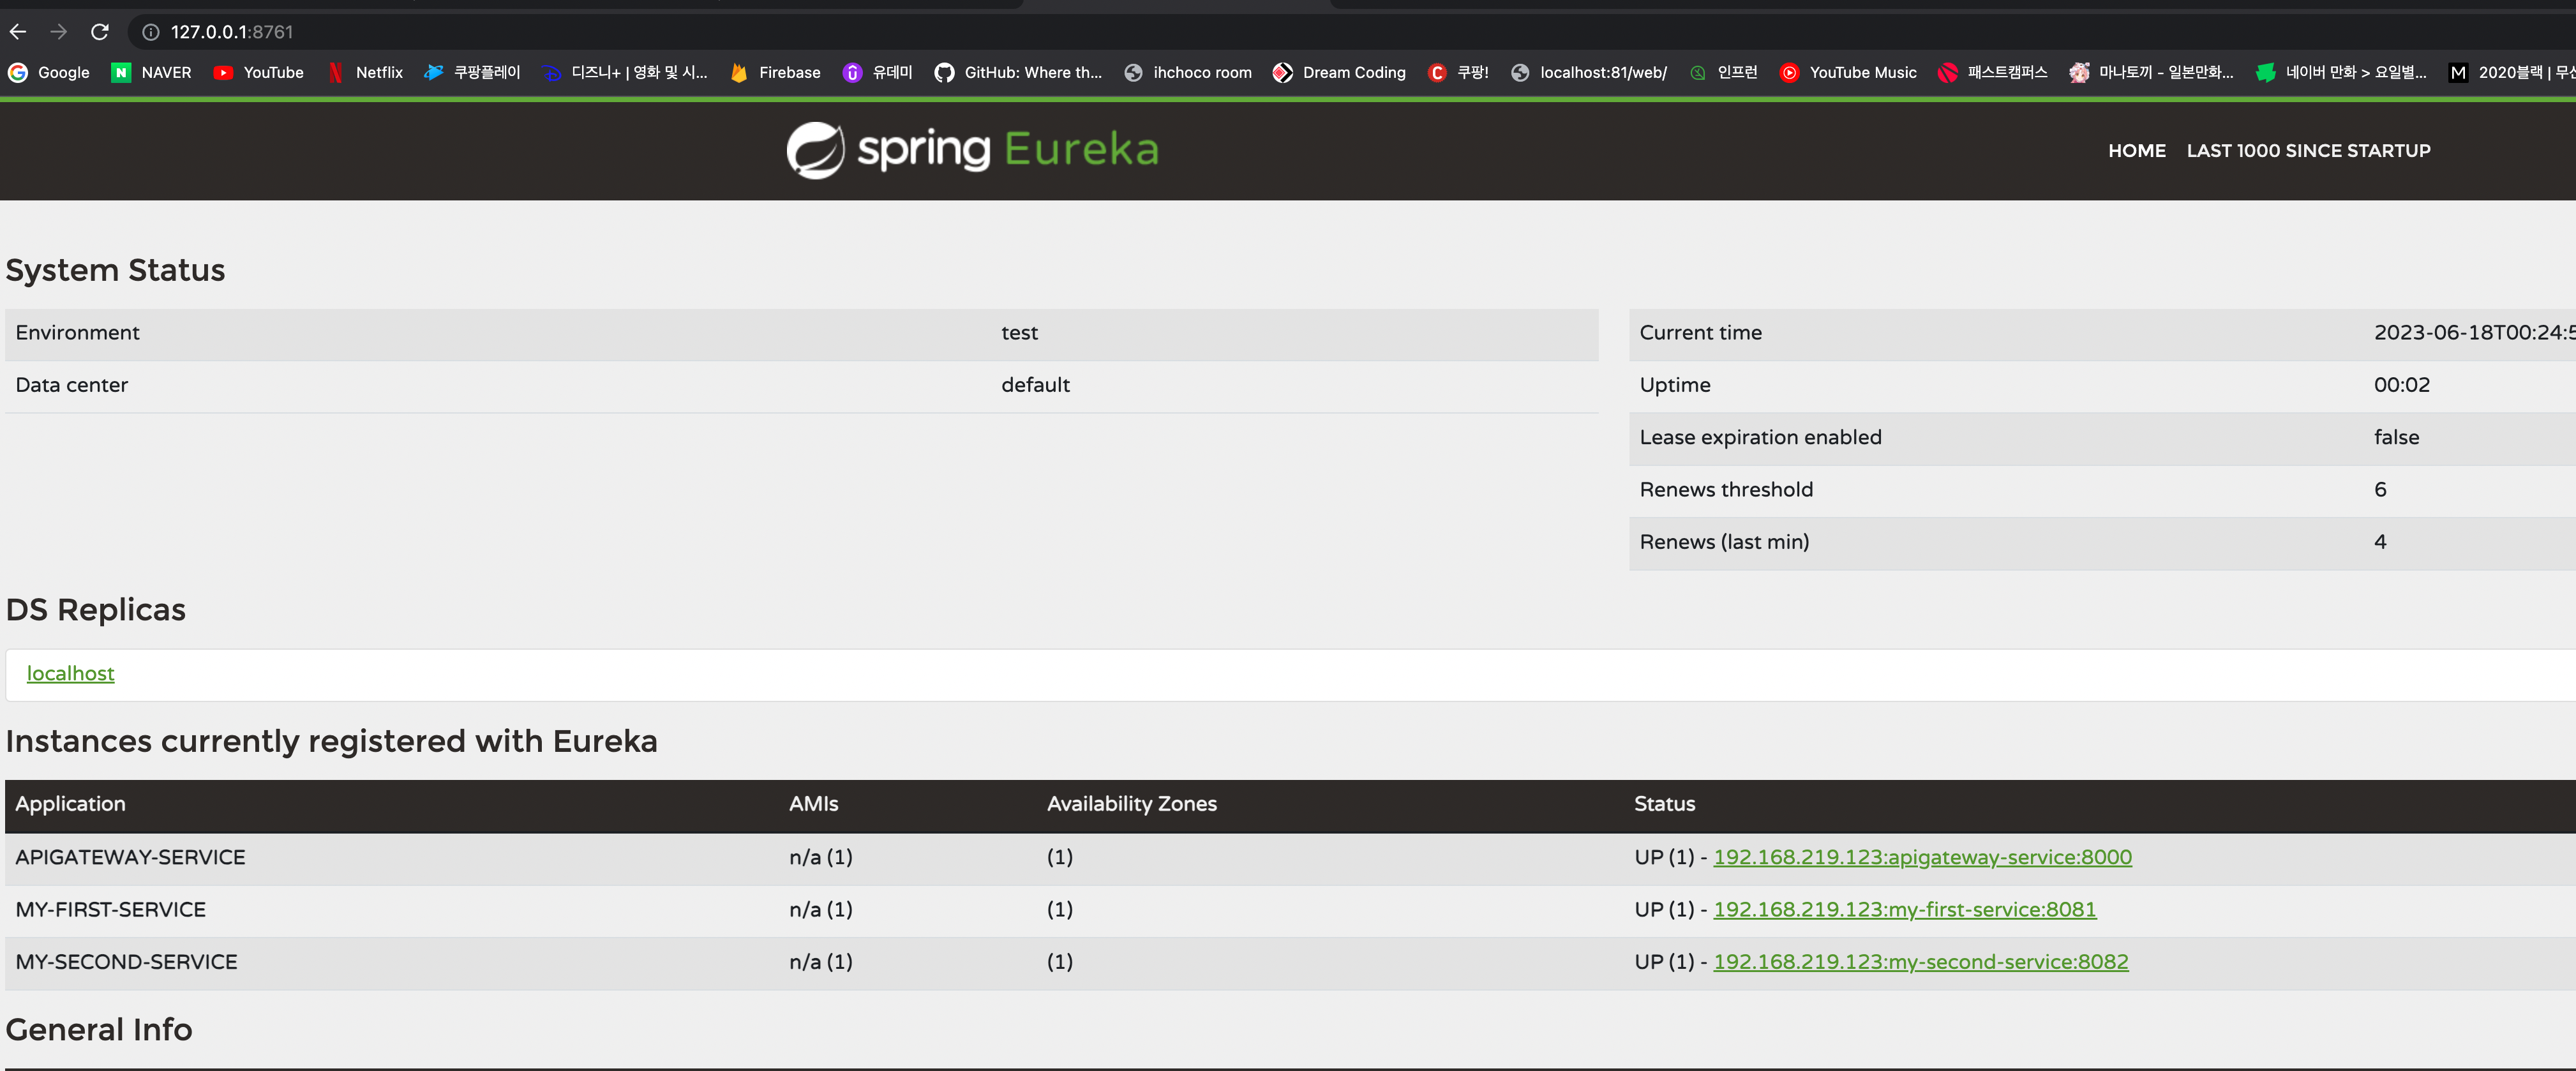
3가지 서비스가 잘 등록되어 사용되는 것을 확인 할 수 있다
그런데 지금 확인 해보니까 gateway쪽 application.yml에 설정이 하나 안되어 있는게 있어서 수정이 필요
routes: uri 부분이 예전처럼 Localhost:8081로 되어있음
server:
  port: 8000

eureka:
  client:
    register-with-eureka: true
    fetch-registry: true
    service-url:
      defaultZone: http://localhost:8761/eureka

spring:
  application:
    name: apigateway-service
  cloud:
    gateway:
      default-filters:
        - name: GlobalFilter
          args:
            baseMessage: Spring CLoud Gateway Global Filter
            preLogger: true
            postLogger: true
      routes:
        - id: first-service
#          uri: http://localhost:8081/
          uri: lb://MY-FIRST-SERVICE
          predicates:
            - Path=/first-service/**
          filters:
#            - AddRequestHeader=first-request, first-request-header2
#            - AddResponseHeader=first-response, first-response-header2
            - CustomFilter
        - id: second-service
#          uri: http://localhost:8082/
          uri: lb://MY-SECOND-SERVICE
          predicates:
            - Path=/second-service/**
          filters:
#            - AddRequestHeader=second-request, second-requests-header2
#            - AddResponseHeader=second-response, second-response-header2
            - name: CustomFilter
            - name: LoggingFilter
              args:
                baseMessage: Hi, there.
                preLogger: true
                postLogger: true
이렇게 하고 재기동 한다음 포스트맨으로 정상 동작이 되는지 확인해보자
포스트맨으로 수행했을때도 정상적으로 잘 동작하는 것을 확인 할 수있다
기존에는 apigateway에서 단독으로 서비스를 등록해서 호출되는 곳으로 보내었지만 지금은 eureka서버와 연동하여 등록된 서비스쪽으로 전송
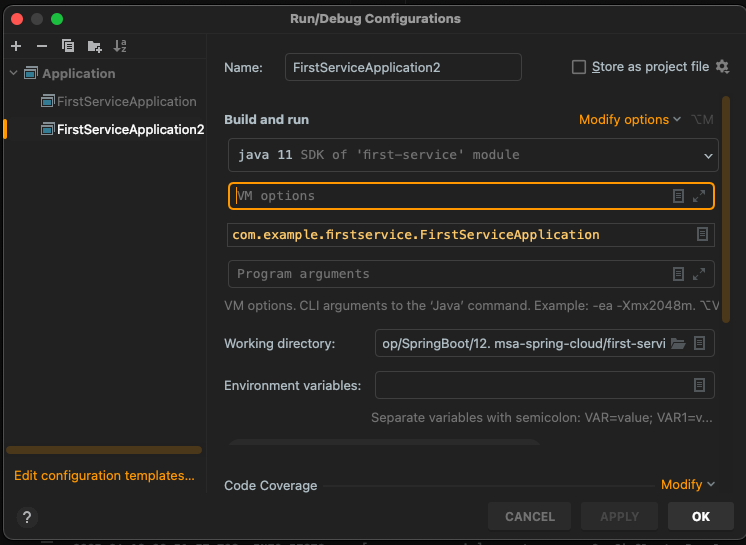
스텝4 : First Serivce, Second Service를 각각 2개씩 기동
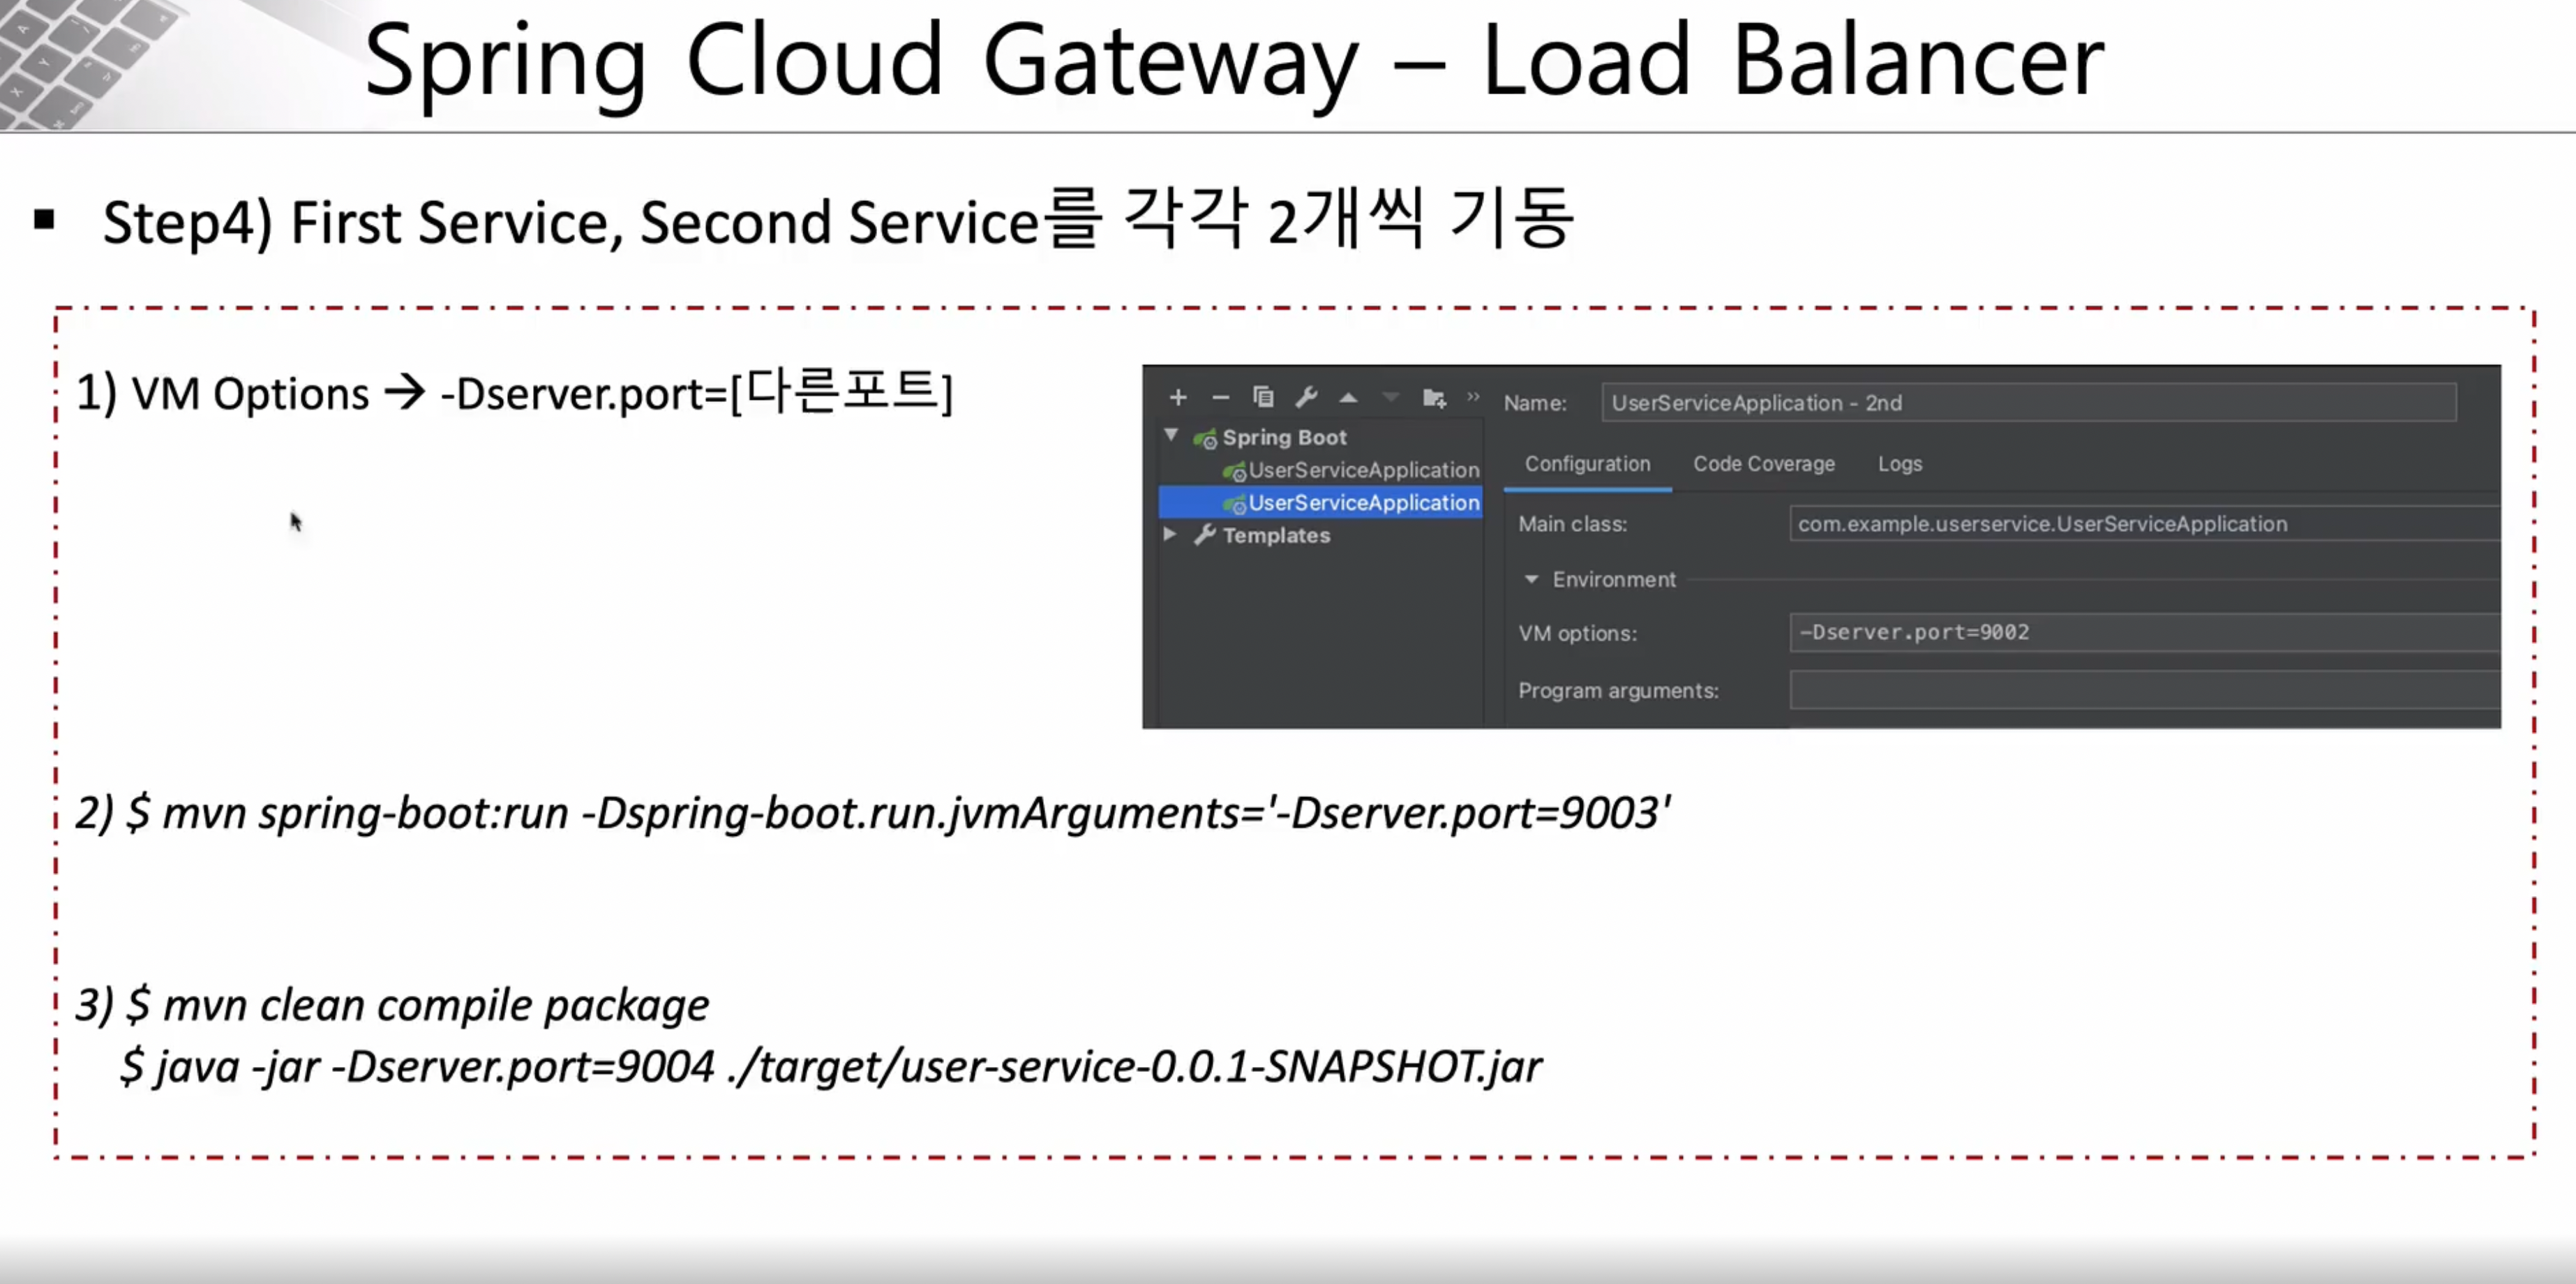
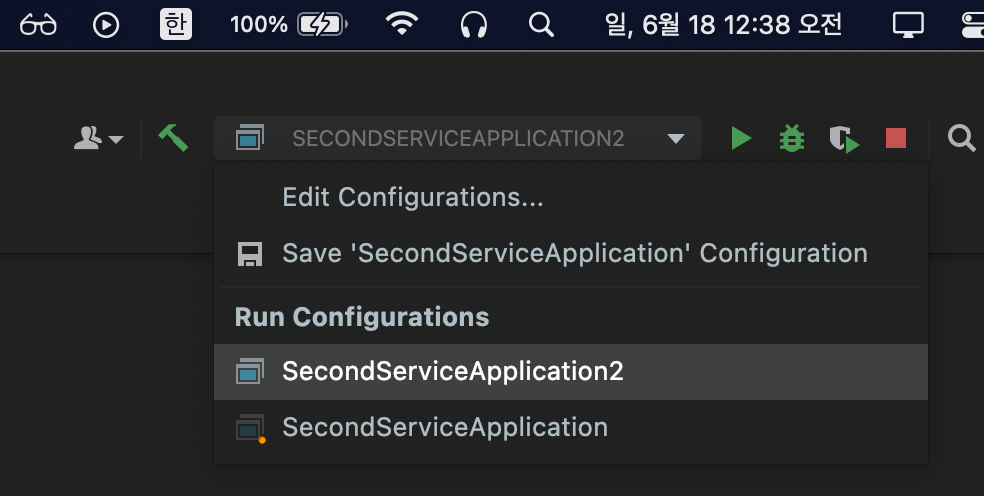
앞에서 이미 배웠던 내용이지만 실행 하는 부분을 그대로 복사해서 하나 더 추가해서 만들어서 실행하는 방법
-
Edit Config 클릭
-
왼쪽 상단에 Copy 클릭
-
Modify OptionS 클릭해서 Add JVM Option 클릭
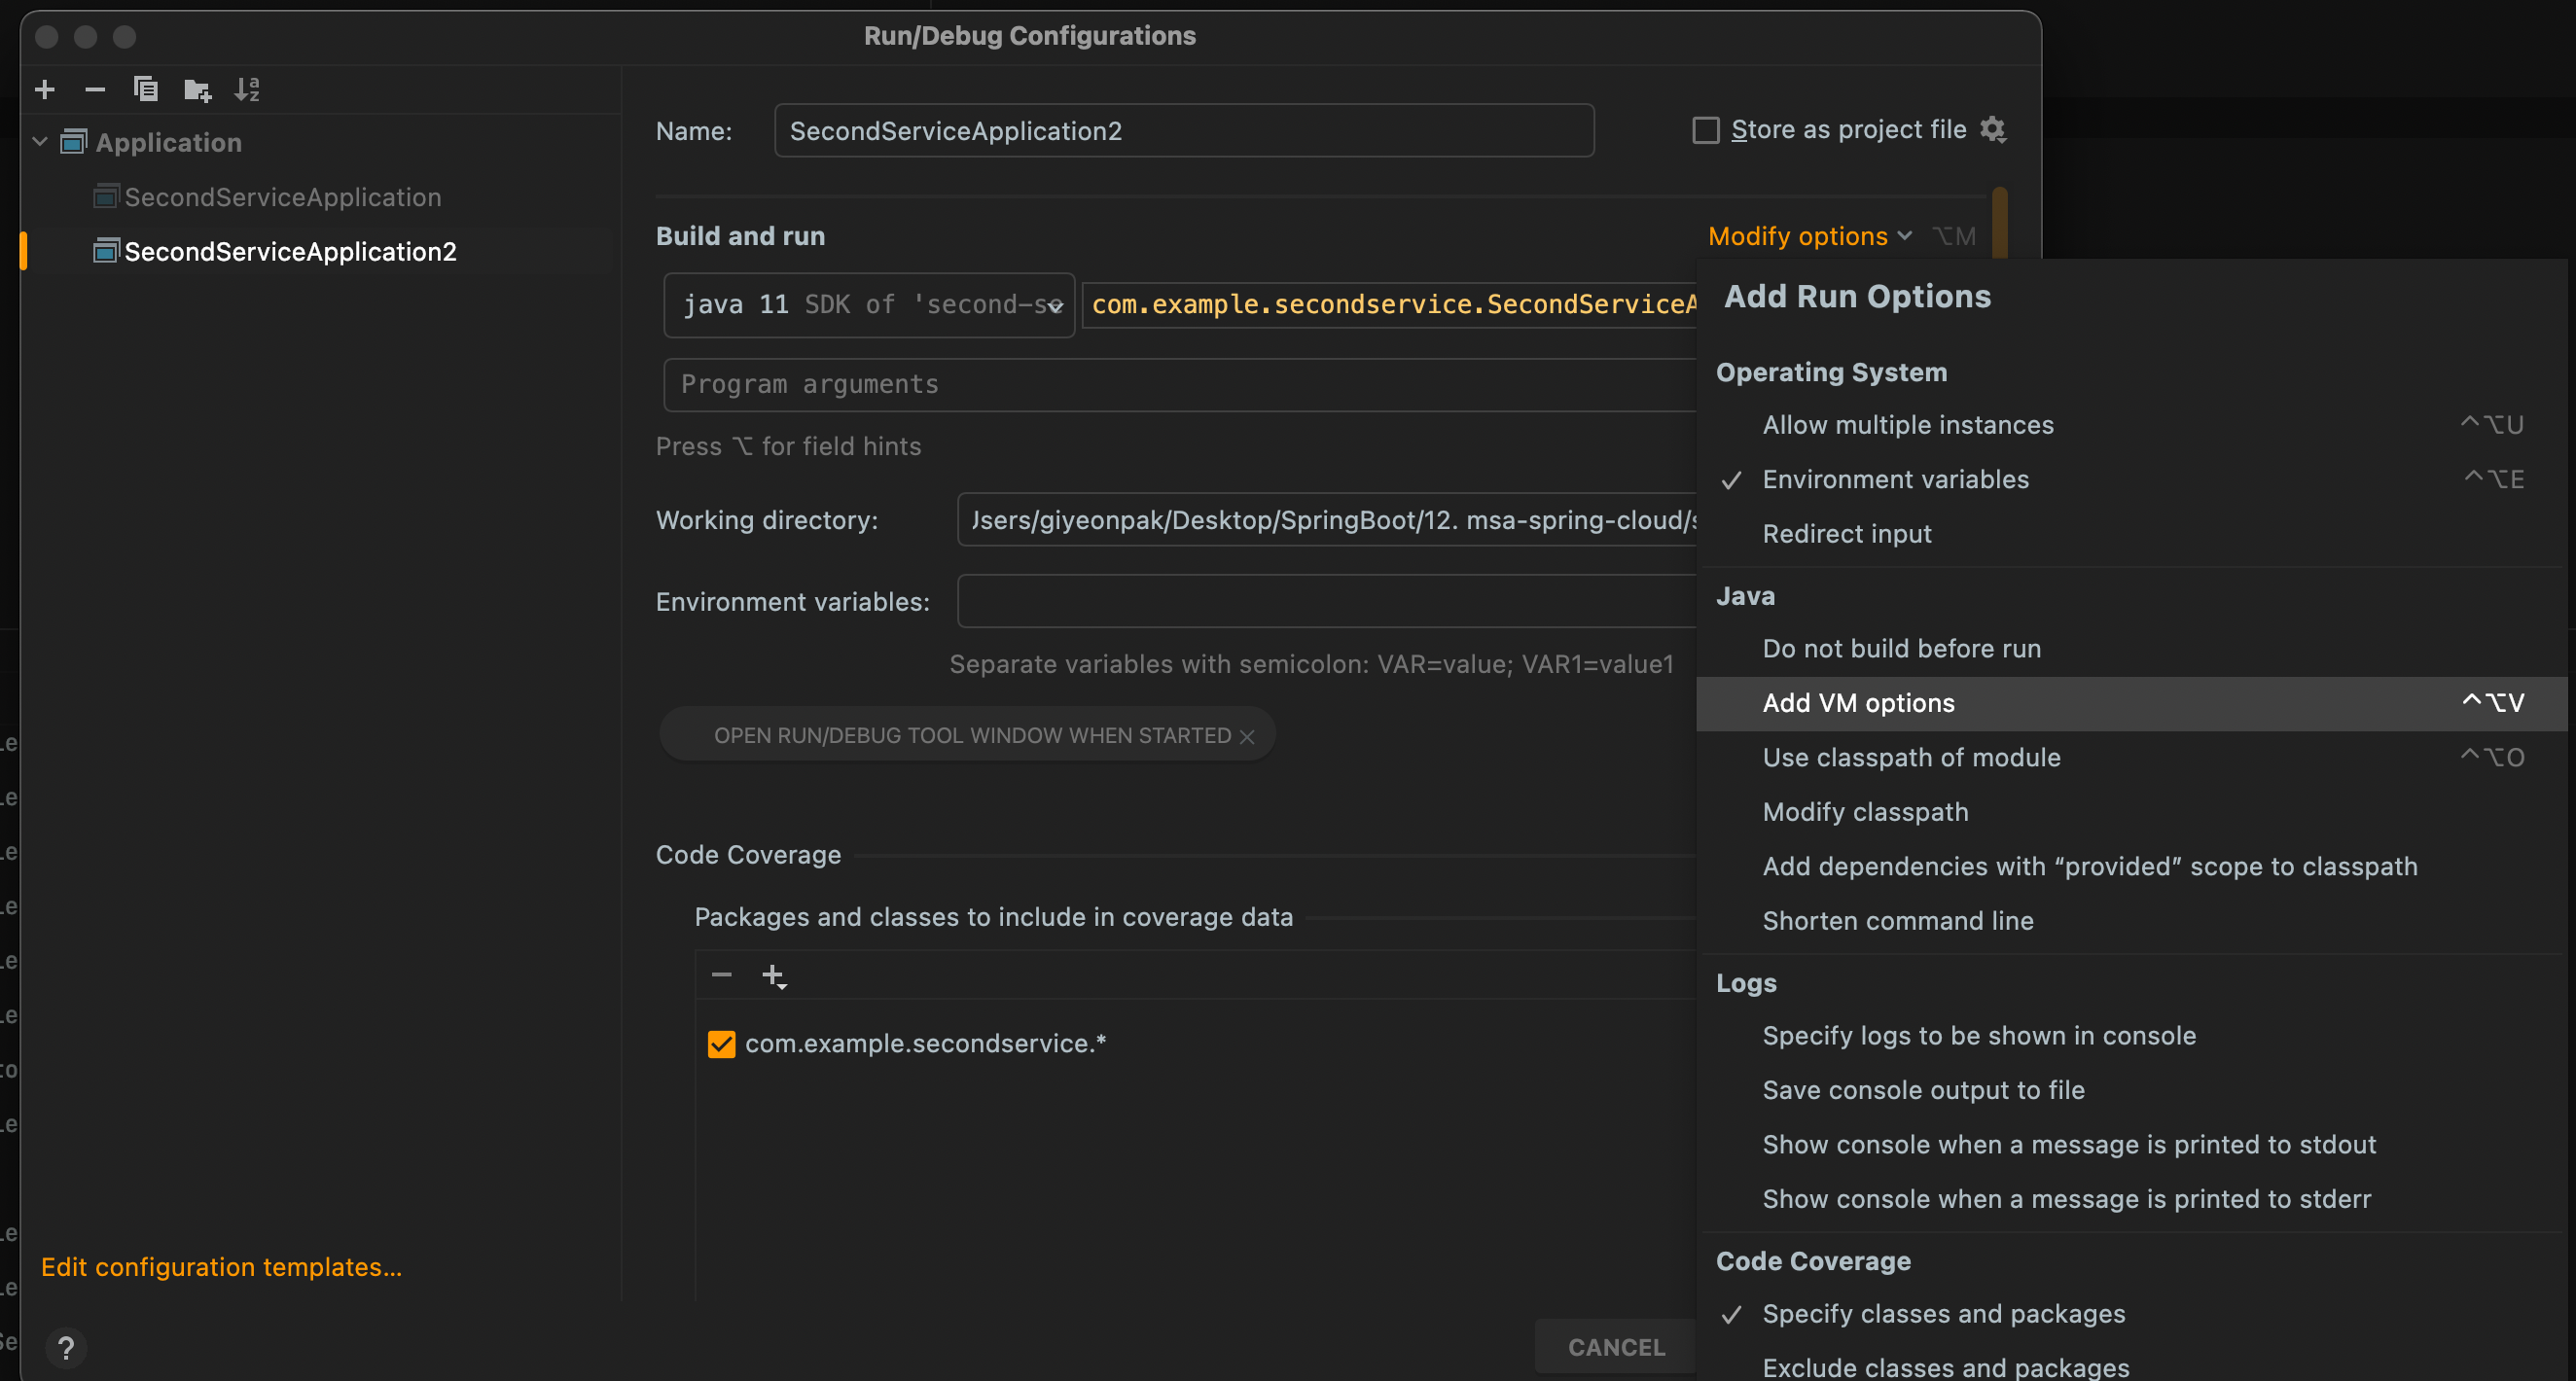
-
VM Option 부분에 -> -Dserver.port=9002 입력 후 OK 클릭
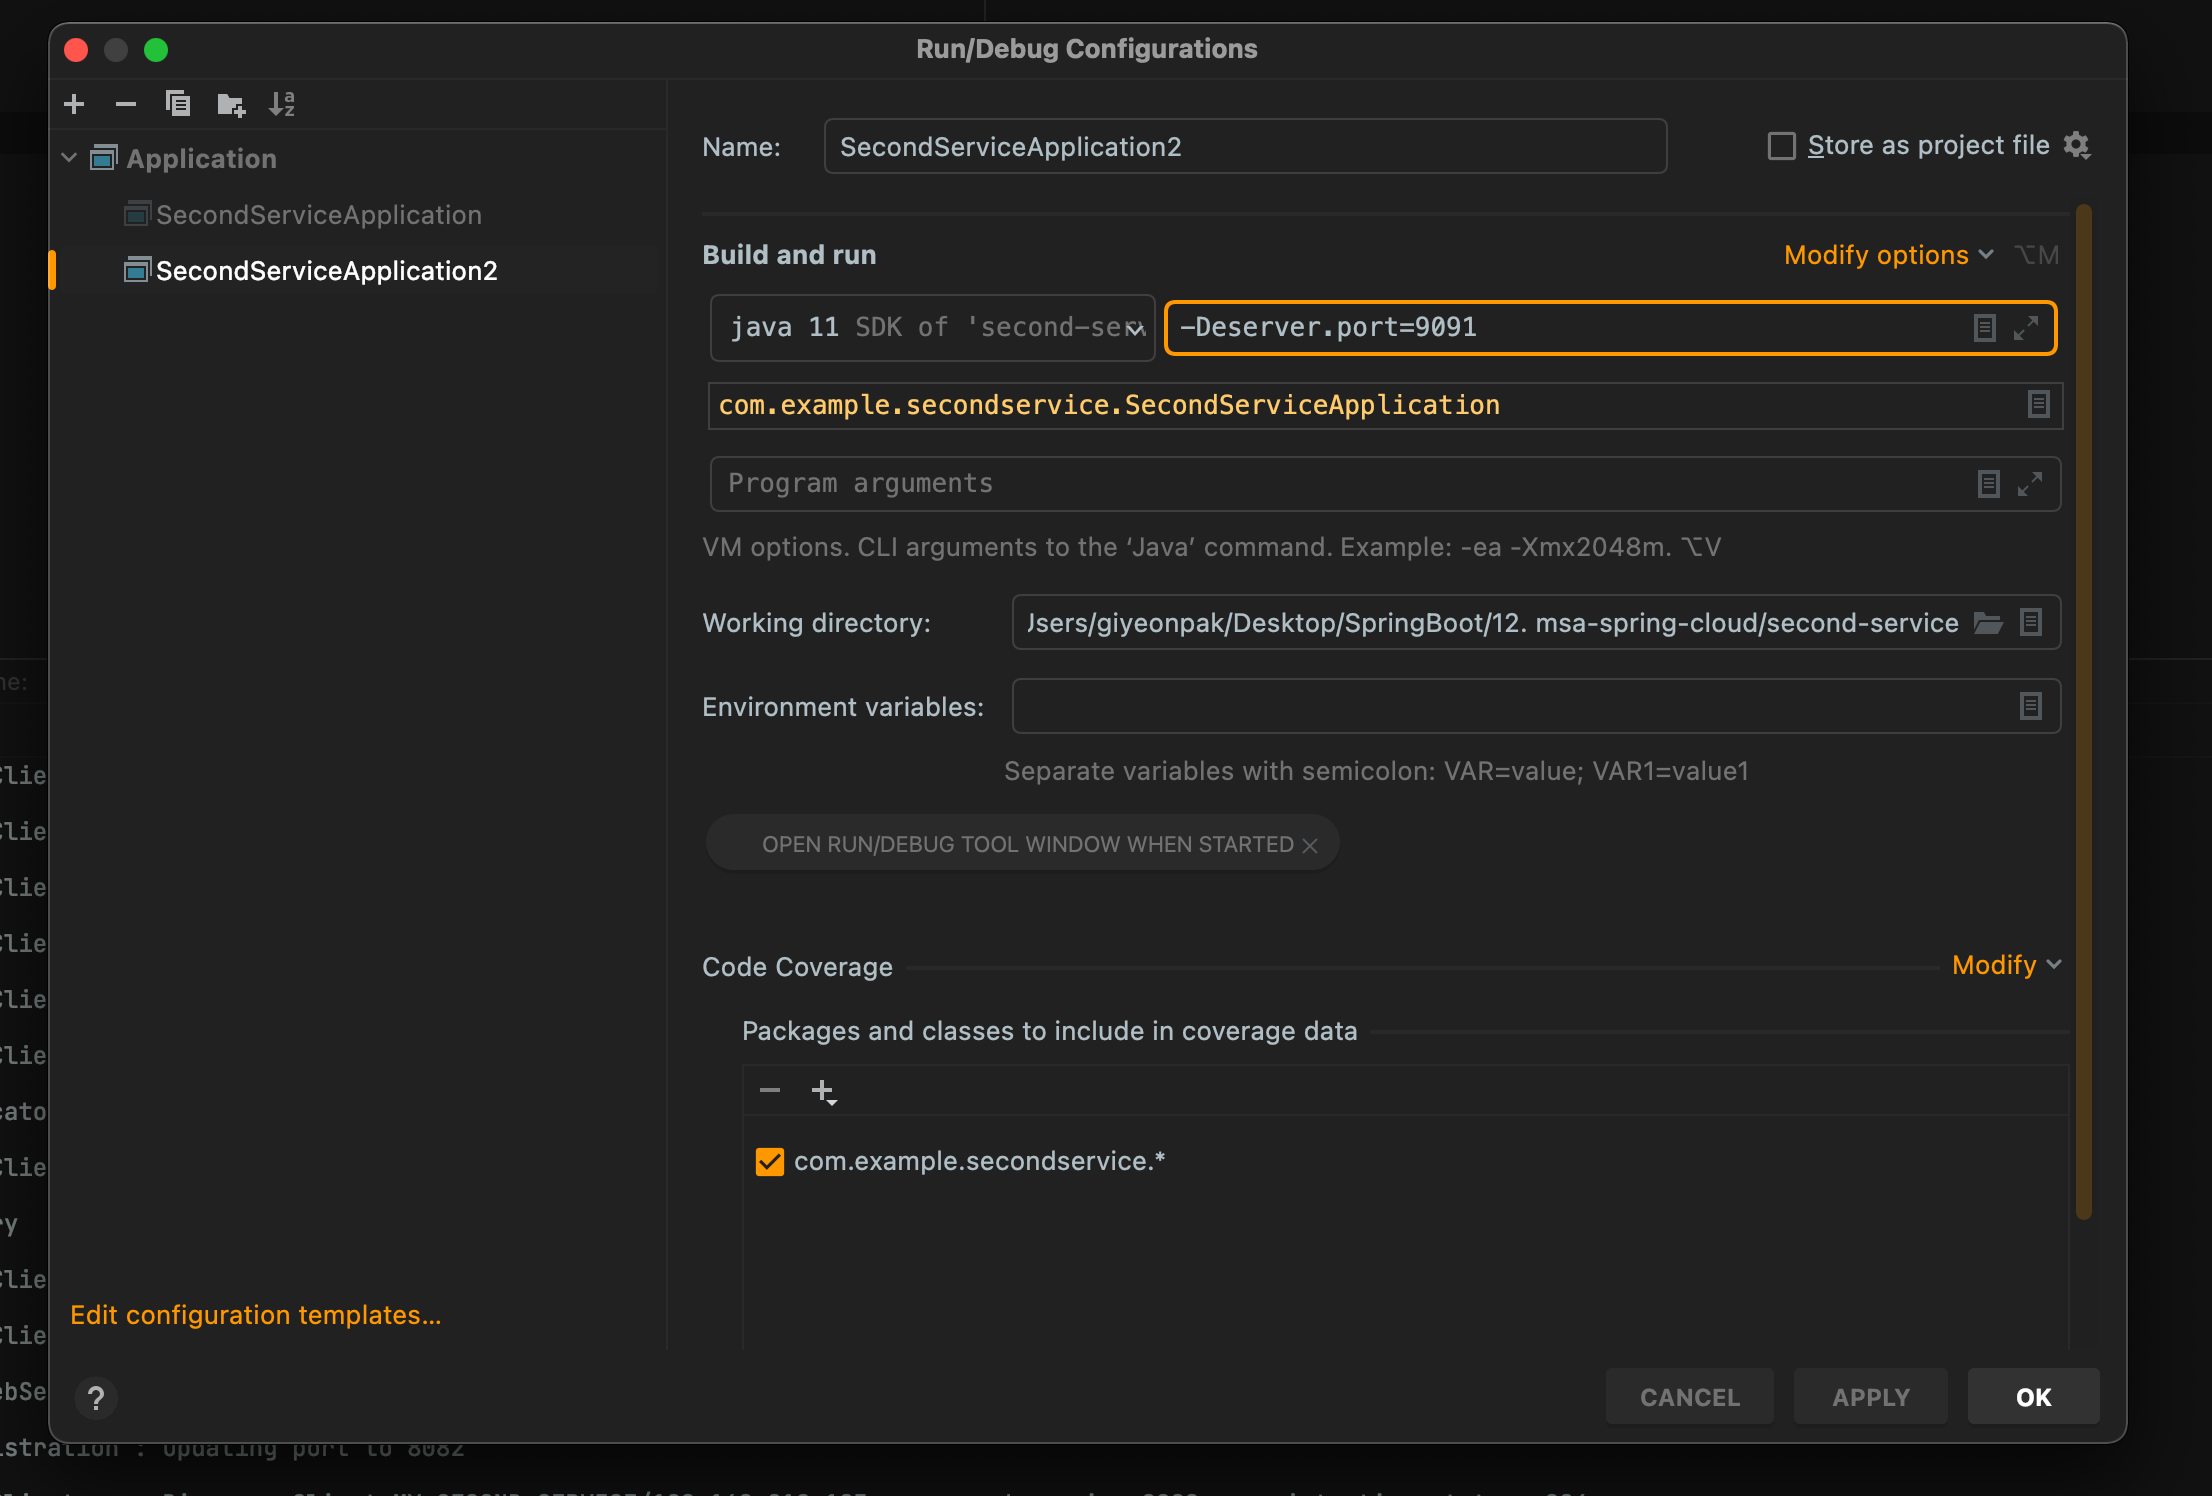
- 사진에는 Deserver.port라고 되어있지만 오타
- (Dserver라고 해야한다)
포트 번호는 의미가 없이 곂치지 않게 임의로 지정하였음
- 실행하기
2번째 다른 방법으로 터미널에서 작동하는 방법이 있다
- 터미널 키기
- 명령어 입력(mvn clean compile package)

- 빌드가 끝나면 끝나면 확인 명령어 입력
- ls -al ./target/first-service-0.0.1-SNAPSHOT.jar
- java -jar -Dserver.port=9092 ./target/first-service-0.0.1-SNAPSHOT.jar
위 부분은 maven 설치가 필요하여 추후에 다시 진행하자
이렇게 first, second 모두 포트를 다르게 해서 2개씩 띄어두고 유레카 서버를 확인해보자
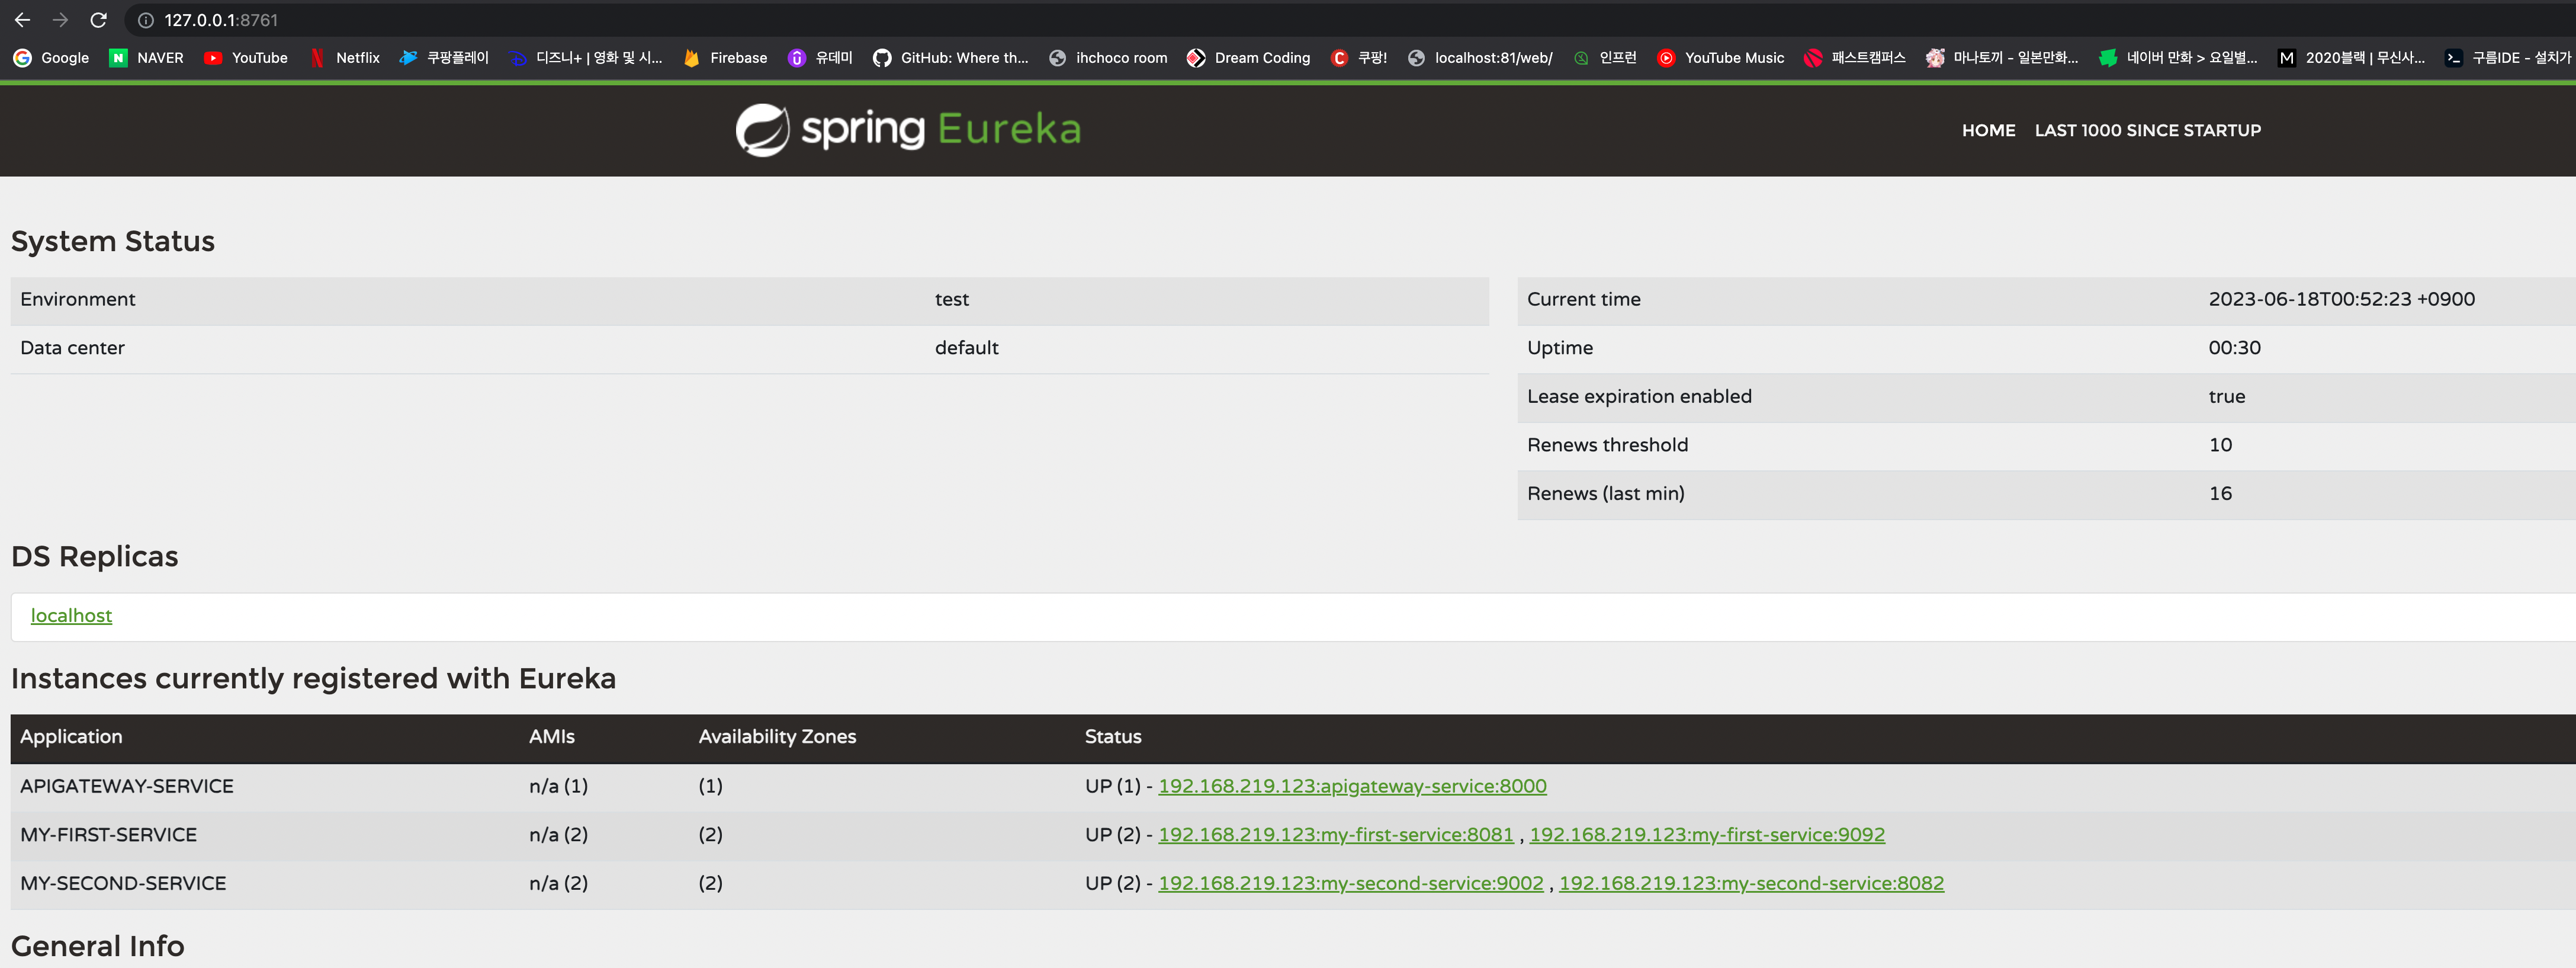
정상적으로 등록된 것을 확인 할 수 있음
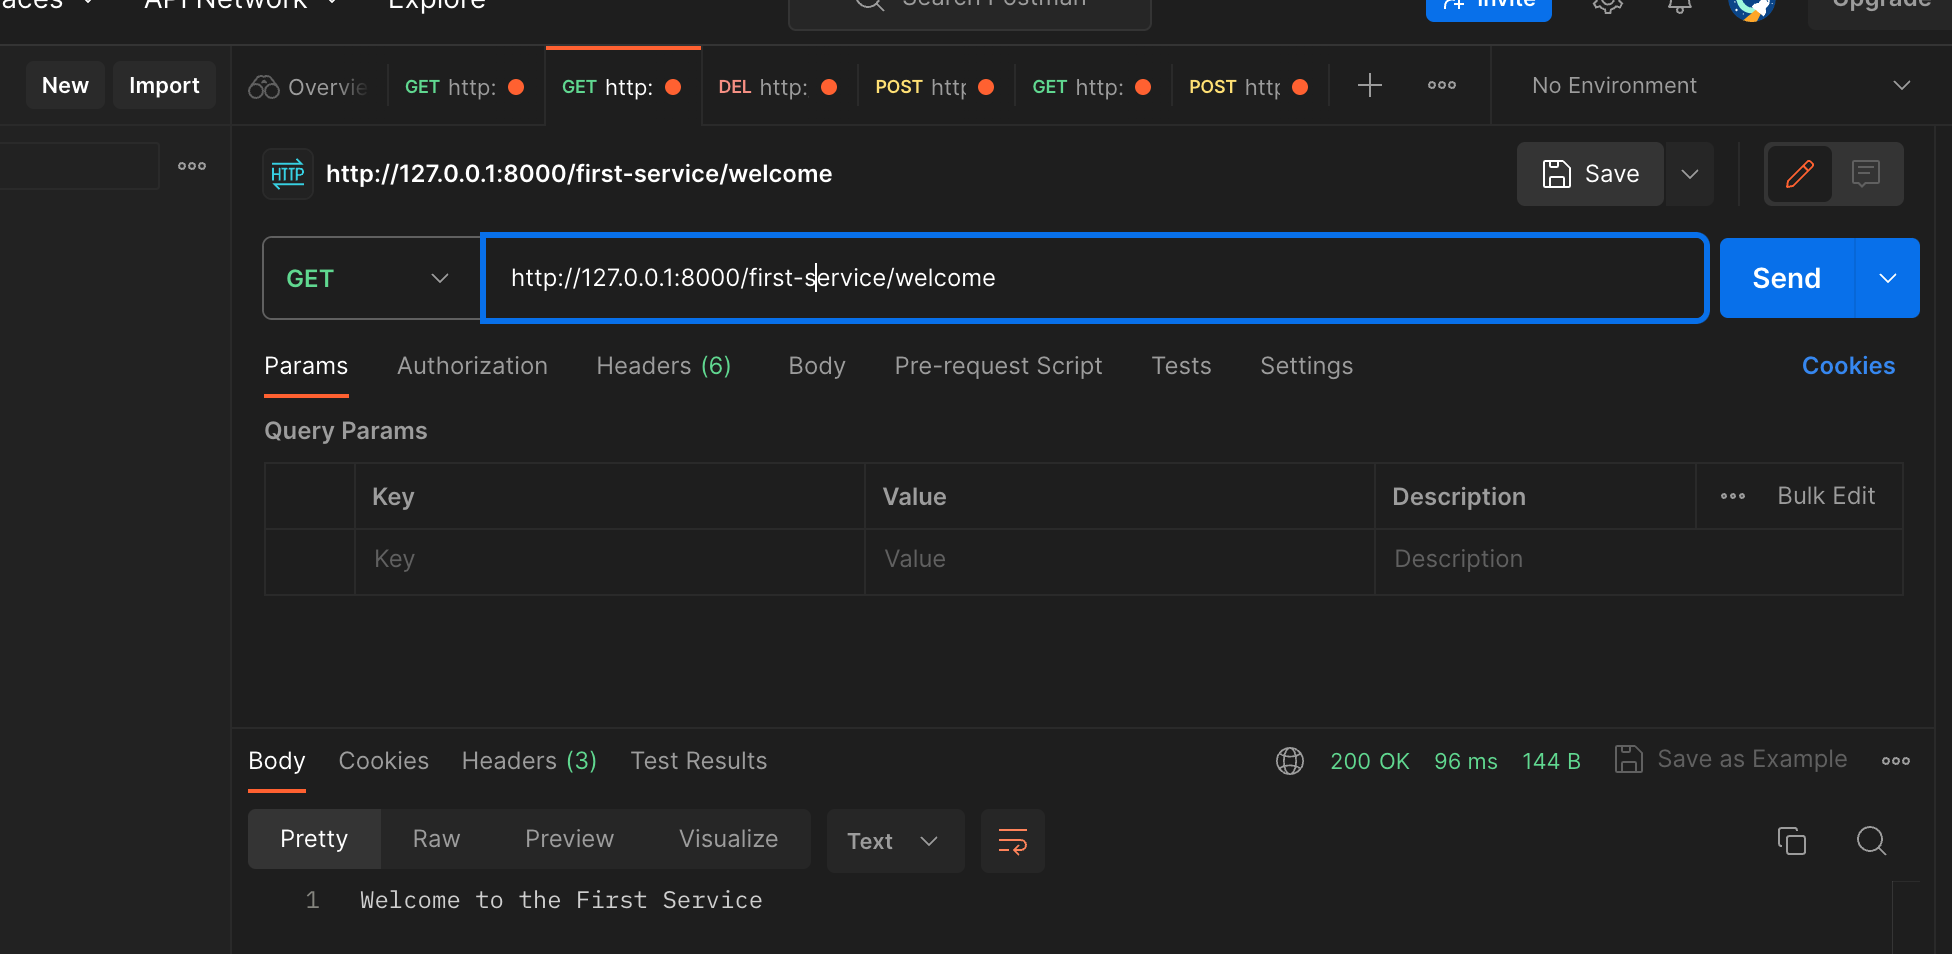
포스트맨으로 테스트를 해도 정상적으로 동작하지만 현재 first-serivce는 2개가 띄어져 있는데 어디로 들어오는건지 확인이 어렵다
이번에는 한번 RANDOM-PORT를 사용해보자
[first-service를 모두 중지후 작업]
first-service에 port를 0으로 변경해보자
application.yml 파일을 수정하자
[기존코드]
server:
  port: 8081

spring:
  application:
    name: my-first-service

eureka:
  client:
    register-with-eureka: true
    fetch-registry: true
    service-url:
      defaultZone: http://localhost:8761/eureka
[수정코드]
server:
  port: 0

spring:
  application:
    name: my-first-service

eureka:
  client:
    register-with-eureka: true
    fetch-registry: true
    service-url:
      defaultZone: http://localhost:8761/eureka
  instance:
    instance-id: ${spring.application.name}:${spring.application.instance_id:${random.value}}
이전에도 작업을 해준거지만 이렇게 해주면 vm옵션에 포트를 별도로 주지 않아도 정상적으로 랜덤포트를 만들어서 실행
그냥 단순하게 포트 0 만 하게 되면 유레카 서버에 표시가 포트 0 으로만 나오기 때문이다
VMOption 부분 설정해준 내역 삭제(-Dserver.port)

MY-FIRST-SERVICE 포트가 이상하게 나오지만 클릭해보면 랜덤포트가 정상적으로 들어가 있음

이제 First-Serivce Controller 부분에서 몇번 포트 서비스가 호출되었는지 알고 싶다
[기존코드]
package com.example.firstservice;

import lombok.extern.slf4j.Slf4j;
import org.springframework.web.bind.annotation.GetMapping;
import org.springframework.web.bind.annotation.RequestHeader;
import org.springframework.web.bind.annotation.RequestMapping;
import org.springframework.web.bind.annotation.RestController;

// http://localhost:8081/welcome 우리가 만든 프로젝트가 받기로 한 URI
// 하지만 API-GATEWAY를 통해서 전달받을 때에는 http://locahost:8081/first-service/welcome 이렇게 받기 때문에 에러가 발생
@RestController
@RequestMapping("/first-service")
@Slf4j //롬복의 로그를 사용하기 위한 어노테이션
public class FirstServiceController {
    @GetMapping("/welcome")
    public String welcome(){
       return "Welcome to the First Service";
    }

    @GetMapping("/message")
    public String message(@RequestHeader("first-request") String header){
        log.info(header);
        return "Hello World in First Service";
    }


    @GetMapping("/check")
    public String check(){
        return "Hi, there. This is a message from Second Service";
    }

}
//application.yml 에 등록된 정보를 가져오는 방법
Environment env;
추가로 스프링부트에서는 변수에 @Autowied를 하는게 아니라 생성자를 통해서 주입하는것을 권장
[포트 정보 가져오는 방법 2가지]
- Environment env 사용
- HttpServletRequest 사용
여기서는 위에 두가지 방식 모두 사용법을 알려줌
[수정코드]
package com.example.firstservice;
import lombok.extern.slf4j.Slf4j;
import org.springframework.beans.factory.annotation.Autowired;
import org.springframework.core.env.Environment;
import org.springframework.web.bind.annotation.GetMapping;
import org.springframework.web.bind.annotation.RequestHeader;
import org.springframework.web.bind.annotation.RequestMapping;
import org.springframework.web.bind.annotation.RestController;
import javax.servlet.http.HttpServletRequest;
// http://localhost:8081/welcome 우리가 만든 프로젝트가 받기로 한 URI
// 하지만 API-GATEWAY를 통해서 전달받을 때에는 http://locahost:8081/first-service/welcome 이렇게 받기 때문에 에러가 발생
@RestController
@RequestMapping("/first-service")
@Slf4j //롬복의 로그를 사용하기 위한 어노테이션
public class FirstServiceController {
Environment env; //application.yml 에 등록된 정보를 가져오는 방법
@Autowired
public FirstServiceController(Environment env){
this.env = env;
}
@GetMapping("/welcome")
public String welcome(){
return "Welcome to the First Service";
}
@GetMapping("/message")
public String message(@RequestHeader("first-request") String header){
log.info(header);
return "Hello World in First Service";
}
@GetMapping("/check")
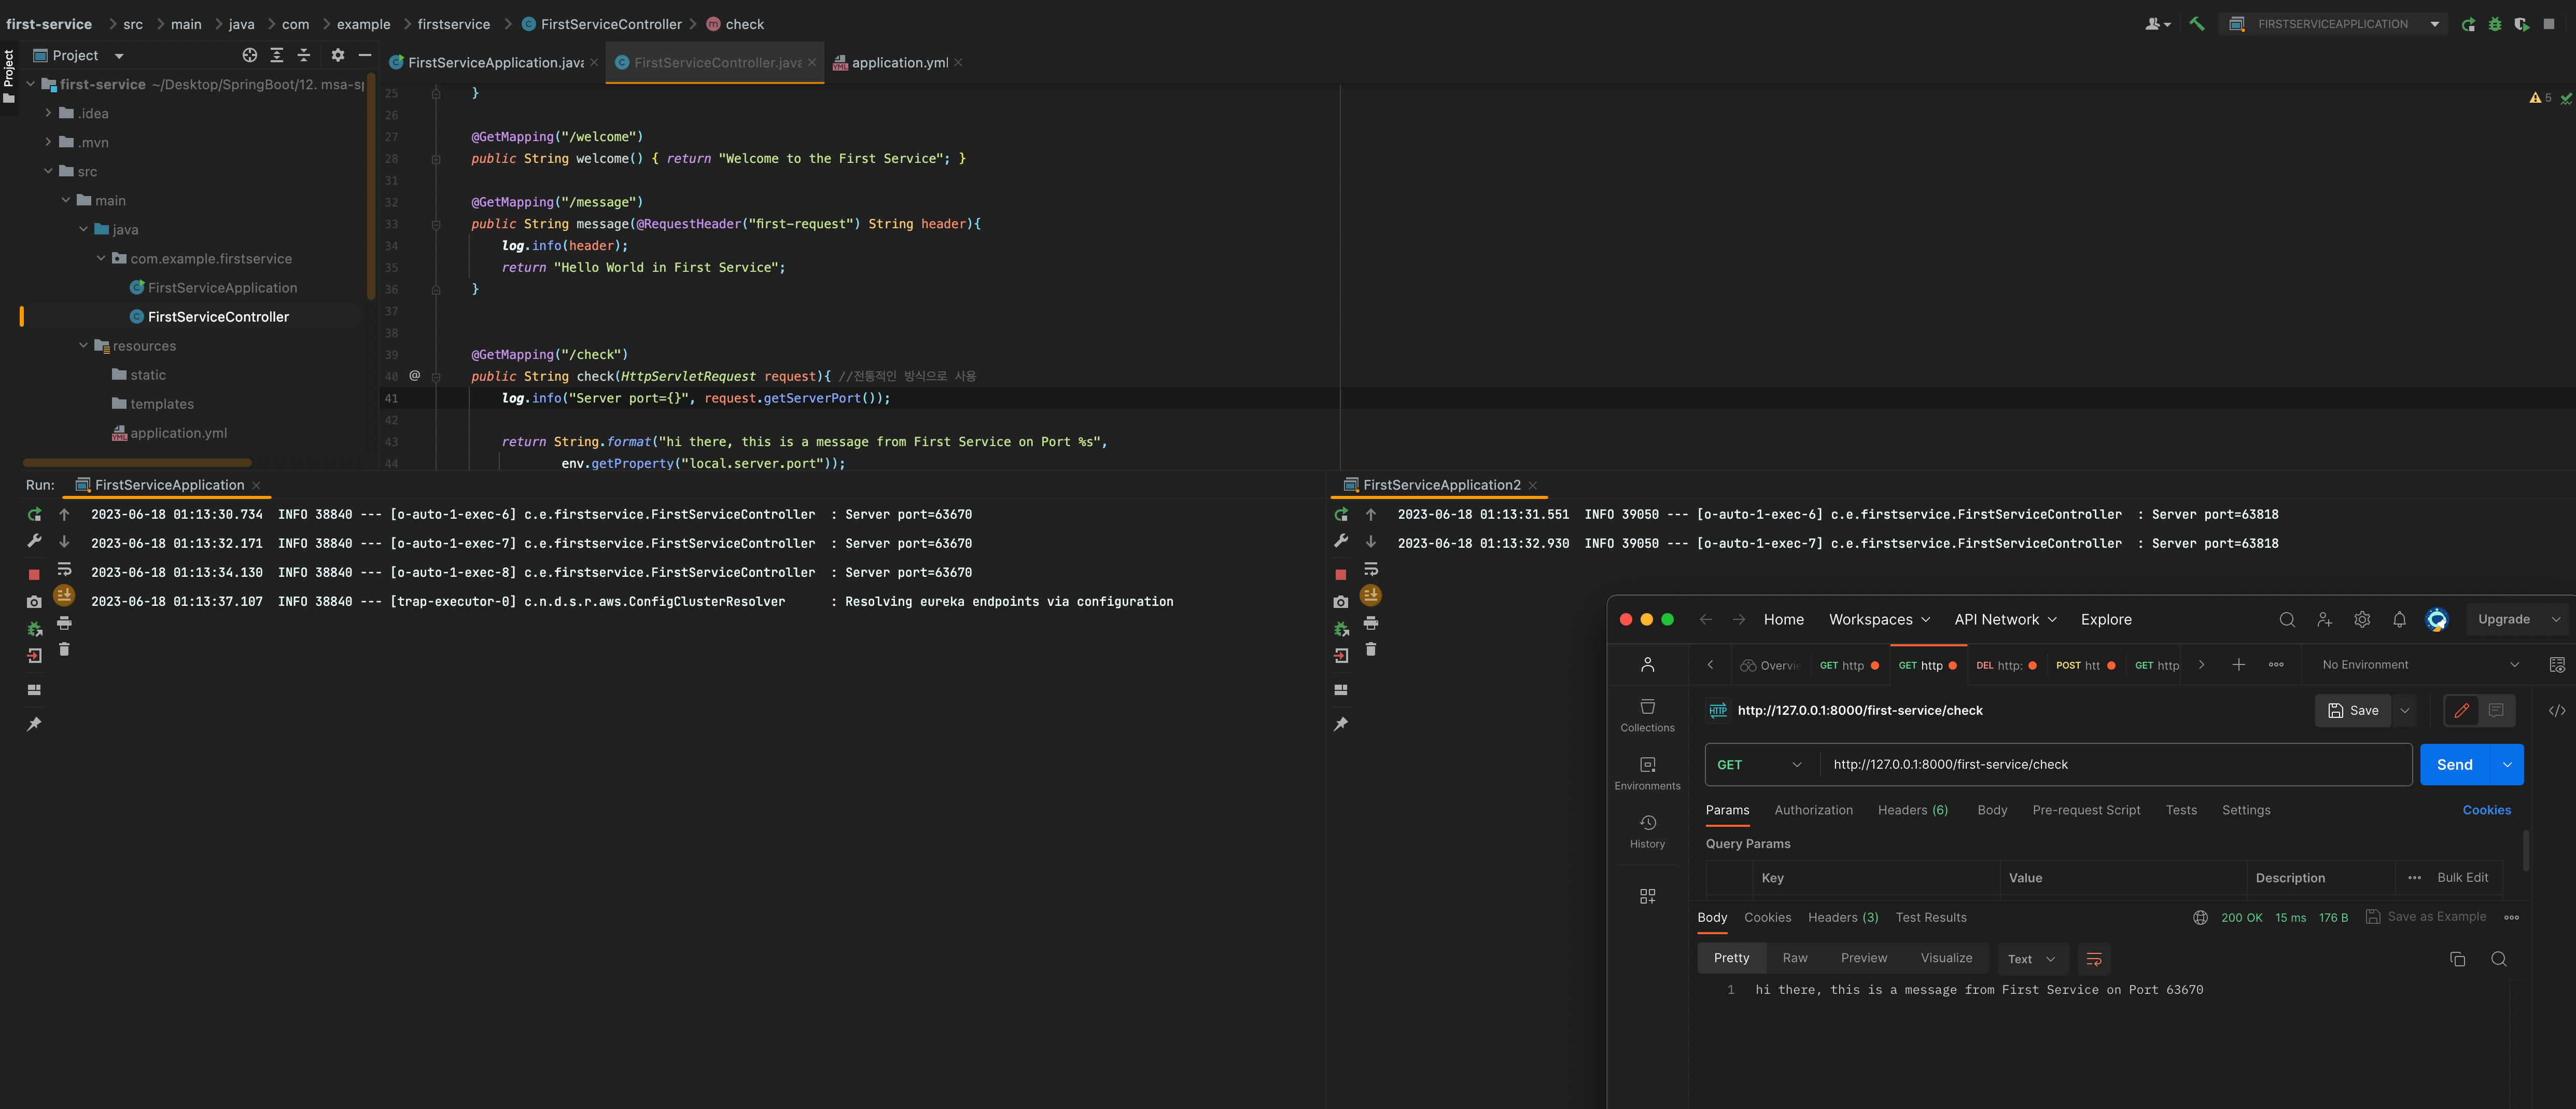
public String check(HttpServletRequest request){ //전통적인 방식으로 사용
log.info("Server port={}", request.getServerPort());
return String.format("hi there, this is a message from First Service on Port %s",
env.getProperty("local.server.port"));
}
}

이렇게 하면 정상적으로 뜨는 것을 확인 할 수 있고 포스트맨으로 테스트 하면 1번은 first-service, 1번은 first-service2로 로드밸런싱 되면서 정상적으로 로그에 찍히는 모습을 확인 할 수 있다
게이트웨이에는 기본적으로 라우팅 + 로드밸런서 역할 탑재
여기까지 기본적으로 MSA(API Gateway, Eureka, Microservice) 기초에 대해서 알아보았다
참고
댓글남기기